While there are so many different knitting techniques out there, I decided to arm knitting and make my very own chunky yarn blanket. And well… Let’s just say it didn’t go as I expected it to.
All I wanted was to knit a chunky yarn blanket.
What I ended up getting was a lesson in DIY failure.
Well sort of, I did eventually work out a solution after a bit of frustration. So, there’s that!
Every time I saw one of these thick big looped blankets, I had the urge to knit one. Last week, I stumbled on to a tutorial on how to knit one of these blankets using your arms as the needles. Then, I saw another and another.
They seemed to be stalking me because every time I went to Pinterest, the ‘arm-knit-a-blanket-in-40-minutes’ tutorial was on my front page.
I took it as a sign from the universe and figured it was high time I made one for our bedroom. That inner DIY voice was like “Get on this already”.
Note: I have two updates to this post- one 6 months after I made the blanket and one a year and a half later when I finally found the right wool and method to make one of these blankets. You can read the updates at the end of the post.
(VIDEO)
My Attempt At Arm Knitting A Chunky Yarn Blanket (A DIY FAIL)
I went hunting for the best “learn how to arm knit” tutorial online and on Youtube. They are all, for the most part, the same. They all promised a blanket in less than an hour with step by step instructions. Perfect!
But, that’s not what happened, and that was not my result.
I’m not saying all these arm knitting tutorials are wrong. I am just saying that there are reasons why arm knitting might not work for some.
Let me explain.
I can knit, I’m no pro mind you, but I can knit a basket and even a scarf, which means I can knit a blanket. Right? Someone agree with me, quick!
Knitting a scarf or blanket is essentially the same thing, only in different sizes.
- Cast on your stitches
- Knit to the end of the row
- Repeat until you reach the length you want for your blanket
It seemed like I couldn’t possibly fail. Easy peasy right? Well not quite.
I followed the arm knitting instructions, and I didn’t make a chunky knit blanket. When I was knitting, I liked how it looked but, when I finished, however, I wasn’t happy at all.
I didn’t knit anything that resembled a blanket… I knitted a fishing net.
My Second Attempt
Honestly, I thought the fault was mine, so I found a video to watch and gave the whole thing a second chance. I unraveled all my work and started again. Same results, no different- I still knitted a net.
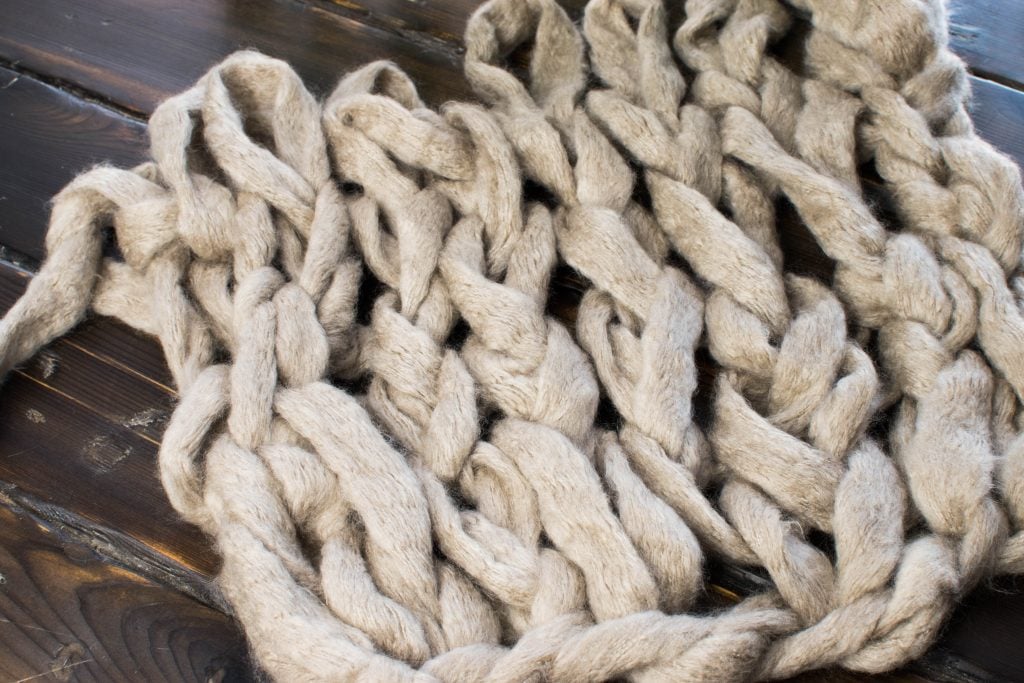
I didn’t take a photo of the fail before I unraveled it. The frustration was too high to think about documenting with photos. I did arm knit a swatch so you could see what I mean.
The following photos are the same. I didn’t move anything except the camera. The photographs are two different angles.
The swatch looks ok from the side, but when you get above it, you can see the gaps and holes.
So Why Did My Arm Knitting Fail?
I kept asking myself this question over and over and over again until it finally hit me.
Problem #1: The Tutorial
I’m not giving anyone a hard time over their tutorials. Arm knitting didn’t work for me but it might for you. Your mileage, as they say, may vary.
Many people seem to love their arm knit blankets, so people do have success with it. I just wasn’t one of them.
There are also folks like me who had mixed results. It really just depends.
Problem # 2: My Arms
If your arms are tiny, I bet you could arm knit this blanket and have it turn out great. My arms are not and I am chalking up my arm knitting fail to my big man arms.
Here is a photo that shows the gaps when the blanket is spread out.
Problem #3: My Expectations
It’s also possible that my expectations were a bit too high.
My buzz for this project came from the videos and the blog posts that we’re all over the place showing off all these beautiful, chunky yarn blankets. The finished products displayed on the websites all show thick chunky knit blankets.
So, naturally, that’s what I figured my final project would look like too.
Nope!
If I go back and look closely, I can see the netting in all the finished products. My expectations were too high to see them when I first wanted to knit this up.
I was blinded by a quick, cheap method and didn’t read the fine print.
Making Giant Handmade Knitting Needles
So, after my DIY failure using my arms to knit this blanket, I decided to make a set of big thick knitting needles to see if I could knit this bad boy the old-fashioned way. You know, old-fashioned knitting with comically giant knitting needles.
After a bit of research, I decided 55mm knitting needles were what I needed.
This is how to make handmade knitting needles:
- Cut a 1.5-inch dowel in half. (36 inches each side)
- Whittle the tips down with a sharp knife. (Wear gloves)
- Use sandpaper to round out the tips.
- Don’t sand to a fine tip. Keep the tip slightly rounded.
- Use fine sandpaper all over the dowels to smooth.
- Wax with wood wax.
- Polish the needles after the wax cures.
The best part about making my own needles- they worked like a charm.
Pro tip: If anyone at the hardware store asks what you’re using the dowel for, say a closet. Trust me on this one. You will get strange looks when you try to explain how you’re going to knit a blanket with them.
How To Knit A Chunky Blanket With Needles
While using the giant knitting needles, I quickly realized I would need extra yarn. The tighter I made the knit stitch didn’t actually spread the yarn as far as before. So because of this, I had to order seven more skeins of wool.
I now had 14 skeins of wool! If it didn’t work this time, everyone I know would get a beige scarf for Christmas. Ho, ho, ho.
I started my chunky yarn blanket for the third time by doubling my wool. I figured I would get a nice thick loop if I just knitted the whole thing with double yarn.
Doubling the yarn was a mistake. It knitted up too thick.
I knitted four balls in before I figured out it wasn’t going to work. By this time, I realized that I didn’t have nearly enough yarn. I was going to need another 14 skeins of yarn!
Nope. Not going to happen.
I added the photo above so you could see how thick it was. After I took this picture, I unraveled it again. For those you keeping count, that’s three times.
I was having doubts I was ever going to get this chunky knit blanket finished.
I decided to knit it up a single strand on my 1.5-inch knitting needles to check the gauge and see if it was going to work. Wider would be better this time, so I cast on a few extra stitches. I started with 18 stitches cast on and knitted up one ball of yarn before stopping to see how it was going to look.
It wasn’t as thick, but I had no complaints. It was knitting up well and had a look I wanted.
Hand Knitting VS. Arm Knitting
While I was hand knitting with the handmade needles, I did have minor difficulty holding up the needles as the blanket gained weight. My arms got tired moving the large dowels back and forth, but it wasn’t too bad.
I had to knit the entire thing standing though. The beautiful thing about hand knitting vs. arm knitting was I could set it down and come back to it later.
I split the knitting between two evenings. All in all, it took me about 2 hours to finish up my chunky yarn blanket.
The giant knitting needle method doubled the time and cost. But, I did end up with something I loved vs. a big ball of unraveled yarn or 14 beige scarfs. I liked the results far better vs. arm knitting because it wasn’t full of holes and didn’t look netted.
The final cost was 160 CDN. That included 14 skeins of Couture Jazz Yarn, my ridiculous knitting needles and a bottle of Advil.
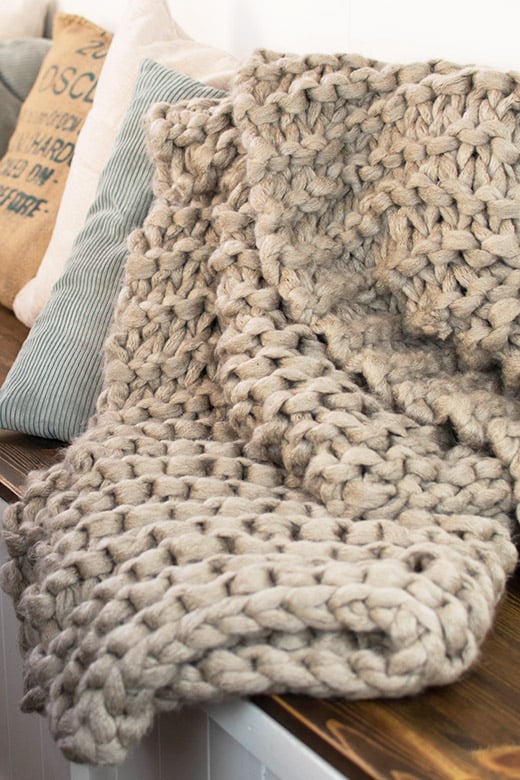
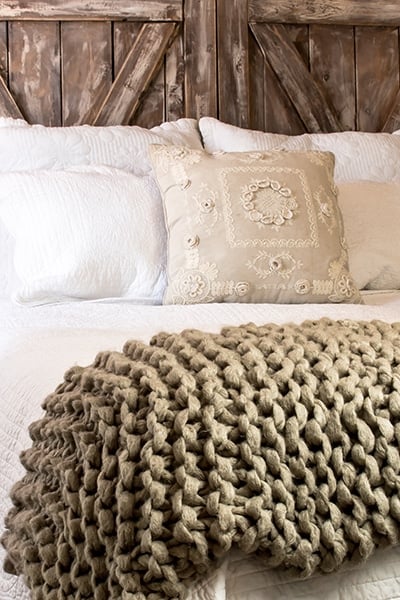
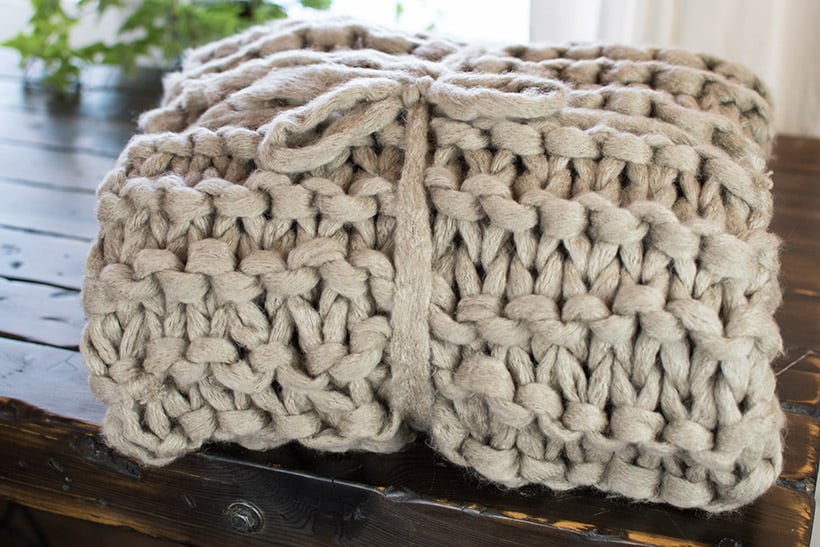
My Final Giant Yarn Blanket Results
I really liked how the blanket turned out!
The yarn didn’t flatten when I laid it on the bed. Instead, it showed the big thick knitting loops in all their chunky glory. I should have tested arm knitting with the doubled yarn! It may have filled much of the gaps and holes and may have made that method viable for me.
This giant yarn blanket added so much texture to my bedroom and seemed to be the thing the room needed. Weird how one item can make or break a space like that.
This blanket is thick, fluffy, and soft. It’s also incredibly warm. The perfect throw for cold nights when you want to cozy up!
Let’s Talk About Yarn For A Minute
The recommended yarn for arm knitting is Premier Yarns Couture Jazz. I found mine from Yarn Canada. The color I used was beige but it looks like a warm grey to me. I tried to render the photo above as close as I could to the actual color of the yarn.
If you are ordering online, don’t be fooled by the Premier Jazz beige swatch. The yarn isn’t remotely close to that color.
In the US, Couture Jazz Yarn can be found on Amazon. It’s a pretty popular yarn! You should be able to source it at most craft stores.
I would also 100% use this thick yarn again and I plan on it.
It’s lovely despite being an acrylic blend. Using an acrylic was a double bonus for me.
- It wasn’t as expensive as the roving wool I wanted.
- It was washable.
With two large slobbery labradors running amok through the house, washable becomes mandatory.
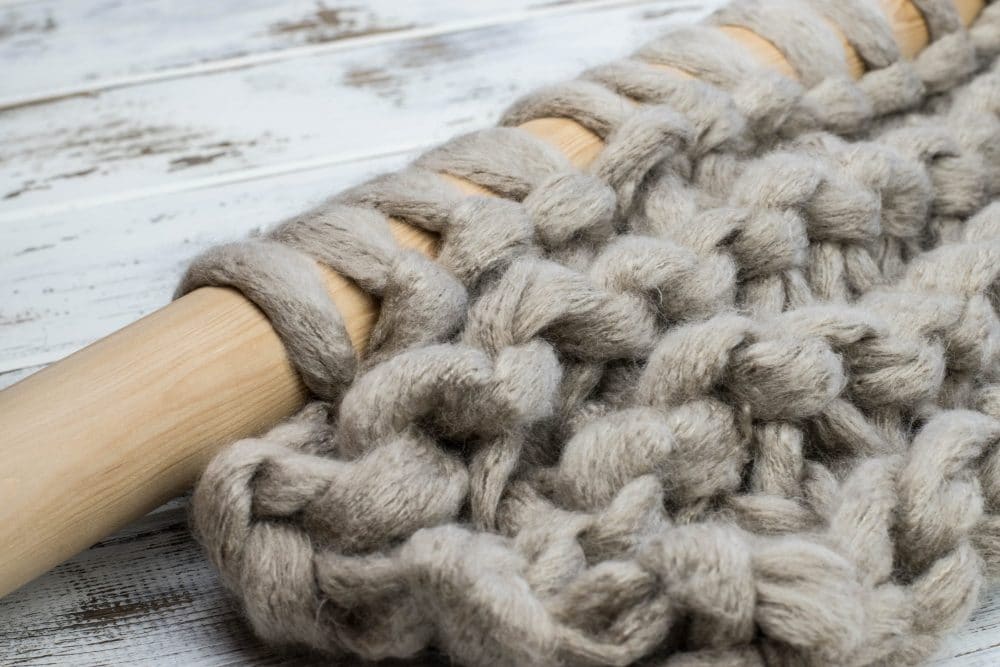
The yarn is very soft and a bit whispy. Here is a close-up shot so you can see the texture!
Arm Knitting: Yay, Nay, Or Maybe?
So, clearly, arm knitting wasn’t for me. The results fell flat. If you like a loose-knit, or if your arms are small enough to keep the stitches tight together, you should give it a try.
But, if you want your chunky knit blanket to have heft and thickness, I recommend knitting your blanket on giant knitting needles. It is what finally worked for me in the end.
Knit on!
Update On This Cozy Chunky Yarn Blanket
As I mentioned before, I was going to keep you all updated on the progress of this chunky blanket. And, here it is!
Update: 6 Months Later
Here we are, almost a year later. I wanted to drop an update about what’s happened with my chunky knit blanket…
Couture Jazz ended up pilling terribly.
By my third month, the blanket (with very limited use) had pilled so much, I had to go over it with a razor for an hour to make it look presentable again.
The blanket still has some beauty and the pills are only noticeable up close, but they irritate me endlessly!
I’ve tried several different types of jumbo yarn in search of what to use on my next blanket – the jury is still out, but you can check out this comparison here: 6 Jumbo Yarns for all Your Chunky Knit Projects.
Update: A Year and A Half Later
It’s a year and a half later and after testing and trying all kinds of wool, I finally found the right one. It’s XXXL wool, by We Are Knitters.
I did a whole post on their Velky Blanket and Peruvian highland wool. After everything, all the methods, all the wool, this is the one that I was FINALLY happy with.
Barely any shedding, it knits up THICK, and no big holes or thinness. You should check out that finger knitting post!
How to Make Giant Knitting Needles
If you want to make a chunky knitted blanket that looks neat with a tighter weave, make a pair fo giant knitting needles! Here's how.
Materials
- 1.5-inch dowel
- Wood wax
- Polish
Tools
- Sharp knife
- Sandpaper
Instructions
- Cut a 1.5" dowel in half.
- Use a sharp knife to whittle the tips down. I recommend wearing gloves as you do so.
- Round the tips out using sandpaper, making sure to keep the tips slightly rounded.
- Wax the needles using wood wax, then let dry fully.
- Once the homemade knitting needles are cured, polish.
- Knit and enjoy!
Paula says
Oh my God! I don’t think I’ve laughed so hard at a tutorial in such a long time! Thank you for your realistic expectations! Man arms, yes I have them as well hence when my very expensive Merino wool arrives, I will be hand knitting! Not sure if I’ll do a tutorial but I’m anxious to get started! Thank you for your honesty and the laugh! And your blanket is beautiful!!!!
Laura Kennedy says
Hi Paula, So glad you enjoyed the post, it was one of the first ones I ever did, and I was super annoyed when I wrote it. I have since hand-knitted a big blanket, the tutorial is on the site too, and that blanket turned out beautiful, without any issues so I think you’re going to be very happy with you handknitted Merino wool blanket. Send me a picture, I would love to see it!
JUDI JOHNSON says
I so appreciate someone with an “unsuccessful” story. I am a newbie and all the easy, can’t fail, it’s easy, etc posts had me almost decide I wasn’t cut out for this craft, art, hobby. Thank you.
Laura Kennedy says
Hi Judi, I think was miffed when I wrote that post, after spending too much on wool that never held up, and too much time trying to figure out why my blanket didn’t turn out the way I wanted. But I keep trying!
Jeanne says
I spent a year trying with arm, wood , pvc pipes and NOTHING worked.. so here is the answer
Use jumbo chenille yarn. It looks awesome and i wash it and dry it in the machine.
I use a folding table and hand/finger stitch as I sit in front of it
Came out PERFECT. Took me a lot of trial and error but now I’m shooting the blankets out like crazy for all my family
Well worth the effort .
Super soft and light and warm
you will be extremely glad you did .. honestly
Laura Kennedy says
I’ve looked at the chenille and my only problem with it is the feel. It’s one of those textures that I just don’t like (I’m a weirdo). But I did look at a few blankets made with the jumbo chenille yarn and I must say they do look good. Add in the fact that they wouldn’t shed, and can be washed and I think it’s a perfect solution. I need to get over the texture. ( I need to get over a lot of things!) : )
Thanks for the comment and the tip!
Connie says
Wow! You tried what I’ve been wanting to do for a long time but have been too afraid! I too thought about making the huge needle. All praise to you dear lady. I will take all your advice but I’m still really afraid my huge blanket will become my dogs new bed.
Laura Kennedy says
lol, oh my dogs love that blanket so much. I’ve been eager to make another one, but I just can’t decide on the yarn to use for the same reason, I don’t want another dog bed! Thanks for the comment, Connie!
Jenna says
Oh gosh I feel your pain…. during my arm knitting experiments a few years ago I was tormented by my short t-Rex arms and I ended up using a giant table and “flat” knitting the blankets … I had to stand the whole time but once I found a rythm it went fast …. but then juSt like your experience …the pillling was terrible and I had used expensive roving !! Arrrggh!! I also have dogs and ultimately it became the dogs favorite blanket so I unraveled the blankets and reworked them into covers for the dogs poufs! *sigh* very expensive dog pouf covers. Thanks for sharing your experience
I srsly thought i was the only person whose arms were not acceptable knitting implements! Cheers xo
Laura Kennedy says
Sorry for the late reply Jenna, I was on a bit of a hiatus. Your comment made me laugh out loud. I am glad that I am not the only one with arms not intended for arm knitting. I am also glad I am not the only one with dogs who have special blankets. lol
Julie says
I loved this article! I recently decided to teach myself how to knit, a for the sole purpose of making a chunky blanket. I also had to unravel and start over a few times. 🙂 However, I love the end result! I lucked up and found Bernat Blanket Big yarn at Michaels. And the yarn is fantastic! It looks and feels like a Terry cloth towel, the blanket is heavy and just perfect!
Laura Kennedy says
Hey Julie, thanks for the comment! I bet the yarn doesn’t shed either. I looked at the blanket yarn a few days times but I never pulled the trigger. I am still very eager to remake my chunky blanket but I haven’t decided what yarn to use. Next time I’m at Michaels I will check it out. Thanks for the tip!
Becca says
Remember to get the Jumbo 7 weight it works out perfectly ?
Laura Kennedy says
Thanks for the tips, Becca!
Mary says
I researched arm knitting and needle knitting and went with the tutorials for finger knitting I found it was much easier to get the size you want if you use 2 inch loops there’s no big holes it’s soft it’s beautiful and you can leave it and go back with ease. It was my very first time doing this I picked up on it very easily you may want to give it a try
Laura Kennedy says
Hi Mary, finger knitting does seem like a promising route, I keep wanting to give it a try. What yarn did you use when you used the finger knitting method?
Holly says
I noticed the bis holes in all the pictures of the arm knit blankets, and that’s why I never tried to make one. Thank you for all your work in being so honest! I love your blanket, but sad about the piling.
Laura Kennedy says
Oh, you’re so welcome Holly and thanks so much for leaving a comment. I am actually considering remaking that blanket with a different yarn so I may have an update in a few weeks. Cheers!
Irene says
A great and honest post about what doesn’t work! Yu’ve saved use all a lot of time trying to make a blanket.
I don’t know what Roving is – and if used how do yu clean the blanket?
Thanks
Laura Kennedy says
Hi, Irene! Thanks for the comment I am glad to know that it saved you some time.
If you use roving, dry cleaning is the only option. I believe there are tutorials around on how to gently wash, but these blankets end up so large that adding water to them will only ruin them. I wouldn’t risk it.
Since writing this post I have found Ohhio https://ohhio.com/blog/. It’s thick like roving, but washable. I haven’t tried it out yet, so I cannot say how it works up but I am leaning very heavily into making a blanket out of this Ohhio braid.
It’s chunky, looks lovely and can be thrown in the washing machine. It might be the best product I’ve found for these blanket so far. If I do pull the trigger and order the braid I will for sure post about it, but if you get a chance you should check out their website. I am not affiliated with them, I just happened to find them recently and really liked the look of their product.
Cheers and Happy New Year!
Gaby says
Hey I would like to make that blanket how many yarn did you jus and how many stitches did you start with thank you
Laura Kennedy says
Hi Gaby, 18 stitches across – and I used 14 skeins of yarn total and the blanket was not large enough for my queen size bed. It fits across widthways, but only halfway up the bed so I use it as a decorative accent to the end of the bed and sometimes as a lap blanket on the sofa. Good luck!
Dana says
Hi – I’m wondering what type of stitch pattern you used for your blanket: all knit, knit knit purl purl, etc?
Laura Kennedy says
Hi Dana, 100% knit stitch all the way through. The knitting needles were a bit too heavy to try to purl stitch. Cheers!
LeeAnne says
Thank you for all the helpful tips! Can I ask how did you join the strands together?
Laura Kennedy says
Hi LeeAnne, I used the “magic knot” method to link my yarns together. If you google “magic knot” there are tutorials that walk you through it. I will add that information to the blog post because it is an important detail. Thanks for pointing that out!
Jen DiBart says
Hi Laura. I’ve also been seeing this blanket being done all over the place. The image that comes to mind of someone knitting with giant knitting needles is hilarious but I’m glad it worked out for you and hopefully others now. The one thing I wanted to add or was wondering is on all of the posts I’ve seen this being done their yarn looks so much thicker than yours. Do you think that might be why it came out the first couple times like a net? I can’t wait to try this. I’m more of a crocheted but all the posts make it seem very easy to do. Thank you for all your DIY posts and will be waiting on your response.
Laura Kennedy says
Hi Jen, the recommended yarn for arm knitting is Couture Jazz, or at least that is one of the most used yarns. In all the photos that I looked at prior to taking on this project the blankets made with Couture Jazz DID look much thicker. It’s one of the reasons why I was so irritated about the whole project. I never managed to get that super thick blanket look using the exact same yarn.
Even though the results were not what I expected I opted to put the post up anyway and show some honest photographs so folks could see what the blanket was actually going to look like if they used the recommended Couture Jazz Yarn. It is a lovely yarn, but you’re right, it doesn’t have that super thick look.
Roving would be a much better wool to use, it is about 4 times thicker, has much more heft, and unlike Couture Jazz is very tubular. Couture Jazz actually looks like a giant piece of flat linguine. The really hefty beautiful blankets that you see all over Pinterest are mostly made with roving.
Roving is also about four times more expensive (i’m in Canada, so your price may vary). When I started doing research for this blanket I was headed down the roving path the entire time but I was enticed by a cheaper, easier method that promised similar results. This is how I ended up using Couture Jazz. Oh, and roving is not washable. Lots of pros and cons to consider.
There are much thicker acrylic yarns out there too that I think would be better. With that said, I’ve yet to find an acrylic yarn that matches roving in thickness. I think if anyone has it in their head that they want to knit a super thick blanket they are going to be disappointed in the results if they use an acrylic alternative regardless of how thick it is.
I am kicking myself for not making my blanket out of roving in the first place. Ah well, live, knit and learn.
Cheers!
Audrey says
Laura this is hilarious! I am an avid knitter but I don’t feel like I would be very successful with the arm knitting thing. Maybe someday. 😛
Laura Kennedy says
Hi Audrey! I love to knit, I really need to do more of it this summer. I have to put those giant needles to use a few more times. I have seen a few more arm knit tutorials where the blanket turned out amazing so I would say give a go and if it doesn’t work you can always fashion up a pair of giant needles.
Aileen says
Hilarious! Thinking of making one of these for my DD who will be going off to college in the northeast (USA) soon. Thanks for the tips!
Laura Kennedy says
You’re welcome, Aileen. I finally put my chunky blanket away just about a week ago because up until a week ago we still had snow! The blanket is nice to snuggle up with and is very cozy, I am sure your DD will love one.
Aileen says
Kennedy, I read another version where someone used PVC pipes as knitting needles. If you could put a cap over the ends to prevent snags. It may be faster than sanding, staining & sealing the wood pole. ???
Laura Kennedy says
You could totally use PVC pipes. As a matter of fact, they would be much lighter and easier to use.
The only reason why I didn’t use PVC pipes is that I was using Couture Jazz and it is very “hairy” and I was worried about the hairs catching on the tape that would cap the tip. I used PVC pipes for another project in the past and my experience was that the tape did move and it did get gummy. I also planned on making a few of these blankets and I wanted something that would last so I made them out of wood. Good luck making your blanket!