How to Make a Pom Pom Rug the Easy Way – It’s SO Fluffy!

I haven’t posted in a while because I have been working on this pom-pom rug for what feels like, forever. I tend to do things the hard way first; this rug was no exception.
But then I figured out how to crack out pom-poms almost four times faster than I was making them before, and the project suddenly didn’t feel so daunting.
The trick is in how you wind the yarn around the maker. I feel like an idiot for not figuring it out sooner.

Materials & Tools to Make a Pom Pom Rug
~This post may contain affiliate links. If you click one and make a purchase, I may receive a commission at no additional cost to you.
I only ever recommend what tools or materials I use for my projects. I also test all my projects before publishing; if something doesn’t work, I don’t share it! ~
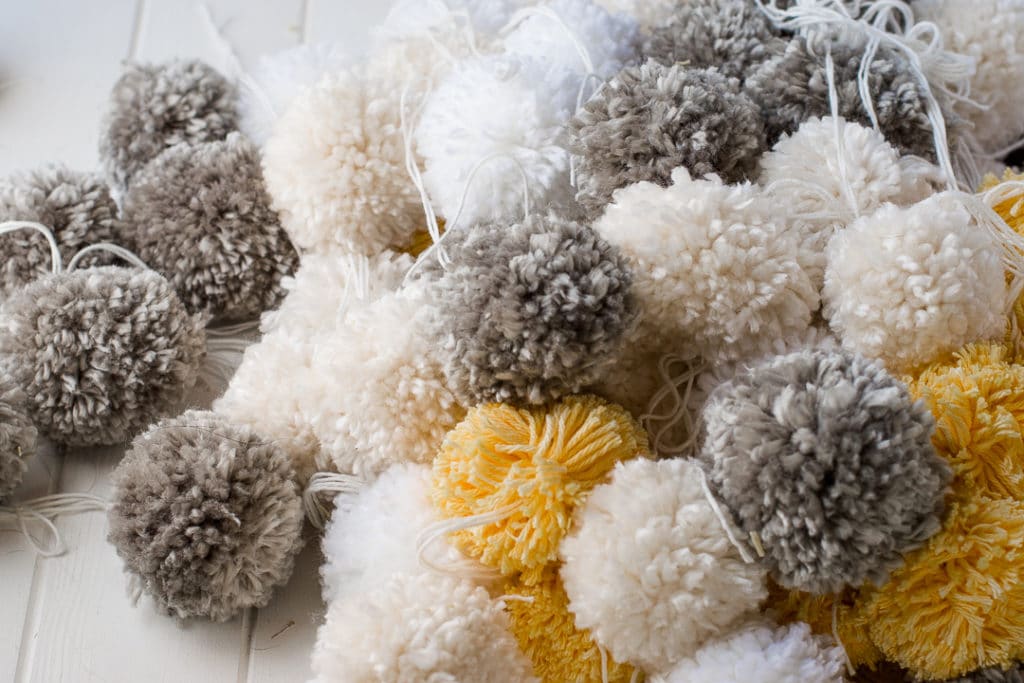
I chose to design my rug with a flower pattern. To make that pattern visible, I used three different colors of yarn and yellow yarn for the centers.
Any color would work well with this rug mat. Keep in mind if you use a single color, your rug will look more like polka-dots vs. flowers. You must have a few different color yarns to create borders and contrasts.
I also chose to use cotton yarn for the center; it adds a bit of contrast to the yarn I opted for the rest of the mat. The cotton pom-poms look like flower centers.
Materials
For my 24″ x 42″ sized rug, I used 15 skeins of yarn.
- Four skeins Bernat Softee Chunky Yarn – Fluffy Cloud White
- Four skeins Bernat Softee Chunky Yarn, Grey Heather

- Four skeins Bernat Softee Chunky Yarn – Natural
- Two skeins Lily Sugar’n Cream Yarn – Yellow
- One skein Premier Yarns Cotton Fair Solid Yarn – White
- Area Rug Pad (5×7) 5×7 is what I used, but a 4×6 would have been more than adequate. I could not find a 4×6 with the right honeycomb size, but I am sure they exist.


 5×7 is what I used, but a 4×6 would have been more than adequate. I could not find a 4×6 with the right honeycomb size, but I am sure they exist.
 Tools
- Scissors
- Large Pom-Pom Maker This is a set of 2 large pom makers, I used the 2.5-inch size for this project.
You do not have to use a pom pom maker, although I will say it will save you a considerable amount of time.

How to make a pom rug with the right yarn
So, what’s the right yarn to use?
Well, it depends on the look you want and how patient you are. Thin yarn will considerably extend your DIY pom-making time, and thick yarn might not look right.
I created a pom yarn comparison post that shows how five different-sized yarns look when made with four different-sized pom makers. I even tested different types of yarn to see what look I would get at each size. Check it out. It might help you decide what size and type of yarn you want to use for your DIY rug.

I chose the middle ground, a bulky-thickness yarn (size 5) that would give me a beautiful fluffy look and help me make my pom poms a bit faster.
If you use chunky yarn, you will have a very high rug that will be very difficult to walk on, so I suggest choosing a wool yarn somewhere from very thin to mid-sized for this project.
How many fluffy poms do we need to make for this project?
So this project required 15 skeins of yarn (yeah, I know.. right?) and about 125 pom poms.
I wanted a rug that would fit under my desk to keep my feet warm in the winter, so my carpet is a bit on the small side.
I also choose to make my pom poms with one of the large clover pom makers. It’s not the largest, but it is biggish. Each ball is around 2.5 inches, which I felt was the right size for this rug.
Also, note that each skein of (this) yarn makes approximately nine pom poms with a 2.5-inch pom maker.
And if you want to know how to make pom poms with a clover maker tool, I have made pom poms with a tutorial in the Valentine’s day heart wreath post.
Important TIP: When making your pom-poms, cut a nice long piece of string and double it up to wrap around the center. When trimming your pom-poms, leave the string tail nice and long. The tails will attach our pom to the rug backing. Doubling up your string will reinforce your pom-poms and keep them from falling apart.
So, what’s the trick to making this pompom rug super fast?
Start with a Pom-Pom Maker

This is a set of 2 large pom makers. I used the 2.5-inch size for this project.
These pom-pom makers do not require a lot of fiddling with tape or making replacement templates. They are sturdy, last a long time, and do the job quickly. Since they are an inexpensive crafting tool, I highly recommend purchasing one if you are attempting a larger project requiring much pom-making.
Second, if you have multiple skeins of the same color yarn, wind multiple strands simultaneously. I used four strands simultaneously, and I could make a pom from start to finish in two and a half minutes. Considerably faster than winding a single strand around and around my pom maker.
And the last tip is to ensure your scissors are nice and sharp. You may find that as you are trimming your pom-poms, your scissors start to stick. Use a small soft cloth and wipe your scissor blades every few pom-poms; they will be as good as new ones.
Tips for Making pom poms
- Tip #1 – Use a pom pom maker; they speed up the process considerably. No pom pom maker? You can also use toilet paper rolls or cardboard tubes to make your pom poms, similar to how the pom pom maker works without buying a pom pom maker.
- Tip #2 – Wind more than one strand of yarn simultaneously; this speeds things up.
- Tip #3 – Use a very sharp pair of scissors to trim your pom-poms.
- Tip #4- This is a great project to help use up scrap yarn leftover from older projects you don’t know what to do with it. A mat with different levels of flowers in different colors is a wonderful idea, and I would love to make one myself with my scrap yarn if I could just find the time. It would be super cute!
What backing is best?
Oh, I bounced around on this one, but at the end of the day, the honeycomb-style rug backing was the best. Not only did it provide spots to attach the pom poms, but it also offered padding and non-slip backing.
Since the yarn is so soft, it will be slippery on the floor; using a non-slip backing makes sense. You also do not need an additional rug pad, as the rug backing works to stop slips.
Add a second layer of rug backing if you want to reinforce your rug further. If you choose to do this, I suggest hand-sewing the second backing to the first in X patterns all over the back.
Adding the second layer will also give your DIY rug more longevity.

How to attach the pom-poms to the backing
Once you have all your pom-poms made and trimmed, it’s time to figure out your design.
The easiest way to do this is to lay out your rug backing on a table and start placing your poms in flower shapes in the design or style you want. I spent much time fiddling until I got my rug laid out correctly.
There is no pattern to this daisy pom-pom rug. I seriously just spread my flower colors around the best I could.
To attach the pom to the rug backing, use your long string tails, thread them through the holes in your rug backing, and tie them off. I would tie them twice to make sure they don’t detach.
Once all your pom is attached, flip your rug over and trim off the excess backing.

How to care for your rug
So you can technically wash your carpet. You need to make sure of a few things before an attempt to clean your rug:
- Make sure you use acrylic yarn to make your DIY rug or at least something that is 100% washable.
- When making the pom-poms, you need to wrap your tie string around at least twice, ratchet down, and tighten as much as you can. This will ensure that your pom does not come apart in the wash.
- Make sure you tie your pom-poms to your rug backing very well. You don’t have to tighten them super tightly, but it would be helpful to tie them down at least twice.
- When you wash your rug, put it in a protective covering first. I used a king-size pillowcase, but you could use a lingerie bag or a duvet cover. Whatever you use, ensure the rug has little room to move around. I locked mine down by tying a rope around the top.
- Lay your rug flat to dry like you would a sweater.
The longevity of your rug rests in your hands. If you take the extra steps while making your rug, it will last a long time. Be sure to double up your tie strings and double tie down your pom-poms to your rug backing.

What you need to know about making this rug!
Pom rugs are super fluffy and very warm under the feet.
But here is the disclaimer about these DIY rugs…
The centers of each pom are pretty hard. The fluffier you make your pom-poms, and the tighter you tie them off, the harder they get. The outside of the pom pom is soft and fluffy, but the inside is hard as a small marble. This makes them a tiny bit uncomfortable to walk on. It makes for a wonderful colorful rug for a special place, but it’s not suitable for, say, a bathroom rug pad as it would need to be washed too frequently to stay looking its very best.
You can remedy this by making your pom poms less fluffy, but your rug will not look nearly as good.
The rug is okay to sit on and or lay on. I do not find that the hardness of the pom centers bugs me in those situations. But I do not like walking on mine. My rug was made to keep my feet warm under my desk, and that’s the perfect use for it. It’s a rug to keep your tootsies warm on a cold day, not for walking on.
On a different note, my labrador Daisy has already tried to claim this rug as hers. She enjoyed rolling around on it, attempting to detach the pom poms from the rug backing.
That dog is 80 pounds of fun.
I kind of feel like I need to make another one because she is so smitten with this one. GAH, more pom poms!
Editorial Note: This post was updated on Sept 4th, 2023 to add additional instructions, fix structuring issues, and fix external links.
Related Posts:


Author: Laura Kennedy
Writer & Owner of Little Yellow Wheelbarrow
Hi.
I made one with thick twisted wool and am finding individual strands are coming out. Any suggestions?
Leza
Hi Leza, if strands are coming out it means the pom-poms were not tied tight enough and they are loose enough to wiggle their way out. If it were my rug I would take the time to reinforce all those pom poms (a lot of work) but it will stop the fraying. You will have to spread apart each pom and resecure them tightly. You don’t have to remove the pom poms from the rug to do this, you can work with the poms attached to the rug. I would advise using a different yarn piece to rescue them, it could be because the yarn is thick it’s making it difficult to get the securing piece tight enough to hold the pom pom together. Make sure whatever yarn or wool you use is strong enough to withstand a hard pull without breaking. That should do the trick. You may not need to resecure all the pom poms, it could be that there are a few that are just not tight enough, but you can test that by trying to pull a strand out, if it comes out easily that pom will need to be resecured. Hope that helps!
Would the backing for latch hook rug work for this?
Hi Linda, yes the latch hook rug backing would work for this project no problem at all. Cheers!
How old does someone have to be to do this craft? By the way great instructions!
Hi Clark, ah that’s a hard one. I think if it’s a child, the child would need to have patience to sit down for a few evenings to actually make the pom-poms. The pom-poms themselves are not difficult, especially if you use a pom pom maker, and attaching them to the mat is pretty easy. I’ve met some pretty amazing and talented 10-year-olds who can knit up a storm and I know they could do a great job with this project, and I know a few 16-year-olds who would start the project with gusto and never finish it.
Hi, I am In my sixties with invisible disabilities and a daughter of 32 with Down Syndrome. Your rug gave us such a lot of inspiration during this awful lockdown and we have made 600 pompoms and are now in the throws of making 8 pompom rugs.. 7 rounds and one oblong. we have to say a big thank you… they ae ae all presents for friends we love and have not seen..and will be posting to them as they are not too heavy.. we have used double knitting wool and they look amazing…… we also understand that if they are put into a pillowcase or laundry bag you can wash them…… so massive thanks x x Junie and Squidgy
Hi Junie, this brightened my entire day, I am so glad that you and your daughter enjoyed this project. I would absolutely LOVE to see photographs of the rugs you made!
Where can I get cheap wool and the honeycombs mat to attach the Pom poms to. I bought some wool and then a non slip rug mat. The holes are too big and the wool now will be too expensive st £3.00 a ball. I didn’t realise I would need so many.
Hi Jackie, up near the top of the post there is a full list of materials and sourcing information. If you click the links, I purchased all my materials from Amazon including the right size honeycomb backing. Michael’s often has the Bernat softee chunky yarn on sale, and I have seen it at Walmart for a decent price. I choose the Bernat Softee chunky yarn for the bulk of the project because it was inexpensive, but for a rug this size, I did use 15 skeins of yarn.
This is the listing in the post under the “Materials” section.
For my 24″ x 42″ sized rug I used 15 skeins of yarn.
4 skeins Bernat Softee Chunky Yarn – Fluffy Cloud White
4 skeins Bernat Softee Chunky Yarn, Grey Heather
4 skeins Bernat Softee Chunky Yarn – Natural
2 skeins Lily Sugar’n Cream Yarn – Yellow
1 skein Premier Yarns Cotton Fair Solid Yarn – White
Area Rug Pad (5×7) 5×7 is what I used, but really a 4×6 would have been more than adequate. I could not find a 4×6 with the right size honeycomb, but I am sure they do exist.
Cheers!
Thank You!!!!!!!!!!!!!!!!!!!!!!!!!!!!!!!!!!!!!!!!!!!!
😉
What does a Pom Pom Maker look like? I’ve always used cardboard. Adorable rugs, thanks ?
Hi Dottie, you can see a pom pom maker in this post https://www.littleyellowwheelbarrow.com/yarn-pom-pom-comparison/.
This is info I was looking for and Daisy is the peace de resistance. I love puppies a lot lol.
Very good directions and side notes thank you
You’re very welcome April, and thanks so much for the comment. The rug was a lot of fun to design so I am glad someone liked it! Cheers.