A $500 Budget Temporary Kitchen Renovation

We had a measly $500 budget to fix this kitchen. The catch was that this budget kitchen renovation would be temporary and hold us off for a year while we settled the rest of the house.
I never thought we could stretch $500 to fix this kitchen, but the results were better than expected.
When you can’t wait for for the big fixes, you make little ones
Yeah, we renovated this kitchen twice in one year. Sometimes, during a renovation, things don’t work out as planned.
If you’re interested in seeing the second renovation where we replace everything you can click on over here: OUR SMALL KITCHEN STORAGE SOLUTIONS. Much prettier pictures too!
I’m getting a bit ahead of myself. I will rewind a bit to when I saw this kitchen for the first time.
Behold –

I know, not so pretty.
I didn’t see the house before we moved in. My husband bought it on his own during a house hunting trip. So my first time seeing the house was walking in and seeing this kitchen.
He sold me on the antique floors, spiral staircase, and the potential for what the house could look like after we finished renovating. He was right of course, but that acknowledgment wouldn’t come back to him for an entire year.

I took this picture after we unpacked a few things. I never thought I would ever share it, but here it is. I was not a happy woman.
And here is the kitchen with a clean, shine and a $500 investment. Far from perfect, but a vast improvement.

So why did we do a temporary kitchen renovation?
In the first 20 minute walk through of our house, I had a DIY list a mile long.
Of course, I wanted the kitchen done first. But it wasn’t going to work that way.
We had a leaking basement and two rotted steps, and they took priority away from my new kitchen.
So my kitchen renovation was on hold for at least a year. But I couldn’t live with it the way it was. I mean who could really?
I had no idea what we could do with it – I just knew we had to do something, so I set aside $500 and set out to clean it up as best I could.
A 500$ budget isn’t a lot when you start out with a mess like I had. I managed to keep the budget low, and I stuck to it because it was money that would go, poof, when we finally got around to our full kitchen renovation.
Do you know how many coffees I can buy for $500?
How we made our old appliances sparkle

All three appliances were old as dirt.
I cleaned them, inside and out with every single suggestion I found online until they sparkled.
Best tip – Hard water scale especially the thick crusted stuff that’s been collecting for a decade is no match for citric acid. I found a product called Lem shine and used it until we installed our new water softener. It worked like a charm. It removed years of hardware scale without any effort.
I also used Rust-Oleum Appliance Spray Paint![]() on the dishwasher and fridge. This stuff stinks to absolute high heaven, and I recommend opening all the windows.
on the dishwasher and fridge. This stuff stinks to absolute high heaven, and I recommend opening all the windows.
It did an incredible job and matched the shine perfectly. You couldn’t tell I had painted the appliances and although they were never going to look new, they did look better. They went from aged yellow to bright white. I call that a win.
I spray painted them with three very light coats of spray paint. 2 cans was all I needed.
Cost: $30
A budget solution to replace an aging countertop

The old countertops were something from the early 80’s. They were a weird shade of salmon pink, chipped and stained and ugly. Also If you leaned on the counters, they popped up in the back.
At first, I was going to refinish the countertops, but the old Formica was crumbling in areas especially around the edges and the sink.
I opted to take it all out and build a simple plank countertop. I made it as cheap as possible with 2-inch pine planks, filled and sanded. I stained them a rich chocolate brown and then used polyacrylic to seal them. They turned out better than I expected.
The new countertops were not at all usable as a work surface because of the polyacrylic. That was ok for me because I never place food directly on a countertop and always use a board.
I eventually replaced these plank countertops with true butcherblock. The planks were a great temporary solution, and they held up very well.
Cost: $60
New faucet and Cabinet handles
I bought the faucet on clearance for $60.00. As soon as I saw it, I fell in love with it.
We also picked up new cabinet handles on clearance for $1.00 each and spray painted the hinges black to give them a new shine.
Cost: $90
Cleaning up the old walls

We put up faux lap (that’s fake shiplap for those of you who are curious)
Every wall in our house has a coat of heavy knockdown texture.
I have no words for how much I hate it. It’s a runny, chunky wall disaster. I couldn’t sand it off even if I wanted to.
The house is also 100 years old, and the walls are lathe and plaster. Our home is temporary for us, so we had to balance time with a budget. When it came to removing the walls we were both in agreement that we just had to work around them.
So we opted to put up a shiplap looking MDF. It was cheap and incredibly easy to install and made a significant difference in the walls.
They looked brand new, hid all sins, and worked so well we ended up putting it up on all the walls on our main floor.
We bought 1/8 inch MDF sheets and had them cut down to 8 inches at Home Depot. We only needed two 4×8 foot sheets for our entire kitchen plus a gallon of Sherwin Williams paint in Alabaster.
Total Cost: $95
A cabinet makeover that worked better than expected.
I decided to reface the cabinets to give them some dimension and clean them up a little.
Refacing the cabinets was a time-consuming job that I did not enjoy and would never in a million years do again.
It did perk up the cabinets significantly.
We used cut pieces of MDF to frame out the flat cabinet doors. I filled in spots with filler, sanded, sanded some more, and sanded again. Then I added four coats of semi-gloss paint.
We also added a fake crown molding to the top of the cabinets. The wood added a bit of extra height.
We used wood that we had left over (2×4’s and little trim pieces). I mean we really cheated here, but it added a nice touch.
They looked so much better. It was hard to believe they were the same cabinets.
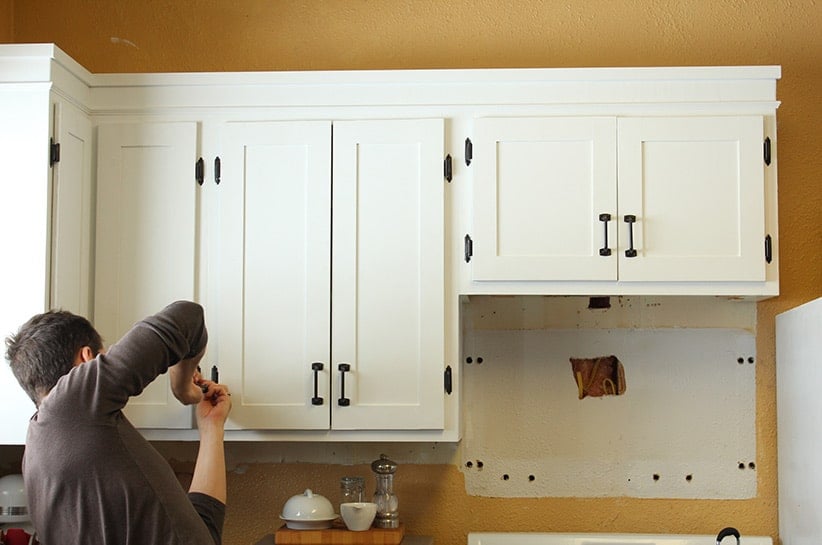
Cost: $50
Restoring the hardwood floors.
We found hardwood under the linoleum in the kitchen. It wasn’t in excellent condition and the decision to restore it was probably the wrong one due to how much work had to go into repairs.
You can see the entire before and after: RESTORING HARDWOOD FLOORS AFTER YEARS OF NEGLECT
We had old beautiful hardwood floors in the end, and I loved them. They were never going to be perfect, but that’s what makes them charming.
We were able to refinish all our floors for $1.00 a square foot.
Cost: $100
We DIY’ed a custom Pot Rack
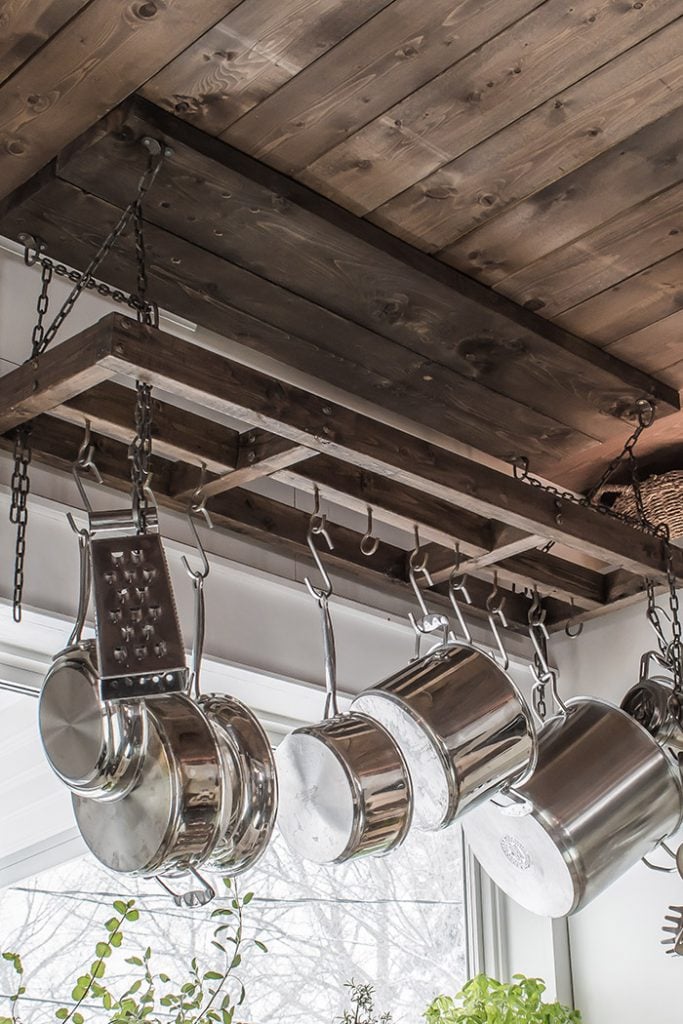
I made the pot rack with some leftover 2x2s and 2×6’s. The cost for this project was all in the hooks and chains.
The pot rack was meant to be temporary, but we kept it when we did the full kitchen renovation. Since it was custom made for our space, I couldn’t find anything that would have fit as well.
It also added a bit of rustic charm to the kitchen.
Cost: $30.00
The new trim for the windows and doors.
We also replaced the trim around the door and the window (and everywhere else in the house). We saved an incredible amount of money by having our trim cut and made from 3/4 inch MDF boards.
Cost for the door and single window – $25.00
Replacement Light Fixture
We also replaced a retina-burning quadruple florescent light fixture in the kitchen. We found this traditional looking double pendant light fixture on clearance and bought it without thinking.
Admittedly I didn’t love the replacement I bought, and I still don’t, but I haven’t found the right thing to replace it with yet.
But ANYTHING was an improvement over what we had.
I wish I had a photo of the light – have you ever directly looked at the sun? That’s what my light fixture was like before we replaced it – a giant box of blinding light.
Cost- $35.00 on clearance.

Cost & Time Frames
We spent just shy of $500.00. We kept the faucet, pot rack, shiplap walls & refinished floors when we did our full renovation. Not including the floors, the entire kitchen only took us a few weekends to complete.
This kitchen was intended to tide us over to the following summer. Five short months after this renovation we were forced to gut the whole kitchen and start from scratch.
I shared this temporary kitchen reno to show how you can stretch your dollar to make improvements around the house. The renovated kitchen was no show stopper, but it was clean and bright and worked well as a temporary solution.
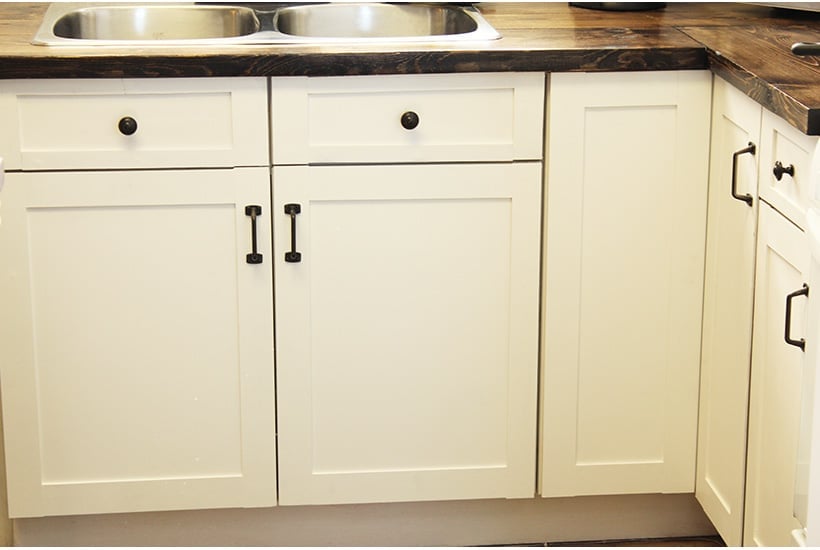
If you’re curious here is a picture of the kitchen after we renovated it for the second time.

You can read how we improved the storage space when we overhauled the kitchen the second time. We almost doubled the storage space with a few simple DIY projects and a handful of in cabinet storage solutions. Catch that post here: 12 WAYS TO CRAM MORE STUFF INTO A SMALL KITCHEN