13 Inexpensive Small Kitchen Storage Ideas To Use In Your Home
Implementing some of these small kitchen storage ideas doesn’t have to be expensive. Instead, add a few baskets and a couple of unique DIY projects to expand and maximize the space in your kitchen. It could be storage heaven!

When we renovated our kitchen the second time, we put significant time into sourcing and finding solutions to our storage shortage.
If you didn’t catch that, I said the second time we renovated our kitchen.
We renovated our kitchen twice in one year. Once, as a temporary solution to tide us over until we could do a proper overhaul. Then, we renovated again five months later when our appliances went kaput.
So what happened?
I’m sometimes a lousy planner, that’s what happened.
I honestly thought that the temporary renovation would tide us over until the following summer but, in mid-June, the dishwasher died, followed shortly behind by the washing machine. The next week, the electrical panel went on the stove.
It was a sign.
So, the kitchen renovation was triaged top priority and we started designing our kitchen.

My Budget For My Small Kitchen Remodel
I had a budget of $7,000.
That sounds like a lot, especially for such a tiny kitchen, but from that budget, I had to get a new washer and dryer, fridge, stove, and dishwasher.
The total for the appliances was just under $5500 and, I have to tell you, I did a lot of shopping to find the right appliances for the right price.
That left $1,500 of the budget for the rest of the kitchen.
See, now it seems like a small budget!
The remaining $1500 went to new:
- Cabinets
- Butcherblock countertops
- Farmhouse sink
- Lots of organization items.
Now, I had to come up with some really clever small kitchen storage ideas to make it all work.
Small Kitchen Storage Ideas On A Dime
I’ll admit- I LOVE to cook and bake. Over the years, I have amassed an extensive collection of kitchen thingamajigs and whatchacallits.
I made sure every single kitchen doodad had a home in this tiny kitchen. It required a bit of creativity and a few custom DIY projects, but it pulled together very well.
So, here are the 12 inexpensive small kitchen storage ideas and solutions that I used to cram everything into my tiny kitchen!
If you want access to the steps I go through to create these rooms, you can download my FREE room planner!
Affiliate Disclosure
This post may contain affiliate links. If you click one and purchase, I may receive a commission at no additional cost. You can read our disclosure policy here.
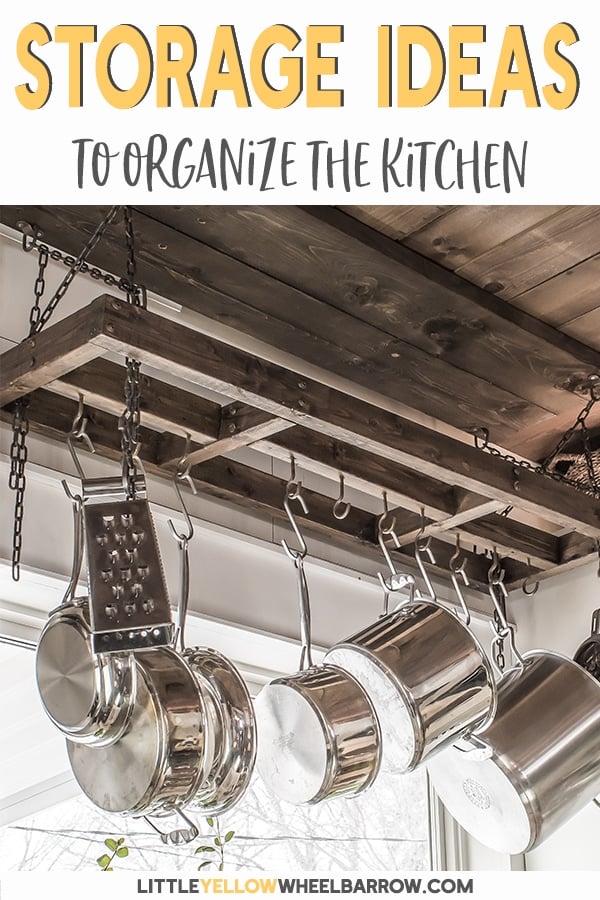
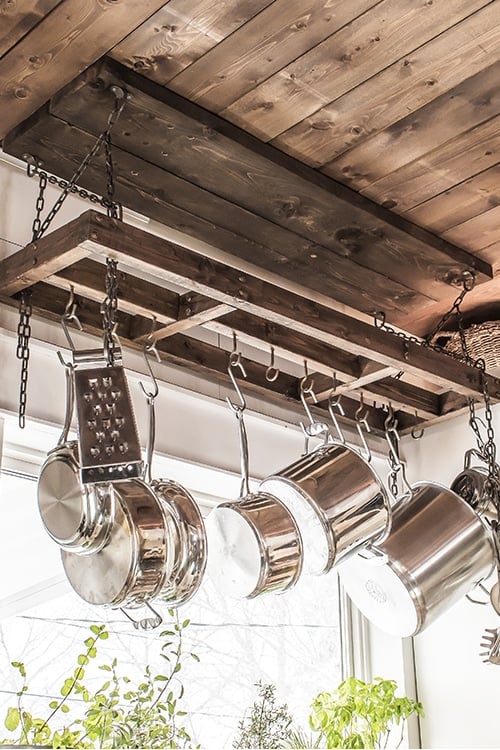
1. DIY Pot Rack
We made our own DIY pot rack for $30 (we already had the wood). It was such a simple build!
We just made it out of 2×3’s and 2×6’s. It was meant to be temporary until we found something else but I still haven’t found anything that would fit the space so well. I haven’t seen anything I liked better either.
I keep all my stainless steel pots, pans, strainers, and utensils on my pot rack. They are always within reach, and I never have to dig around a bottom cabinet to find a pot.
The pot rack also freed up an entire bottom cabinet!
You can find the plans for the pot rack here.
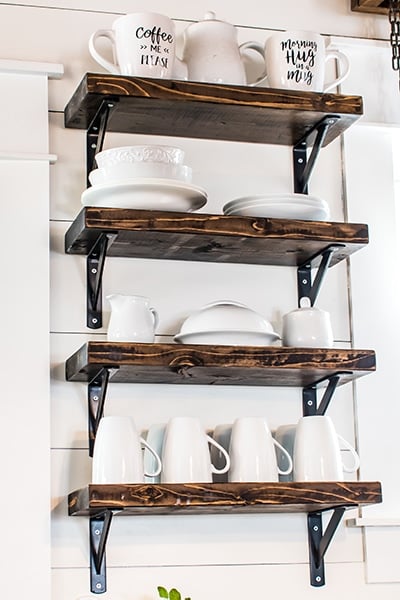
2. Install Open Shelves
We had one wall that was too small for a cabinet, so we decided to add a few open shelves. It was a perfect location above the dishwasher, making loading and unloading a breeze.
Our open shelves never have time to get dusty or dirty because we only use them for our items that are in our heavy daily rotation.
Trust me, there might only be two of us, but we go through a lot of coffee cups!
I’ve had questions about the brackets I used. I purchased mine through Amazon and these shelves came in a pack of 2!
They are solid, very heavy duty, and have an industrial look to them. Completely unfancy, but they did the trick.
3. Coffee Station
I took all the coffee supplies out of the cabinets and set them up on the counter in a lovely rustic tray.
Making coffee in the morning doesn’t (shouldn’t) require hunting the cupboards. I also know at a glance when we are running out of coffee – which if you haven’t figured out yet, is vital to our consciousness. Super efficient for the two of us!
Side note: I recently read that coffee was good for longevity. If that is the case, we drink enough coffee that we’re on the path to immortality

4. Magnetic Knife Rack
I LOVE my simple $10 knife rack. I wanted something a bit more robust, but it was what we could find at the time, and it’s served me well so far.
The knife rack freed up a full drawer and put my best knives in a location that was easy access and kept them safe.
This is the one that we purchased and it has held up very well for over a year.

5. Add Storage Baskets On Top Of The Cabinets
I have lots and lots of baking and cooking nic-knacks. Like, I have countless cookie cutters, icing nibs, molds, and things that I don’t use very often but still want on hand.
I was able to fit quite a few baskets up top which allowed me to sort and organize all those little baking pieces into categories.
It was a cheap and easy way to add additional storage! Plus, the wicker baskets add some texture to those white cabinets.
I recently took them down to give them a good clean because they do get dusty up there. When I put everything back, I added a tea towel over the baskets so I wouldn’t have to dust so much next time.
The tops of your cabinets are a great storage area for things you don’t want to part with but that you don’t use every single day.
Pretty baskets or small boxes are an inexpensive way to extend those cabinets! We went with these eco-friendly wicker storage baskets and they worked perfectly.
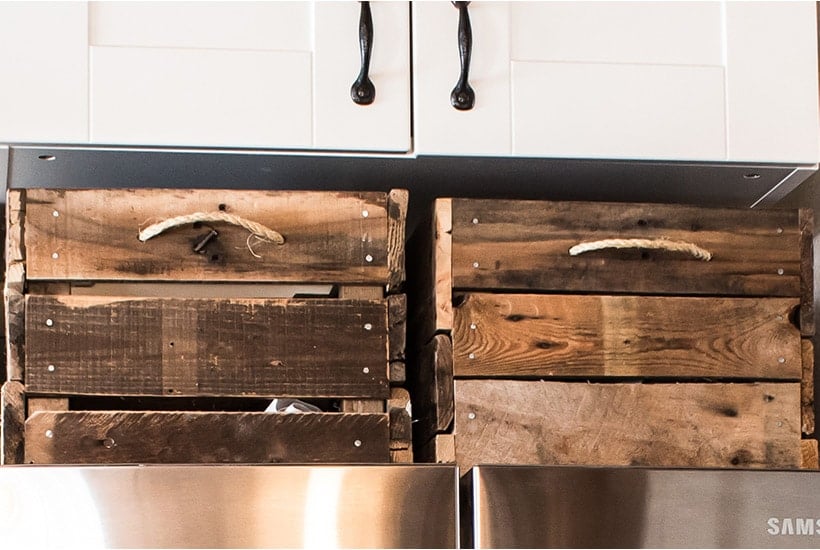
You can also DIY your own storage containers. We made these canning storage crates to go above our small pantry cabinet!

6. Add A Few Crates To The Open Space Above The Fridge
Okay, I’ll admit it. I screwed up the measurements for our refrigerator.
The refrigerator was shorter than we had planned for and we had a full 18 inches free between the fridge and top cabinet. My husband built these crates as a temporary solution but I like them so much I never bothered to replace them.
If you have space above your fridge, a few crates might free up a cabinet or enable you to buy more baking pans (because that’s what I did).
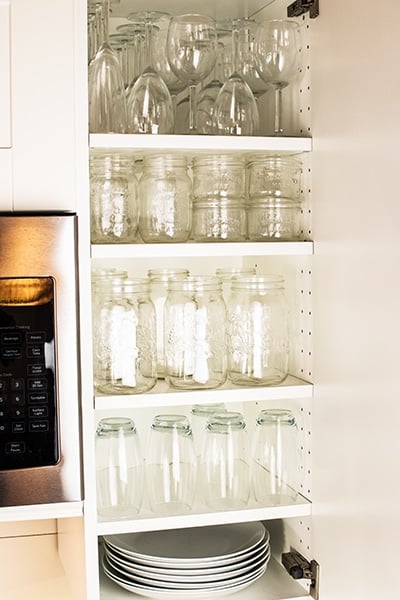
7. Order Lots and Lots Of Extra Shelves
It always surprises me that people buy aftermarket organizing products for their cabinets.
The solution is far more straightforward- just buy more shelves. If you have adjustable shelves, you might be able to find extra ones that fit your cabinets but check with your manufacturer.
If you have Ikea cabinets, you’re really in luck because they have them available in all sizes for a pretty reasonable price.
We bought lots of extra shelves for our IKEA cabinets so we could maximize the space we had. We could custom fit shelves for specific items eliminating any space-wasting gaps.
It looks great this way too!
If anyone opens your cabinets, you will look like an organizing pro.
8. Install A Kitchen Island For Extra Counter Space And Seating
We DIYed our kitchen island, and it was by far the most significant improvement to our small kitchen space.
It provided additional counter space, extra shelves, two extra drawers, and seating! It’s big- probably bigger than it should be for the space that it’s in, but it works great for me.
I don’t have to share our small kitchen with anyone and the island, pantry, fridge, and stove are all in reaching distance.
If you have room for an island, there are all kinds of creative ways to make an inexpensive one. We made our from plans from Ana White and tweaked them a bit, so we had the overhang and the extra seating. The entire thing was less than $200 in lumber.
You can find the plans for this island here: Rustic X Kitchen Island by Ana White.

9. Use A Linen Cabinet As A Kitchen Pantry
So, something happened. I ran out of budget money while designing our small kitchen. I wanted a floor to ceiling cabinet for our pantry because the extra space would have been incredible.
The full cost of the cabinet I wanted was going to cost me $1000. Adding an extra $1000 to that budget was not going to happen, so I settled for a cheaper alternative.
I hunted around thrift stores to find a linen cabinet or a small cabinet that I could redo- no luck. I finally found this cute little cabinet on Amazon for $199. Sold!
It works great. We added a shelf (I’m just mental about shelves apparently) and used the pantry for all our dry goods and spices.
If you have space a vintage linen cabinet or an old hutch, it might be the perfect thing to extend your pantry.
This is the exact cabinet that I purchased from Amazon: Homestar 2 Door Storage Cabinet in white.

10. Lazy Susan Corner Cabinet
I’ve read some really negative reviews about the IKEA lazy Susan corner.
I love it and I have had no issues with it despite the fact that it is stuffed full. After months of heavy use, there is no wear or tear and the spinner works as well today as the day we installed it. I haven’t experienced anything negative and I honestly wouldn’t build another kitchen without one.
The lazy susan organizes almost all of my small appliances and makes them easy to find and easy to access. I just spin it around and grab what I need. No digging, no moving anything around.
It was also SUPER cheap. I regret not putting one in the upper cabinet.
In my corner cabinet, I keep my:
- Food processor
- Vitamix blender
- Instant Pot
- Food sealer
- Spiralizer
- Toaster
- Two hand blenders
- Waffle maker and several billion attachments
It’s mind-blowing how much fits on that spinner!
You can probably fit more physical items in the corner cabinet without the spinner. If I did that, I would be in the corner cabinet trying to pull out appliances every day. The loss of space is entirely worth it for the efficiency the spinner provides.
I have the Ikea version of this cabinet. If you do not have an Ikea nearby, they are available to order online.
I also found this lazy Susan version that is very similar if you do not have access to an Ikea. I can’t speak to the quality of it but it is the same style as the one that I currently use.
11. Simple Rack Sack For A Small Kitchen
This hack for garbage cans was one of the simplest small kitchen storage ideas I came across.
We had absolutely no room in our small kitchen for a garbage can.
I tried several things that just didn’t work before I broke down and bought a $20 rack sack. They work GREAT!
The little bags hold a lot of garbage and since it’s just the two of us and we recycle everything, we can the small garbage bin works great.
Pro-tip: Tape a small piece of paper from the recycling bin to the underside of the rack sack lid. My husband and I occasionally play the how-full-can-this-thing-get game and sometimes not so lovely stuff gets stuck to the top. Keeping a small piece of paper there keeps it clean.
Even if you have room for a garbage bin, the rack sack works very well as a depository for dirty dishtowels, scraps for compost, cleaning rags, or anything else.
It’s a great way to add extra storage on the inside of a cabinet door.
12. Add A Few Big Shelf Dividers For The Baking Pans
Another IKEA solution, but I have seen these at most hardware stores.
Shelf dividers that go front to back are FANTASTIC for cake pans, muffin pans, and cookie sheets. It keeps the space neat and organized, and I can see at a glance what I need.
I can also pull out something without unstacking a hundred things.

13. Get The Tall Cabinets
I wanted double cabinets all the way to the ceiling, but the budget just wasn’t there. I did manage to squeak in 40-inch cabinets, and that was almost as good. The extra height adds much-needed storage space.
We raised the cabinets and created a clearance of 23 inches.
Now, 23 inches is not standard, but I wanted my cabinets a bit higher to allow for space for appliances like my tall stand mixer and Vitamix.
The higher clearance makes our small kitchen appear more spacious. It also makes the counter space much more accessible and usable.
It does mean I need to get out a step stool on occasion to reach the top of the cabinets, but I don’t mind.

The Best Small Kitchen Storage Ideas: We Crammed Everything In!
Every single bit, bob, and appliance fits in my cabinets now. Everything has a home, and I do not believe I have ever had a more organized kitchen.
It’s also the smallest kitchen I’ve ever had, but it’s my favorite of the lot. It feels well put together, and I finally have a space I enjoy cooking in again.
If you want to see the before photos of this kitchen (and be warned they are not very pretty), head on over to this post: A $500 BUDGET KITCHEN RENOVATION
If you like the style and want to see more of the house, check out these two posts:
- DINING ROOM NOOK DIY SHUTTERS
- DIY INDUSTRIAL DESK FOR A SMALL HOME OFFICE
- GREAT SMALL BATHROOM ORGANIZING TIPS AND TRICKS!
- Hardwood Floor Restoration: After Years of Neglect

Hello! I’m a new reader, and I’m not sure if you have a post that explains all of this already…if you do, please share the link!! But I did notice in the one on the shutters, you discuss the wall color, etc. I would love to know all the specifics in the kitchen part….like what color are your cabinets…alabaster also or something different? What stain did you use on your ceiling and how did you finish it (coating)? I LOVE LOVE LOVE your kitchen and dining space. We are building a house and I want my kitchen and dining space to look just like yours if its possible!! My husband is literally building the house himself, so we aren’t afraid of DIYing anything! Thank you!
Hi KJ, Ok lemme see, the cabinets are from Ikea GRIMSLÖV, off white, we also picked up our butter block countertops from Ikea and stained and sealed them. The stain we used on the countertops was dark oak by Minwax and we used a marine varnish to seal them. I’m sorry, I cannot for the life remember what brand of sealer. But they have held up beautifully and after 4 years of two messy kitchen people, and one food blogger ( I have a second blog about low carb baking), the countertops are still perfect.
You can’t see in the photos but my dining room and kitchen share the same open space, so the kitchen has the same stain and paints as the dining room. The walls are Sherwin Williams Alabaster on the walls and the semi-gloss version on the trim.
The ceiling is simple pine boards stained with Minwax Early American. The ceiling boards were stained, and then very lightly sanded to lighten them up a touch and give them a bit of a weathered look, no additional finish or sealer was added to them. It’s been almost 4 years since we did the ceiling and it has held up beautifully.
The floors are white oak (100+ years old too, and it shows) we stained them dark oak by Minwax. If I was redoing this house again I would go for lighter floors, but since our floors had so many dents, marks, holes, and everything else that happens to floors in 100 years I decided to go dark and hide a lot of them.
I think I covered it all if I missed anything feel free to give me a shout over email littleyellowwheelbarrow@gmail.com. Cheers!
Simply lovely renovation… and LOVE all the small space savers!
Thanks, Julie. It’s tiny but we absolutely love it. I’d love to say it’s always that organized, but I’ll keep it real and say it needs a reset!
I love your kitchen redo! The baskets up above look great, I’m always struggling with how to organize the space above the cabinets. Where did you find your baskets?
Thanks, Tina! Those baskets were purchased at Walmart about a year ago. I think they were only $5.00 each as I recall. They work great for all the things you rarely use but don’t want to give up.
Hi Laura,
2nd time just made it twice as nice! I’m wondering the dimensions of your kitchen, please. I’m going to use your tips to cram all of my stuff in mine. Thank you, Karen
Hi Karen, my kitchen is tiny, it’s only 10×10 and open on two sides, so not a lot of cabinet space at all. Good luck sorting out your kitchen!