How to Make a Chunky Knit Pillow Cover in Under an Hour


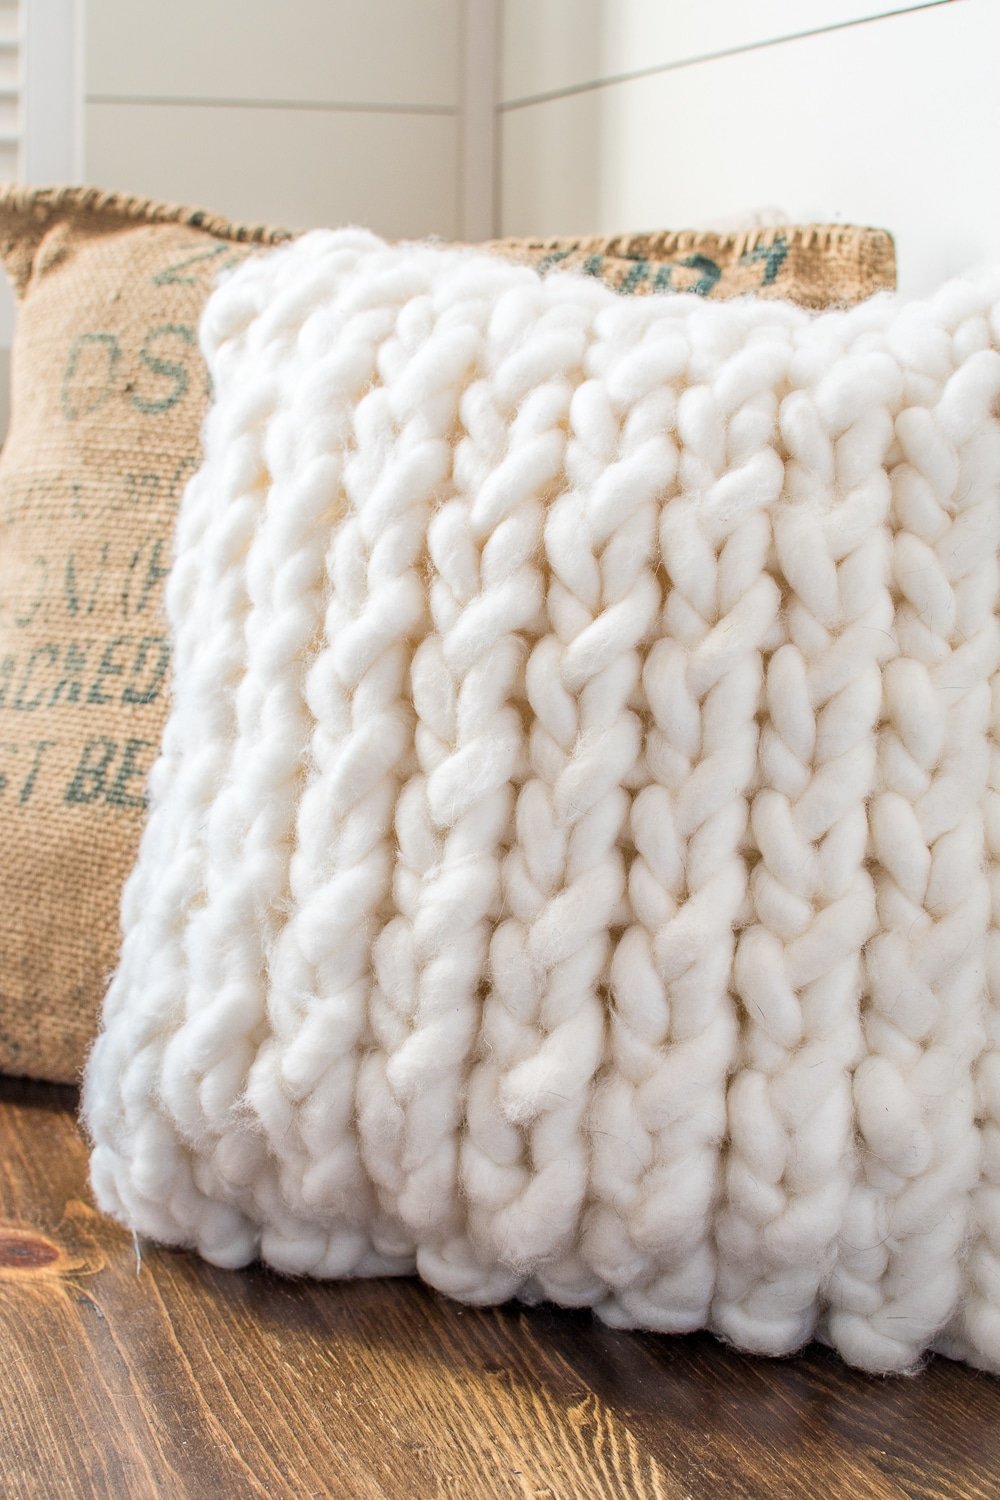
This chunky knit pillow cover is the perfect project for a beginner knitter. If you have mastered the dishcloth or a scarf and you can knit and purl, this project is for you. This one has no fancy seams or confusing patterns, and it pulls together in under an hour. This pillow cover is a great way to breathe life into old pillows. With some yarn and a few hours, you could have a new look for your sofa!

This project isn’t about how perfect or not perfect the stitches are (please stop sending me messages and emails about it); it is about taking a few easy stitches and working on a project you can prop up on your sofa even if you are a beginner, and even if you make a few mistakes. Plus, the project was super easy because we used big knitting needles and jumbo yarns.
Materials and Tools required
Affiliate Disclosure
This post may contain affiliate links. If you click one and purchase, I may receive a commission at no additional cost. You can read our disclosure policy here.

Materials
- Throw Pillows Inserts 14″ x 14″
- Three skeins of
Lion Brand Yarn Wow Yarn, Non-Dairy Creamer - Small needle and thread
Update 2024: Lion Brand WOW was discontinued, and the replacement we were recommending from Michaels has also been discontinued. Here are the updated yarns that can work for this project that are available as of February 2024:
- The texture of this yarn is single-ply.
- The gauge (3 sts / 10 cm) falls within the suggested range given for the original yarn.
- This yarn’s warmth, drape, elasticity, and durability reasonably match the original.
- Less dense. The fabric will be lighter than the original yarn.
- The fiber content is different. This yarn contains Merino Wool (100%)
- This yarn is much softer. The fibers in this yarn are finer than those in the original yarn and may not stand up to heavy wear as well as the original.
- This yarn comes in 1000g / 100m balls. For each ball of the original yarn, you will need 0.19 balls of Fat & Sassy.
You can also try doubling or tripling thick yarns to get the gauge you need to make the pillow.
Tools

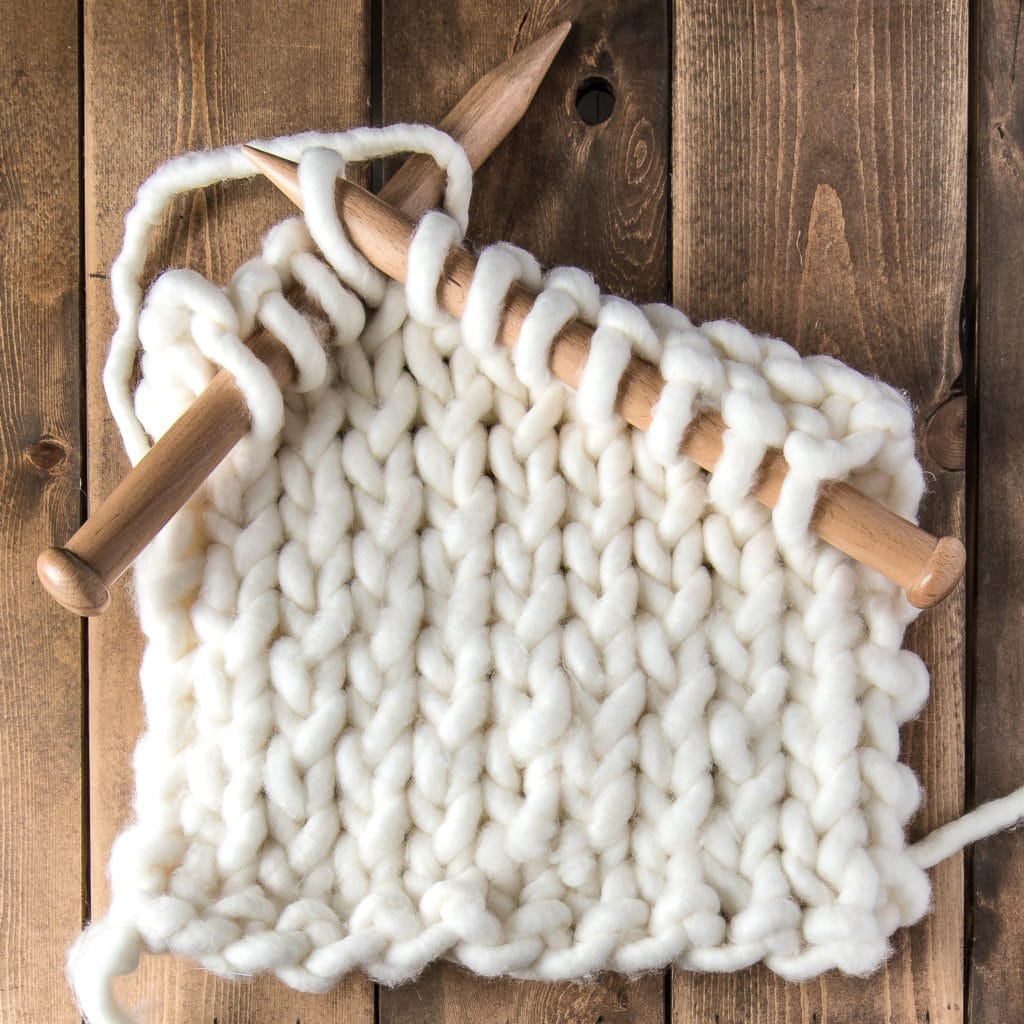
Step 1: Cast On
Start by casting on 12 stitches.

Step 2: Knit and Pearl The First And Second Row
- Knit the first row.
- Purl the second.
- Repeat.
- A simple stockinette pattern, a perfect classic look for our pillow.
- (it is that easy and all you need to know)
It really is that easy, and all you need to know!
Step 3: Continue the pattern
Continue knitting and purling each row until your knitting measures 29 inches in length.

Step 4: Fit the Knitting Over the form
Place your pillow form on the end of the knitting and make sure that your knitting fits over the form.
You do not need and do not want any overlap. If anything, you want the pillow cover to stretch for a good fit.
I measured my knitting before fastening it together and found that 29 inches made for a good fit around my pillow form.
You do not cast off! Don’t cast off your knitting; there is no need.

Step 5: Attach Skeins together to Continue Knitting
You will also eventually need to attach your skeins of yarn together.
Since this yarn is so thick, it is best to sew the two ends together like in the photo below. I added about ten stitches, 1/2 inch from the end, to get a good connection.
Since the yarn is super thick, trying to tie off or attempting a magic knot doesn’t work. This sewing method keeps the yarn from looking lumpy and bumpy and only takes a few minutes.

Step 6: Sew the Knit Pillow Cover Around the Form
This step is where you fasten your chunky knit pillow cover around your pillow form.
I used a different color yarn for the photo below so you could see what I did to fasten them together.
Take one long length of yarn, about 75 inches ( You won’t use it all, but it’s better to have too much than not enough!). Start at the bottom corner and weave your yarn through the knitted loops of your pillow cover.
Weave under, not over.
If you look at the photo below, the first weave-in from the right-hand side was done over the loops, not under.
I did this intentionally so you could see why going over looks weird. Go under and go around the pillow until you reach the final corner.
If you do it this way, your weaving will become invisible, and you will not see that the seams were woven together.

Step 7: Weave the Sides together
I wanted to show you what to do when you get to the end with one that still has a knitting needle.
Just slip your knitting needle out and continue to weave the two sides together. Make sure you catch all those knitted loops on the top.

Step 8: Fluff and fuss until your pillow looks perfect
Once you finish, weave in any ends and give your chunky knit pillow a fluff.
If you can see the dog hair in the photo, please ignore it. I tried to pick it all off, but my labrador is shedding like mad right now, and the dog hair is everywhere despite my best efforts.
If you know what I am talking about, comment to commiserate!

Expert Tips
Working with size 50US knitting needles and big, thick, bulky yarn can create wonderfully textured, cozy items in a fraction of the time it takes with smaller needles and yarn. Here are some expert tips to help you get the best results:
- Loose Tension: Working with bulky yarn and large needles requires a looser tension than you might be used to. Moving the stitches along the needles will be difficult if you knit too tightly. Keep your hands and wrists relaxed.
- Use the Right Yarn: Not all bulky yarns are created equal. Look for yarns that are specifically recommended for use with size 50 needles. These yarns are typically super bulky or jumbo and will give you the best results.
- Knit With Your Whole Arm: Because of the size of the needles, you’ll need to use your whole arm to knit, not just your wrists. This can take some time but will help you maintain an even tension and prevent fatigue.
- Joining Yarns: When you need to join a new skein of yarn, try to do so at the end of a row to make it easier to weave in the ends. With bulky yarn, the woven-in ends can be quite noticeable if not done carefully. See our tip for sewing the yarns together vs knotting them in the post.
- Stitch Selection: Simple stitches often look best with bulky yarns, as they allow the texture and thickness of the yarn to stand out. Try garter stitch, stockinette, or ribbing for impactful visual and tactile effects.
- Care and Maintenance: Bulky knits can be prone to pilling and wear. Follow the care instructions on your yarn label closely, and consider using a garment bag if machine washing is allowed.
FAQ
You cannot use any yarn for this project. If you change the yarn, you change the gauge and will need to rework the sizing of the stitches required to make the pillow cover.
If you change the size of the knitting needles without changing the yarn size, you will have gauge issues, and the project will not turn out as intended.

How to Make a Chunky Knit Pillow Cover in Under an Hour
A chunky knit pillow cover for a 14x14 inch pillow form. This big knit pillow is perfect for a beginner, has no difficult sites or seams, and comes together in less than an hour.
Materials
- 14 x 14-inch pillow form
- 3 skeins of Lion brand Wow (colour used is non-dairy creamer)
- OR Pick up 2 skeins of Loops and Threads Spirit Yarn which you can find at Michaels (often on sale!)
- Small sewing needle and thread
Tools
- 25mm size 50US Speedsticks
Instructions
- Cast on 12 stitches. Cast on method does not matter.
- Knit the first row
- Pearl the second row
- Continue alternating knit and pearl rows until your knitting measures 29 inches in length
- Do not cast off!
- Slide your knitting needle out and simply connect your open loops to the bottom side of your knitting by weaving them together.
- When you need to connect an additional skein of yarn to the first use a sewing needle and thread to connect them together.
- Wrap your knitting around your pillow form to verify the size you knitted will work.
- Take a 70 inch length of yarn and weave your seams together all the way around your pillow.
- Weave in any errant ends, and fluff your pillow.
Notes
For this pattern is it important to use the yarns suggested. If you use a different size yarn, or even a different jumbo yarn the measurements will not be accurate.
Same for the knitting needles, if you use something larger or smaller the pattern will not work out the same way.
Final Remarks
So, this is a simple beginner knitting project. There are no complicated stitches counting rows or even fussy seams.
Super jumbo yarn makes it even easier because the chunky knit pillow knits up in less than an hour. I timed myself, and it took me 40 minutes, 2 cups of coffee, and a phone call to knit the pillow. Weaving the sides together took another 5 minutes to create the pillow cover. And another 10 minutes removing dog hair!
Related Posts


Author: Laura Kennedy
Writer & Owner of Little Yellow Wheelbarrow
Editor’s Note: This post was originally published on January 8th, 2018, and updated on February 9th, 2024. The post and headers were reformatted and updated for clarity. FAQs, expert tips, and related posts were added for the reader’s benefit.
I’d like to make this in the round, would that be easier?
Hi Lisa, sorry for the late reply, it’s harvest season here and we’re knee deep in tomatoes. The pattern isn’t quite right for in the round, but if you’re a seasoned knitter, you should be able to make the pattern work fairly easily. I haven’t tested in the round but I have had lots of requests so we’re going to test it here in a week or two and update the post to add additional instructions. Cheers!
Love this pillow. Is there way to sew zipper on opening so can be washed.
Hey Kay ,sorry for the late reply, sewing a zipper on to this project would be a bit difficult. The yarn is very thick with large gaps between the stitches, I can’t see a way to add a zipper, but my readers might have a suggestion.
Can you please modify the directions for a 18×18 size pillow?
To modify the directions for an 18×18 inch pillow all you have to do is add additional stitches and measure across your pillow to see if those stitches will be adequate for the width. Knit until the cover fits the pillow (test as you go). Cheers!
Commiserations on the dog hair , I have a long haired Dachshund ! ! !
Love the pattern 💕
It gets everywhere! I mean everywhere. But I wouldn’t change that for the world. Glad you liked the pattern Susan and thanks so much for the comment! Cheers.
You must have super human hands and fingers! I’ve been at this pillow pattern for over an hour and only halfway done! The big needles are torturously difficult to handle, but I will persevere! The joining of the yarn does not look so great, but luckily it’s on the inside. I couldn’t find the white yarn so opted for the Mermaids tale instead. It’s going to look pretty too, if my poor old hands survive working with this yarn and the humongous needles! Thanks for the pattern!
Hi Sarah , sorry for the late reply, I was away. But you know, I never even considered my hands, but I do have freakishly strong fingers. I know when I first started knitting with the big needles, it was a bit awkward and since it is such an exaggerated motion, it’s almost like a work out for your hands. I absolutely love the mermaid colored yarn, I don’t think I have seen one that I didn’t like. I hope your pillow turns out well!
Can’t wait to try this pillow! I love that Micheals brand yarn. As a newbie knitter I am not ready to invest in more expensive yarn. Also, we have a lab. I saw a handmade sign once that read, “In our house dog hair is not only an accessory, it’s also a condiment.” I thought whoever made it must have a lab. #welostthedoghairfight
I love that hashtag, and I feel that every single day. I spend a lot of time editing out black dog hair from my photos. But I love her with all my heart despite the fact she does not want me to have nice things. I love the loops and thread spirit yarn too, it’s such a fun yarn to work up. Good luck with the pillow, drop me a line and let me know how it goes!
I want a lab. I have always wanted a lab. I envy you and the fact that you mentioned your lab makes me smile. Also, I will be making this pillow for my daughter for xmas. She is away at college and loving her new place off campus. Can’t wait to see her open it xmas morning!
Hi Kris, Labradors are great fun, we’ve had three over the years, one American, one English and one that was a mixed breed (he was mostly labrador), and they were and are wonderful companions. I feel they have a much longer “puppy” stage, like 3 years (no joking), they seem to stay in that manic puppy stage for a long long long time and then one day a switch flips and they seem to chill out. Our most recent labrador, Daisy, never chilled out until she was 8 years old. I am not even joking. Great dogs though. I hope your daughter loves the pillow!
Hey Laura,
Just realized I called you Lauren the other day in a comment, and then again in my effort to give you due credit with my proud post about the amazing pillow you helped me knit, I got your name wrong repeatedly. As a Lara who is constantly called Laura, I truly apologize for my mistake. So sorry! (just wanted to reach out and apologize for my oversight/mistake). Again, what a great post you put up. Very thankful for it!
Hey Lara! No worries, I get called Laurie, Lara, Lauren, Hey You, I answer to all of them. Your pillow turned out SO well. This is the whole idea about making your own home decor, you don’t have to be an expert to create something beautiful for your home and you nailed that. Thanks so much for the comment.
haha I am completely with you! Months later, one of my kids said he likes these pillows best because they’re made with love. So, even though, they’re not perfect, they’ve turned out to be pretty wonderful. Love seeing all your new stuff!
That is such a wonderful comment to leave. I know so many people got their panties in a twist over my twisted stitches, whatever! If you enjoy it, and you love it, that’s all there needs to be. Thanks again for leaving the comment, you made my day! I’ve been working on another blog project the last few months and I admit this blog has been a little neglected, but I am ramping up content creation this year so you will so a lot more from me. Cheers Lara!
You’re amazing! I just came across your blog and LOVE LOVE LOVE your pillow cases, I’ll get right to it once I’ve gathered all materials. I’m not the best knitter but I love it and pillow cases and this so super therapeutic!!! Keep up the good work!
Thanks so much, Michelle, and for the record, I am also not the best knitter (as evidenced by my twisted stitches!), but this pattern is so easy even if you mess it up like I did it will still be awesome. Thanks for the comment and for popping by!
Do you twist all your stitches on purpose?
I address the twisted stitches at the top of the post.