A Dollar Store DIY Halloween Wreath (Only $15.00!)

Ok, I was out meandering in the city last weekend, taking a peek at all the fun Halloween decorations. I was GOBSMACKED when I saw some of the prices. No lie, I saw this style of wreath in a store, and the price tag was over $100. Say what? Yeah, no. I went to the dollar store and pulled this DIY Halloween wreath together in about 90 minutes.
Oh, and the kicker? I purchased all my supplies for just a little over $15.00. Of course, your mileage may vary depending on your dollar stores or what you have in your craft stash, but the materials shouldn’t cost more than a few coffees.
These wreaths made with tulle and felt turn out so pretty that no one would guess they were dollar store wreaths!
Oh my, now I want coffee. I digress. On with the tutorial for this lovely DIY Halloween wreath.

An Orange And Black DIY Halloween Wreath
I loved how this turned out. It looks great hanging on the door, and the black and orange scream Halloween. You could leave off the spiders and have an exquisite-looking wreath. However, I wanted to add a bit of creepy to my wreath, so I added the eight-leg crawlies.
I’m not a huge fan of scary Halloween because I am a shrilly screamer when presented with fear.
You do not want to take me to a haunted house or one of those Halloween events with actors in the woods.
I mean we could go, it could be fun, right? Just be prepared to be deaf when I see a creepy clown or doll.
So much nope.
So yeah, a pretty wreath with a little creep is as good as I get at Halloween.
Affiliate Disclosure
This post may contain affiliate links. If you click one and purchase, I may receive a commission at no additional cost. You can read our disclosure policy here.

Materials To Make A DIY Halloween Wreath
- Eight pieces of 12×18 orange felt (or 12 pieces of 8×12 felt)
- 1x 25-yard spool of orange Tulle (or orange ribbon or orange fabric). Use what you have, or buy what is cheapest.
- 1x 25-yard spool of black Tulle (you only need a few yards, so if you can find a smaller amount, don’t bother buying 25 yards)
- 1x 14-inch wire wreath frame (you could also use a foam wreath form or grapevine wreath form)
- A few tiny fake spiders
I picked up my felt at our local dollar store for $1.00 apiece. You may be able to pick up orange felt at a fabric store for even cheaper.
The frame was $1.25, and the dollar store had rolls of Tulle, but no orange. I ended up picking up 2 spools of Tulle, the orange and black from Michaels for $2.50 each. If you can find Dollartree Halloween spiders it will be much cheaper. The same spools were only $1.25 for the same 25 yards, too bad they didn’t have orange!
My spiders were also only a buck.
In the photo, I laid out some burlap and wire. I was going to make a burlap bow for this project, but when it was finished, I decided I much prefer the contrast of the black tulle bow, but you can do anything you want.
This wreath would make a really pretty fall wreath with a simple burlap bow and a few mini pumpkins.
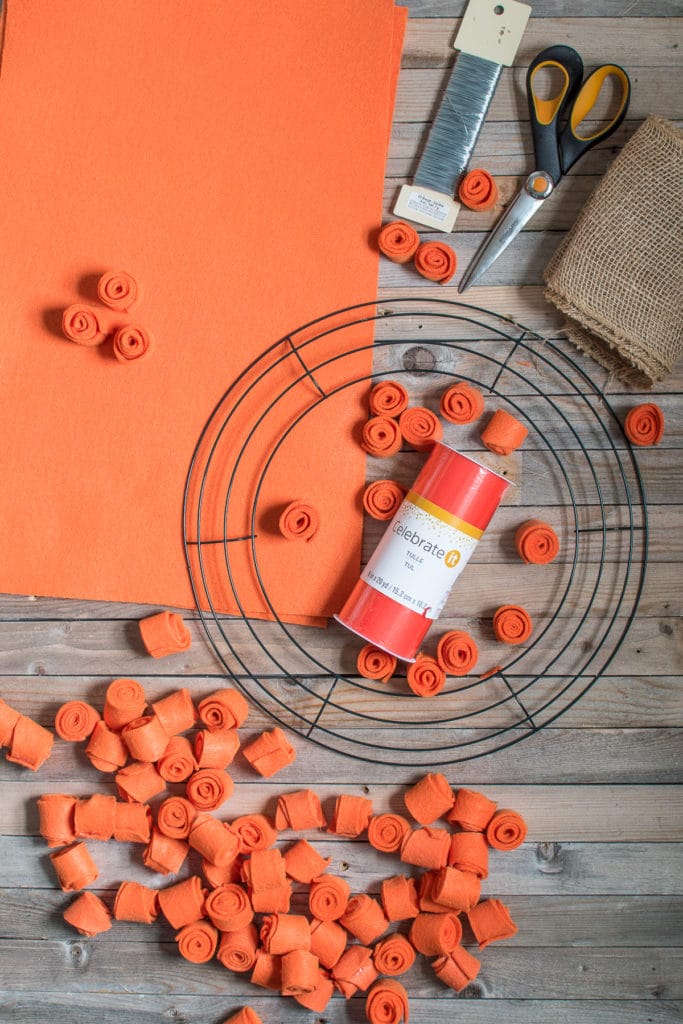
Tools
- Sharp scissors
- 1 piece of paper
- Glue gun
- Glue sticks (several, I went through about 7 standard size glue sticks)
- Gloves
Step 1: Cover the Wreath Form With Tulle
Before I even start this tutorial I want to suggest that you wear gloves while working with the hot glue gun. The number of burns that I get doing projects like this is dumb. I always forget gloves, and always figure I won’t burn my fingertips off, but I am always wrong. Do yourself a favor and wear gloves.
So this step has a few options. You do not need to use Tulle to wrap the wireframe. We want to cover the edges, so you never see them when you hang your wreath.
I opted to use Tulle because I love how well hot glue adheres to it. But you can use orange fabric or even an orange ribbon.
Bash your stash and see what you have, you might have something you can use on hand. It doesn’t have to be pretty, it just needs to cover the wreath form.

Step 2: Make sure all outside and inside edges are covered with Tulle.
If you use the Tulle, you will use the entire 25 yards. Wind the Tulle around the frame and push the fabric together.
You can see in the photo below I gathered the Tulle quite tightly so you couldn’t see through it.
Once you finish, if you have a few spots where you can see the wireframe, you can push the Tulle around to get better coverage. Seeing a bit of the wireframe is fine, don’t fret if it isn’t perfect.

Step 3: How to cut out the felt roses for your DIY Halloween wreath
The roses are incredibly simple to make. Take a 1-inch strip of paper 12 inches long. I used a piece of scrapbook paper, but if you don’t have scrapbook paper you can use anything. If the sheets are not long enough just tape two pieces together to get your 12-inch strip.
Once you have your strip cut, you will cut some waves and ripples across one of the long edges. You can see in the photo below what I mean.
It does not need to be perfect, you can see my waves do not all match and that’s a good thing. It adds a bit of a different dimension to the roses once you start rolling them.

Step 4: How to cut the felt so we have no waste.
When you cut that first row you will have a second row that looks a little different. So we don’t waste any felt, we use this row too. All you need to do is trim the edges so they are curved the right way.
Use a pair of scissors and snip the edges up as shown in the photo below. Use the arrow as a guide. It doesn’t need to be perfect. The edges of the roses look better if the ends curl down instead of up.

Step 5: How to make the roses for your DIY Halloween wreath
To make your roses, roll them from one side to the other and add a dab of hot glue on the end to secure them. You don’t need to glue it all the way through, that small dab on the end works well.
Roll 122 roses for your 14-inch wreath. This sounds daunting, but you can make these roses in about half an hour, give or take.
Once all the strips are cut, it’s just a matter of rolling. If you can get someone to help you, it goes even faster.
When you add your roses to your wireframe, add a good dollop of glue. We don’t want the roses falling off if the wreath gets bumped, or brushed up against.

Step 6: Adding the orange roses to the wreath form
Start in the middle of the wreath, and run a row of roses all the way around. Stagger the roses on the outside and inside filling in small gaps.
You can see in the photo how the roses do not line up perfectly, they are a bit staggered. I started this wreath wanting all my roses to be lined up perfectly, but there were too many gaps and I did not like how it turned out. I found the wreath looked fuller with the roses staggered on the outside and inside rim.
You may need to hold your roses on the outside and inside rim to allow them to dry a bit before moving on. Using a few straight pins to hold the roses in place while they dried works very well.

Step 7: Add a bow and some creepy spiders
I had the black Tulle and made a bow for a different project, but I loved how it looked on this orange Halloween wreath so I used it in here instead.
The bow is incredibly simple to make. Take 4 strips of Tulle about 3 feet long and make a bow. I separated the layers to add a bit of fluffiness to the bow.
Add a few creepy fake spiders and you’re all set!
Looking For More Halloween Projects?
We have a few more cute and whimsical Halloween projects you might enjoy including more DIY Halloween wreath ideas. No scary Halloween wreaths in this collection, but be sure to check out that creepy giant spider!
- An Elegant Halloween Wreath For Your Front Door
- Gnome Witches and Vampires
- Creepy Giant Halloween Spider
- Black Out Dead Flower Wreath
- 10 Free SVG files – Cute Halloween Sayings


A Dollar Store DIY Halloween Wreath
Materials
- 8 pieces of 12x18 orange felt (or 12 pieces of 12x12 felt)
- 1x 25 yard spool of orange tulle (or orange ribbon or orange fabric). Use what you have, or buy what is cheapest.
- 1x 25 yard spool of black tulle (you only need a few yards, so if you can find a smaller amount, don't bother buying 25 yards)
- 1x 14 inch wire wreath frame
- A few small fake spiders
Tools
- Sharp scissors
- 1 piece of paper
- Glue gun
- Glue sticks (several, I went through about 7 standard size glue sticks)
Instructions
Step 1: Cover the Wreath Form With Tulle (or what you have)
- So this step has a few options. You do not need to use tulle to wrap the wireframe. We want to cover the edges, so you don't see them when you hang your wreath. I opted to use tulle because I love how well hot glue adheres to it. But you can use orange fabric or even an orange ribbon. Bash your stash and see what you have, you might have something you can use on hand. It doesn't have to be pretty, it just needs to cover the wreath form.
Step 2: Make sure all outside and inside edges are covered with tulle.
- If you use the tulle, you will use the entire 25 yards. Wind the tulle around the frame and push the fabric together. I gathered the tulle quite tightly so you couldn't see through it.
- Once you finish, if you have a few spots where you can see the wireframe, you can push the tulle around to get better coverage. Seeing a bit of the wireframe is fine, don't fret if it isn't perfect.
- If you use ribbon or fabric, you do not need to gather the fabric or ribbon. You only need to cover the wreath frame so you do not see the wire.
Step 3: How to cut out the felt roses for your DIY Halloween wreath
- Cut a 1-inch strip of paper 12 inches long.
- Once you have your strip cut, cut some waves and ripples across one of the long edges. You can see in the photo in the post for a visual.
- The cuts do not need to be perfect, you can see my waves do not all match and that's actually a good thing. It adds a bit of different dimension to the roses once you start rolling them.
Step 4: How to cut the felt so we have no waste.
- Use the paper template that you made and cut your first row of strips. If you have very sharp scissors you can cut 2-3 layers at a time. You can pin the template down to make cutting easier.
- When you cut that first row you will have a second row that looks a little different. So we don't waste any felt, we use this row too.
- Cut a straight line down creating another set of strips. The ends of this row will need to be trimmed. You can see a photo in the blog post for a visual example.
Step 5: How to make the roses for your Halloween wreath
- To make your roses, roll from one side to the other and add a dab of hot glue on the end to secure. You don't need to glue it all the way through, that small dab on the end works well.
- Roll 122 roses for your 14-inch wreath. This sounds daunting, but you can make these roses in about a half an hour, give or take.
Step 6: Adding the orange roses to the wreath form
- Start in the middle of the wreath, and run a row of roses all the way around. Stagger the roses on the outside and inside filling in small gaps. Add a good dollop of hot glue to the bottom of the rose and hold it in place for a few seconds to secure it to the wreath.
- Once the inside is completed, start on the outside and place roses between two roses from the center row of roses. The roses on the outside and inside rim will need to be held in place to secure. You can add a few straight pins to hold them in place while you continue. This saves a bit of time.
Step 7: Add a bow and some creepy spiders
- Take 4 strips of Tulle about 3 feet long and make a bow. I separated the layers to add a bit of fluffiness to the bow.
- Add a few creepy fake spiders and you're all set!
Notes
**Wear gloves while using a hot glue gun and save yourself the burns**
You can make this wreath for autumn and leave off the black ribbon and spiders. It would look just as good with a simple burlap bow, and a few small mini pumpkins.
You do not need to use expensive felt, any felt you find at the dollar store will be adequate. If the felt is very thin, you may want to pick up a few extra pieces just to make sure you have enough. Dollar store craft supplies vary from supplier to supplier. The felt I picked up wasn't super thick, but it wasn't super thin either.

