DIY Giant Halloween Spider Decoration to Scare Your Neighbours


I have to admit when my husband told me he was going to make a giant DIY giant Halloween spider out of coat hangers, bubble wrap, and a fur throw, I was skeptical.
Color me amazed at how this turned out! It’s not often I admit to him I was wrong, and I’m not going to start now, but this spider turned out phenomenal!

A Creepy Halloween Lawn Decoration
This DIY giant Halloween spider is easy to make, using inexpensive materials that we found mostly at bargain stores and thrift shops – there’s no need to spend a ton of money.
We’ve seen other tutorials online that require specialized tools or expensive hardware store materials. No fear about that with this tutorial. With little more than a hot glue gun, a hammer, and some wire cutters you can make this super creepy spider.
If you’re looking for a few additional Halloween projects you can make to add to your decor we have a few projects that might interest you
- Glowing Specimen Jars
- DIY Halloween Gravestones (made from foam!)
- An Elegant Orange & Black Halloween Wreath
- Eerie Glowing Halloween Shadow Boxes
- Vampire Gnomes
- & Witch Gnomes Too!

Materials and Tools
Go to a dollar store to find most of the materials you need for this project. There are a few specialty materials like the lights and fence staples you will need to procure, but most of the supplies are cheap and easy to find.
In the photos and videos, you’ll see we used black duct tape. That was a waste. It turned out that packing tape was more than strong enough, and way cheaper.
As always, I recommend using gloves when working with hot glue. My husband learned that lesson the hard way despite my nagging.

Materials
- Fur throw (or fun fur) 48-inch x 48-inches min. We bought our throw at bargain shop for $10.00
- 18 wire coat hangers
- One piece of scrap wood 1×6 (about 12 inches)
- One piece of scrap wood 2×4 (about 6 inches)
- Bubble wrap (60ft roll)
- 2 rolls of Packing tape
- 36 fence staples ( way cheaper if you go to a hardware store)
- Large rubber ball (about 14 inches) We found ours at Walmart for $3.00
- Two small red plastic balls (hollow)
- Lots of hot glue sticks
- Four battery-powered LED lights
- Hobby wire or twist ties
- Black spray paint
- Scrap tulle or mesh fabric
- One screw
Tools
- Hammer
- Pliers
- Wire cutters
- Hot glue gun
- Gloves (rubber dipped)
- Scissors
- Pen, pencil, or marker
SAFETY WARNING ABOUT HOT GLUE – DON’T DO WHAT MY HUSBAND DID.
I nagged my husband to wear gloves for the video, he ignored me.
The wind picked up and the fur he had glued blew back and landed on his hand. It stuck and took off several layers of skin.
Hot glue is no joke, it is incredibly hot and sticks to whatever it’s globbed on to, be that a craft project, or your hands and fingers.
Please wear gloves. If you happened to watch the video you might catch where he burns himself. You will also catch where he finally uses gloves.
Moral of the story, the wife is always right, hot glue burns, and gloves will save you a trip to the pharmacy.
Step 1: Straightening Coat Hangers
We used coat hangers for the legs on this spider. The coat hangers do not provide enough strength for the spider to stand on its own, but they ARE cheap and very easy to work with. They give just the right shape to the legs.
The spider is stabilized to stand properly with a small piece of wood under it’s belly.
Cut 16 of the coat hangers near the hook and straighten them out. Don’t worry about unwinding the twisted bit near the hook, we are going to hide that later with bubble wrap.
On the end opposite the twisty bit, fold back about 3 inches of the hanger to create a loop at the end. Repeat for all 16 straightened hangers.
Pull the remaining two hangers (like a bow and arrow) so that they are straightened out, but doubled up, with the hook at one end. Straighten the hook, too.

Step 2: Attach the Legs
Draw a line across your 1×6 at the halfway point. Mark out 4 lines per side, pointing in the directions you want your legs to point.
Using the fence staples, nail the loop end of the long hangers to the marks you made in step 4, using 2 hangers of each leg. One staple should have one leg inside the end of the loop, and the other should straddle both sides of it.

Use the same method to nail the two shorted hangers to the front end of the board (for the mandibles).
Twist each pair of hangers together to give them extra strength. Secure the end with hobby wire or twist ties.
Step 3: Shape the Legs
Bend each leg upward about 3 inches away from the board, then downward in 2 more spots to make the shape of the spider’s leg. The trick is to make sharp bends rather than gentle curves, to make it look like joints. It doesn’t have to be perfect, you can make adjustments later.
Bend the mandibles upward at almost 90 degrees, then once downward bend and a gentle curve back towards the body.
Once you’re happy with the general shape of the legs and mandibles, wrap them in bubble wrap and packing tape until they’re about 2 inches thick.
Paint the scrap 2×4 black. When it’s dry, put it under the body of the spider so that it holds the spider up, then use a screw to hold it in place.

Step 4: Cover the Parts with Fur
You may have to do some planning in order to get the most use out of your fur, so read this step entirely before putting scissors to fabric.
Cut 10 strips of fur from your throw to cover the legs and mandibles. They should be about 6 inches wide by around 34 inches long for the legs, and 24 inches long for the mandibles. Be sure to cut with the direction of the fur, not across it. The spider’s fur should point towards his toes.
Wrap the fur around each leg, and secure it with hot glue. The fur is very forgiving, so if you have to make cuts or folds to make it around the bends in the legs, you can just cover it up by gluing down any extra bits.
Wrap the large rubber ball with a large rectangle of fur, and glue it in place. The fur will bunch up at the ends, but you can actually use that to create really natural-looking folds. As before, use the hot glue liberally to hide any mistakes, and to keep the folds just where you want them. This is going to be the spider’s big rear end.
Bunch up another ball of bubble wrap and packing tape into a flat oval for the spider’s head. It should be about 8 inches across. Wrap it in fur, too.
If possible orient the fur on the head and body so that it points toward the rear of the spider.
Use any leftover fur scraps to cover the board you attached the legs to.

Step 5: Assemble your DIY Giant Halloween Spider
Glue the body and the head of the spider to the board. Be liberal with the hot glue!

Step 5: Add the Eyes
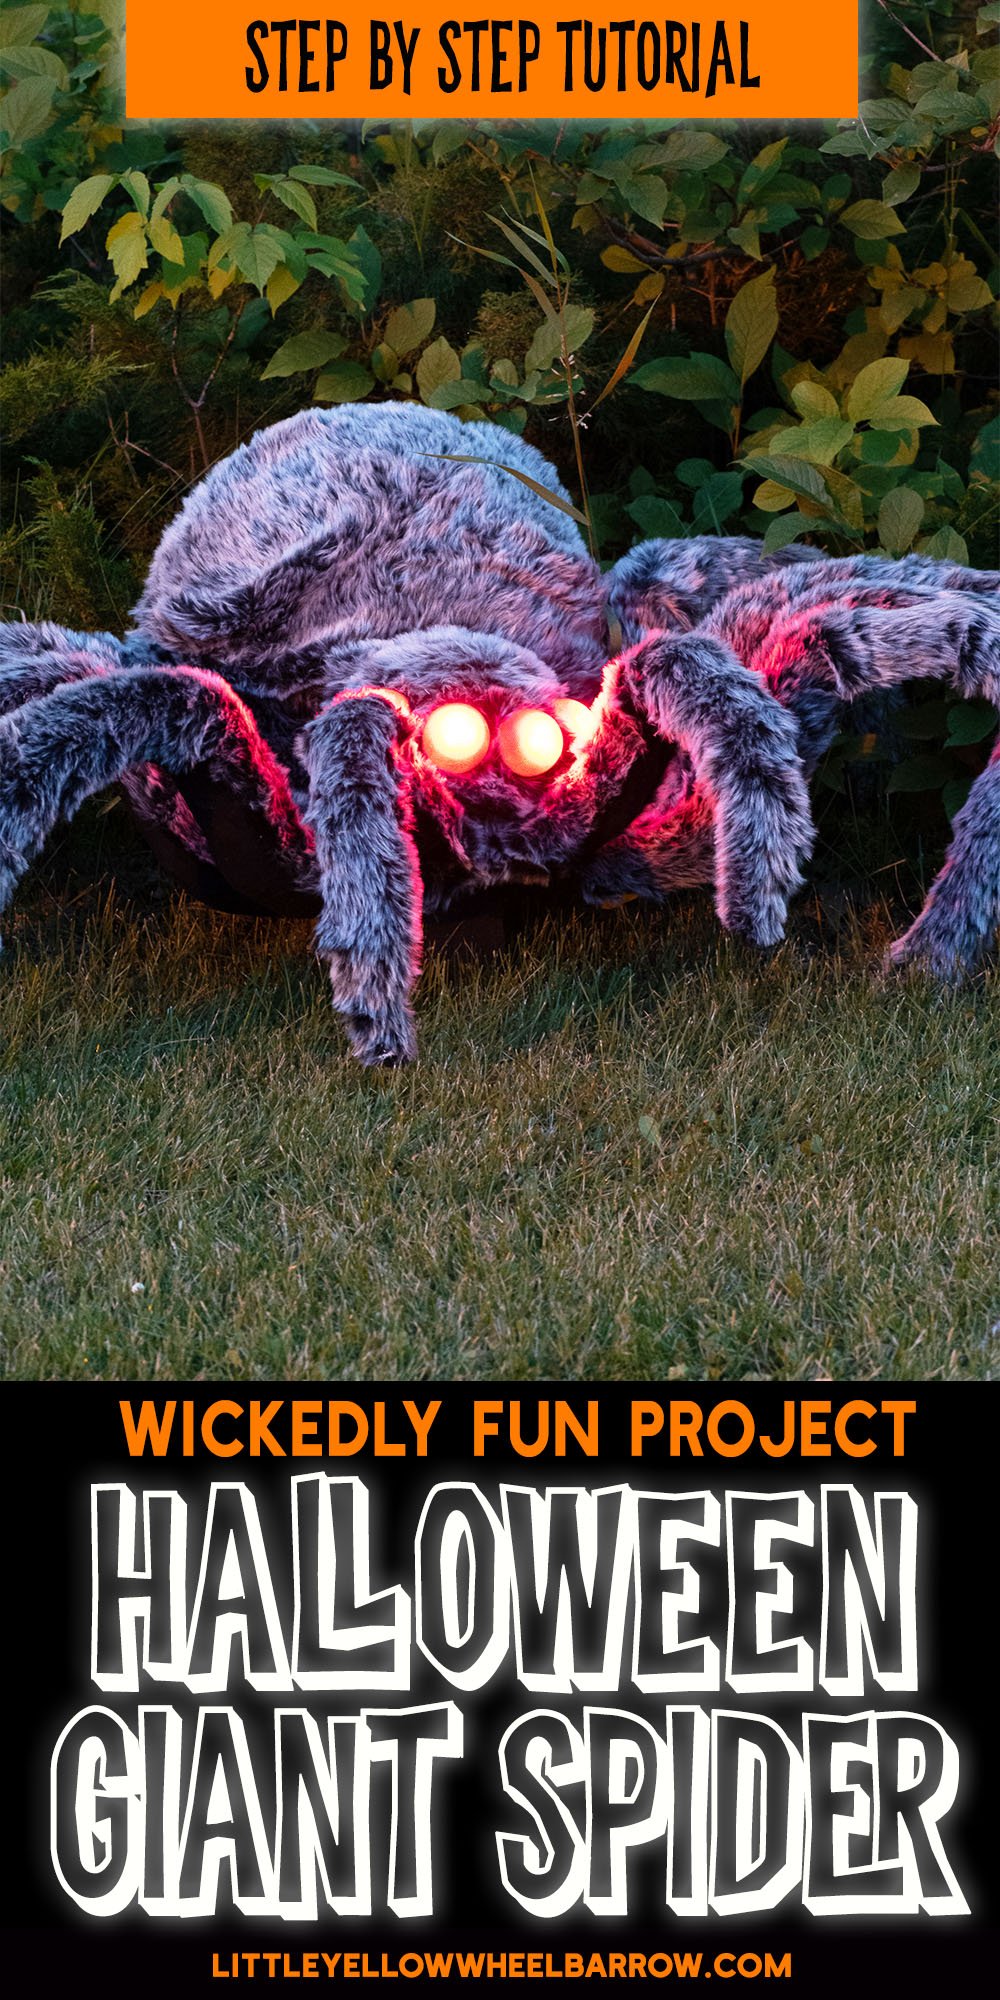
To give the eyes a bit of texture I just wrapped the ball tightly in a scrap piece of tulle, then gave it a light spray with black paint. You could use a paintbrush or even a felt marker. The trick is to leave a fair amount of red showing so that the lights can glow through.
Cut the small plastic ball in half, and glue the LED lights inside. We used these submersible remote-controlled lights that we also used on our Specimen Jars project. They’re weatherproof, and the remote actually works through the plastic ball, so you don’t need to take anything apart in order to turn the lights on and off.

Glue two eyes in place fairly close together at the front of the head, then two more a little further back and higher up. Put a line of glue along the top edge of each eye and press it into the fur so that there isn’t a gap between the fur and the rim of the eye. All that’s left is to turn on the lights!
Put your DIY giant Halloween spider somewhere to scare trick-or-treaters, your neighbours, or your arachnophobic friends. We had so much fun making this project, we would love to see your Halloween decoration setup with your own giant spiders!
Update September 2022
This post was originally published on August 1, 2020, and since then we’ve received a lot of great feedback and questions on this project.
Many people have wondered about the durability of the giant spider, which I totally get! With many of the materials coming from the dollar store, it makes sense to worry that they might not hold up in the elements; but after living two seasons outdoors, our original giant spider is still going strong! We’ve had to replace the batteries in the eyes, but other than that the fur, giant ball, and bubble wrap are all perfectly in tact.
Many Halloween spider plans that I’ve seen use PVC pipe for the legs and body. It certainly would be more durable, but I find that it’s harder to work with, and more expensive to build and repair. If something did happen to my Halloween spider, it would be very easy to remove a leg and rebuild it with a coat hanger and more black duct tape, rather than having to cut and re-glue PVC pipe.
We did notice that the reviews on the LED lights were getting worse and worse, so we’ve updated the link above to a better reviewed product at the same price.
Happy Halloween!

More Halloween Decoration Ideas:
Looking for more Halloween ideas? Check out these DIY Halloween decorations:
- DIY Halloween Tombstones
- Black and Gold Pumpkins for a Classy Halloween Display
- Glowing Jack-o-Lantern Shadowboxes
- Free Halloween SVG Files for any Project
- “Boo!” Bunting Decoration for Halloween Parties
- All Black Dead-Flower Halloween Wreath
- Cute DIY Gnome Vampires and Gnome Witches
- Our Super-Popular creepy Glowing Specimen Jars
- Or our Budget-Friendly Dollar-Store Halloween Wreath


A Giant Spider For Halloween
Materials
- Fur throw (or fun fur) 48inch s 48 inches min. We bought ours a bargain shop for $10.00
- 18 wire coat hangers
- One piece of scrap 1×6 (about 12 inches)
- One piece of scrap 2×4 (about 6 inches)
- Bubble wrap
- 2 rolls of Packing tape
- 36 fence staples
- Large rubber ball (about 14 inches) We found ours at Walmart for $3.00
- Two small red plastic balls (hollow)
- Lots of hot glue sticks
- Two battery-powered LED lights
- Hobby wire or twist ties
- Black spray paint
- Scrap tulle or mesh fabric
- One screw
Tools
- Hammer
- Pliers
- Wire cutters
- Hot glue gun
- Gloves (rubber dipped)
- Scissors
- Pen, pencil, or marker
Instructions
Step 1: Straightening Coat Hangers
- We used coat hangers for the legs on this spider. The coat hangers do not provide enough strength for the spider to stand on its own, but they ARE cheap and very easy to work with. They give just the right shape to the legs.
- The spider is stabilized to stand properly with a small piece of wood under it's belly.
- Cut 16 of the coat hangers near the hook and straighten them out. Don't worry about unwinding the twisted bit near the hook, we are going to hide that later with bubble wrap.
- On the end opposite the twisty bit, fold back about 3 inches of the hanger to create a loop at the end. Repeat for all 16 straightened hangers.
- Pull the remaining two hangers (like a bow and arrow) so that they are straightened out, but doubled up, with the hook at one end. Straighten the hook, too.
Step 2: Attach the Legs
- Draw a line across your 1x6 at the halfway point. Mark out 4 lines per side, pointing in the directions you want your legs to point.
- Using the fence staples, nail the loop end of the long hangers to the marks you made in step 4, using 2 hangers of each leg. One staple should have one leg inside the end of the loop, and the other should straddle both sides of it.
- Use the same method to nail the two shorted hangers to the front end of the board (for the mandibles).
- Twist each pair of hangers together to give them extra strength. Secure the end with hobby wire or twist ties.
Step 3: Shape the Legs
- Bend each leg upward about 3 inches away from the board, then downward in 2 more spots to make the shape of the spider's leg. The trick is to make sharp bends rather than gentle curves, to make it look like joints. It doesn't have to be perfect, you can make adjustments later.
- Bend the mandibles upward at almost 90 degrees, then once downward bend and a gentle curve back towards the body.
- Once you're happy with the general shape of the legs and mandibles, wrap them in bubble wrap and packing tape until they're about 2 inches thick.
- Paint the scrap 2x4 black. When it's dry, put it under the body of the spider so that it holds the spider up, then use a screw to hold it in place.
Step 4: Cover the Parts with Fur
- You may have to do some planning in order to get the most use out of your fur, so read this step entirely before putting scissors to fabric.
- Cut 10 strips of fur from your throw to cover the legs and mandibles. They should be about 6 inches wide by around 34 inches long for the legs, and 24 inches long for the mandibles. Be sure to cut with the direction of the fur, not across it. The spider's fur should point towards his toes.
- Wrap the fur around each leg, and secure it with hot glue. The fur is very forgiving, so if you have to make cuts or folds to make it around the bends in the legs, you can just cover it up by gluing down any extra bits.
- Wrap the large rubber ball with a large rectangle of fur, and glue it in place. The fur will bunch up at the ends, but you can actually use that to create really natural-looking folds. As before, use the hot glue liberally to hide any mistakes, and to keep the folds just where you want them. This is going to be the spider's big rear end.
- Bunch up another ball of bubble wrap and packing tape into a flat oval for the spider's head. It should be about 8 inches across. Wrap it in fur, too.
- If possible orient the fur on the head and body so that it points toward the rear of the spider
- Use any leftover fur scraps to cover the board you attached the legs to.
Step 5: Assemble your DIY Giant Halloween Spider
- Glue the body and the head of the spider to the board. Be liberal with the hot glue!
Step 5: Add the Eyes
- To give the eyes a bit of texture I just wrapped the ball tightly in a scrap piece of tulle, then gave it a light spray with black paint. You could use a paintbrush or even a felt marker. The trick is to leave a fair amount of red showing so that the lights can glow through.
- Cut the small plastic ball in half, and glue the LED lights inside. We used these submersible remote-controlled lights that we also used on our Specimen Jars project. They're weatherproof, and the remote actually works through the plastic ball, so you don't need to take anything apart in order to turn the lights on and off.
- Glue two eyes in place fairly close together at the front of the head, then two more a little further back and higher up. Put a line of glue along the top edge of each eye and press it into the fur so that there isn't a gap between the fur and the rim of the eye. All that's left is to turn on the lights!
Recommended Products
As an Amazon Associate and member of other affiliate programs, I earn from qualifying purchases.

