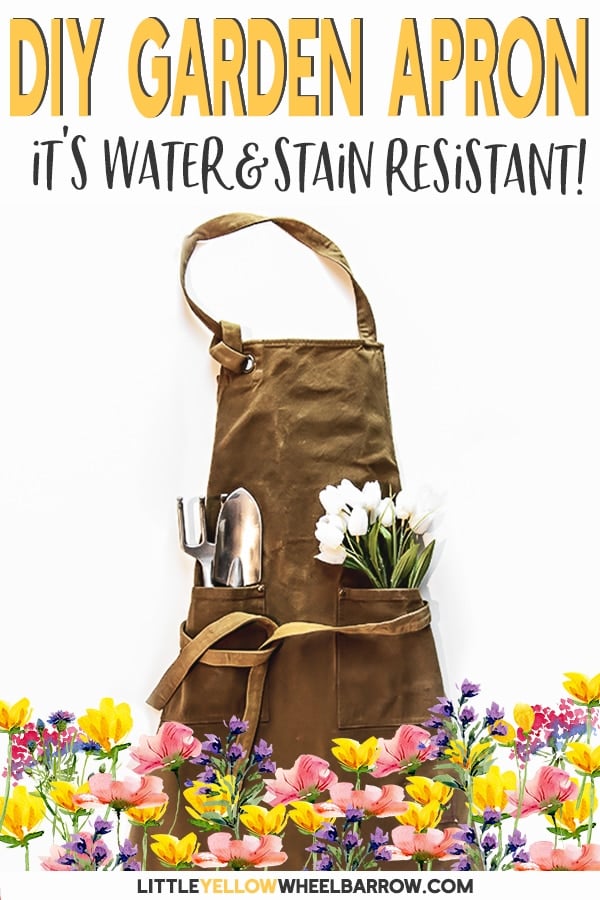
How I Made the Best Garden Apron Ever With Beeswax
So I was never one to go out and buy a garden apron. Most of my aprons for outside are old, ugly kitchen aprons that have seen better days.
And if you are one of those people who can garden and stay clean you do not need to read any further, actually you’re not even real, so just move along.
If I step outside with a hose in hand, I can come back 20 minutes later looking like I rolled around in the mud.
Oh and also, wet. Always wet. I can garden, but apparently, I cannot do it and stay clean.
It’s a sacrifice I am willing to make because – tomatoes.

How Waxing Canvas Created a Great Waterproof Apron
A few weeks back I made some beeswax wraps. They were super simple to make and have become a staple in my kitchen. Chances are if you know me in real life you’re probably getting a set for Christmas. Suprise!
But in all seriousness, I do love the beeswax wraps, and I am amazed at how easy they are to clean. Water beads off and never soaks in, so they stay dry. Smutz just seems to rinse off them. I am enamored with them.
So I started thinking about other things I could wax, things I needed to be waterproofed and things that needed to be easy to clean. Then it dawned on me, could I make a waxed canvas apron for outside in the garden?
Spoiler alert, you absolutely CAN wax a canvas apron, and it’s AWESOME.
~This post may contain affiliate links. If you click one and make a purchase, I may receive a commission at no additional cost to you.~
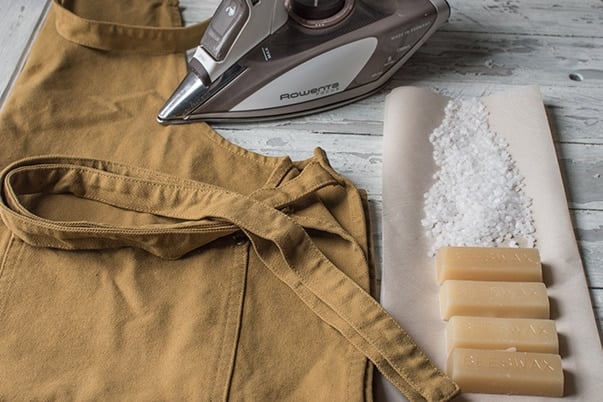
Tools and supplies to make a waxed garden apron
- Apron – make one, use an old one or buy one as I did. You can wax cotton too, just make sure it is a tight weave.
- Organic White Beeswax Pellets
 – I used pellets and wax bars because that is what I had. Pellets will melt faster so that is what I recommend.
 - Iron – This is the best iron I have ever owned, and I bought it based off of positive online reviews.
- Parchment Paper
- Jar to melt the wax (you will not use it again, so use something you are willing to toss)
- Foam Paint Brush
- Two old pillowcases
- old towel or drop cloth
Safety Notes and Tips (this is important, you should read it if you’re going to use this method to wax fabric)
Iron safety tips
Beeswax smokes when heated. Go slow and avoid getting it on your iron. If you do get wax on the iron, you need to wipe it off. If you leave it on the iron the wax will smoke enough to set off your fire alarms.
Beeswax is also combustible, so take all precautions. Don’t leave your iron unattended, or keep it on the wax and parchment for too long, keep your iron moving and you will not have any problems.
Clothes Dryer Saftey Tips
If your dryer is SUPER hot, set it on a medium temperature and do a few spot checks. If the wax is not melting, turn the dryer up.
The flash point of beeswax is 204.4 °C (400 °F), and even the hottest commercial dryers only reach 180 °F, but it is always better to be safe than sorry, so keep an eye out on that dryer.
Additional Tips!
Beeswax will also discolor over 85°F. I do not advise using white or light fabric unless you do not mind a bit of yellowing.
The hot wax may also pull dye up, so if you choose an apron with a colorful pattern, you may have some color bleed.
Step 1: Setting up your work area

Put down an old town or drop cloth to protect your working surface and turn your iron to the linen setting.
Place a piece of parchment down on your work surface and add your apron.
Place about two tablespoons of wax pellets on to your fabric in 6×6 increments.
Step 2: Melting the beeswax into the cotton canvas

Add your top sheet of parchment paper and place your hot iron on top, gently moving it back and forth over the area with the wax beads.
It takes a minute to get the beads completely melted. You can lift your parchment to check the progress. If you see any unmelted wax, you can continue to pass the iron, but you don’t have to catch every piece. Eventually, it will all get melted.
Step 3: Covering your apron with beeswax

Continue working in 6×6 increments until you have all of your garden apron coated with melted wax.
There will be areas, like the hem, or around the pockets, or the apron strings that will be difficult to wax this way. Don’t worry about them; we have a step that takes care of all the missed nooks and crannies.
Also do not be concerned at how bad it looks at this point. It all comes together in the end.
Step 4: How to get those tricky areas with melted wax
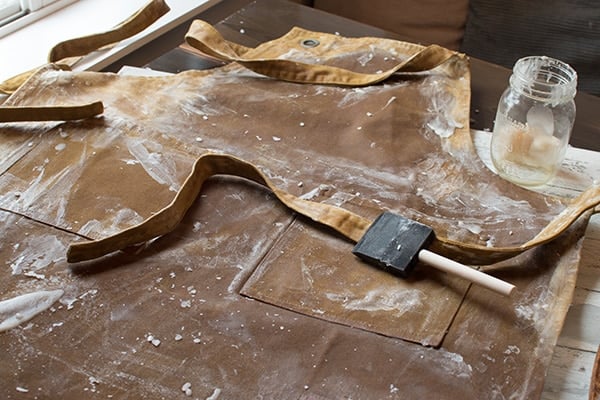
The next step is to melt a pot of wax. We’re going to use the melting pot of wax and a paintbrush (I used a foam brush) to paint on the beeswax onto the areas that we missed.
The easiest way to melt the wax is to use a double boiler method. I used a small pan of water and a mason jar, which worked perfectly. No worries about the mason jar cracking under heat, and I have so many of them that It was not a problem sacrificing one up to this project.
I added 120 grams of wax to my jar, and it took about 5 minutes to melt down. I only used about half of that, and I left the wax in the jar when it hardened and tucked it away to make more bees wrap wraps in the future.
The jar is hot, use a mitt, but work quickly. You want to paint your wax on before it starts to harden, and it starts to harden very quickly.
Paint it on any areas you missed like the apron strings, pockets, and hemlines. We want to make sure every spot has a bit of wax but use a light hand. We do not want areas that have too much wax, or it will make a glorious mess during the next step.
Step 5: How to melt the wax to get a perfectly even finish on your fabric.

Once your apron is wax painted it is going to be hard to bend if the wax cools.
The apron does get hard, don’t worry about that, we have a solution for that too. But you want to try to get the apron rolled or folded before it becomes too stiff to do so.
We need to put the newly waxed garden apron into a double ( I said double, don’t cheat out on this or you will curse me for the rest of your life) pillowcase.
If you do not double the pillowcases, the wax on the apron will make it’s way past the single layer of protective fabric. If the wax seeps past your layer of fabric protection, it will leave a film in the drum. You can rub if it off, but it does take a lot of work.
If you were heavy handed with your wax painting, you might want to go three layers thick to protect the inside of your dyer.
Make sure you tie off your pillowcases well. I didn’t, and eventually my apron made it out of the first layer of pillowcases, and of course, it left a waxy film on the inside of my brand new dryer. I had to rub it off while the dyer was still hot and it was not fun. Up until that point, there was no issue, so I know from experience that one pillowcase is not enough, but two does do the trick.
Toss the whole thing into your dryer and set it for 2 hours.
During these two hours keep an eye on your wax apron. Do a few quick spot checks and adjust the apron inside of the pillowcases for even heat distribution.
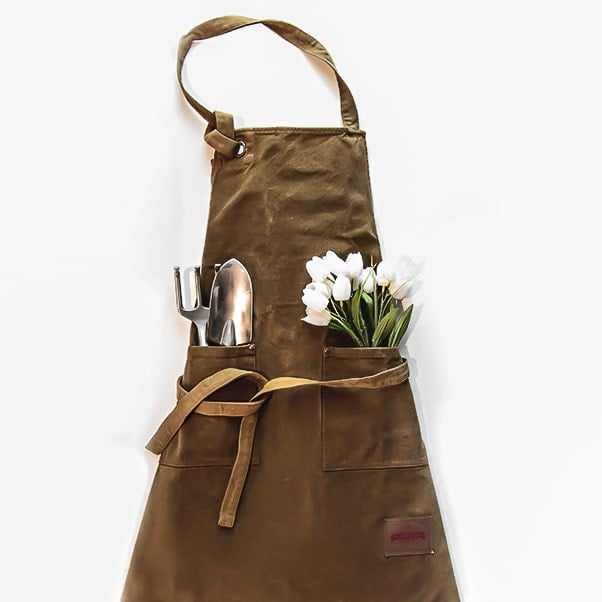
After two hours your garden apron will look like the photo above – fully waxed and melted evenly.
Let your new garden apron dry for an hour or two.
Step 6 Softening up the waxed canvas
The canvas will look great but will feel like plate armor. I mean a great look for any gardener really, but not at all practical. Hard to bend in an apron that is stiff as a board.
We need to work it out and soften it, the same way you would soften a waxed jacket, or waxed bag. The more use it gets, the more pliable it is. I also learned this lesson with my beeswax wraps. The more I used them, the softer and easier they were to use.
So roll, crunch, crinkle, and roll some more until that fabric becomes pliable.
This process will work with any heavy cotton apron. Find one that you like that suits your needs and try waxing it.
For the cost of an apron, some wax and afternoon you can have a garden apron that keeps you dry, keeps you clean and rinses off with a hose!
It really has become one of my favorite gardening tools. I still manage to get wet and I still manage to get dirty, but I look pretty styling in my little yellow apron out in my garden, so that has to count for something?
Looking more more craft projects?
Check out these fun and easy projects, including a few more wax-related posts:
- How to Make Soy Wax Candles
- DIY Beeswax Kitchen Wraps
- Restoring an Old Dresser with Fusion Mineral Paint Bayberry
- How to Make Natural Dyes
- How to Make Potpourri Using Dried Flowers


