DIY Wooden Planter Box: A Simple Garden Woodworking Project

Crafting your own DIY wooden planter box is a rewarding and creative way to elevate your indoor or outdoor space while indulging in some hands-on craftsmanship. Whether you’re a seasoned DIY enthusiast or just starting, constructing a wooden planter box offers practicality and aesthetic appeal. This article will explore step-by-step instructions and essential tips to help you create stunning wooden planter boxes that breathe life into your greenery and décor.

These wooden planters are easy to make and easy on the wallet. I made mine using scrap wood and some “spare” construction shims that I took from another project, but even if you bought all the materials new, it would still be a cheap project. There’s nothing quite as fulfilling to me as repurposing scrap wood for a fun project, especially if it means getting involved in some gardening!
Tools and Materials Needed
Essential Tools
To create your DIY wooden planter box, you will need a few essential tools. First, grab a measuring tape to ensure accurate dimensions for your project. A powered mitre-saw (or chop saw) is recommended, but this project can be completed with a hand saw. You’ll be using a few nails on this project, so grab a hammer, or if you have one a finishing- or brad-nailer.
For sanding down rough edges and achieving a smooth finish, keep sandpaper nearby. A foam brush will be needed to stain your planter. Clamps always come in handy, especially when gluing a project, and don’t forget about safety gear like gloves and goggles for protection while working with tools.
- Saw (either powered or hand-saw)
- Measuring Tape
- Pencil
- Foam Brushes
- Hammer (or finishing nailer)
- Quick-Clamps (recommended)
- Safety Glasses
- Work Gloves
- Rags

Required Materials
Gather all the necessary materials beforehand. Ideally choose a wood suitable for outdoor use; cedar is an excellent choice due to its durability against weather conditions. But don’t think that cedar is the only option – pine is cheaper and will work great indoors and even outdoors, it just won’t last quite as long as cedar. Avoid using treated wood, as the chemicals can leech into the soil, potentially affecting the plants.
- One (1×4) board at least 30 inches long
- One(1×6) board at least 42 inches long
- Wood Glue
- Wood Shims
- Wood stain of your choice – I used Minwax Early American
- 1.5-inch Finishing Nails
Cut List
Cut your boards before starting on assembly. Once the glue comes out you don’t want to be messing around on the saw!
- Two 1×6 cut to 20-inches
- One 1×4 cut to 20-inches
- Two 1×4 cut to 4 1/4-inches
- Cedar construction shims cut to 2 1/4 inch lengths (40-45)
Step by Step:
1. Precut your Wood
Decide how many planters you are going to make, and cut the wood per the cut list above. Don’t forget the safety glasses!

2. Attach the Sides to the Base
Our first step is to attach the two small 4 1/4 inch (1×4) pieces to the 20-inch (1×4) base piece. Use a bead of wood glue and nail 2 or 3 finishing nails straight up through the base into the end of each side piece.
I used the brad nailer and air compressor, but a simple hammer would work here as well. If you plan on using a hammer, I recommend clamping the pieces to a table or workbench so that they don’t fall over when you take a swing with the hammer.
You do not need to wait for the glue to dry to move onto the next step, but be careful when moving the planter not to knock the ends off.

3. Attach the Front and Back
Once we have our two sides attached it’s time to add the front and back pieces.
Add a good bead of glue along the front and side pieces and lay the 20-inch (1×6) board across the front. Clamp and add a few finishing nails along the sides and bottom to hold your pieces in place.

Add a good bead of glue along the front and side pieces and lay the 20-inch (1×6) board across the front. Clamp and add a few finishing nails along the sides and bottom to hold your pieces in place.
Flip the planter over and repeat this on the other side. For the sturdiest results, leave the planter clamped overnight until the glue has set before moving on to the finishing touches.

4. Attach Shims
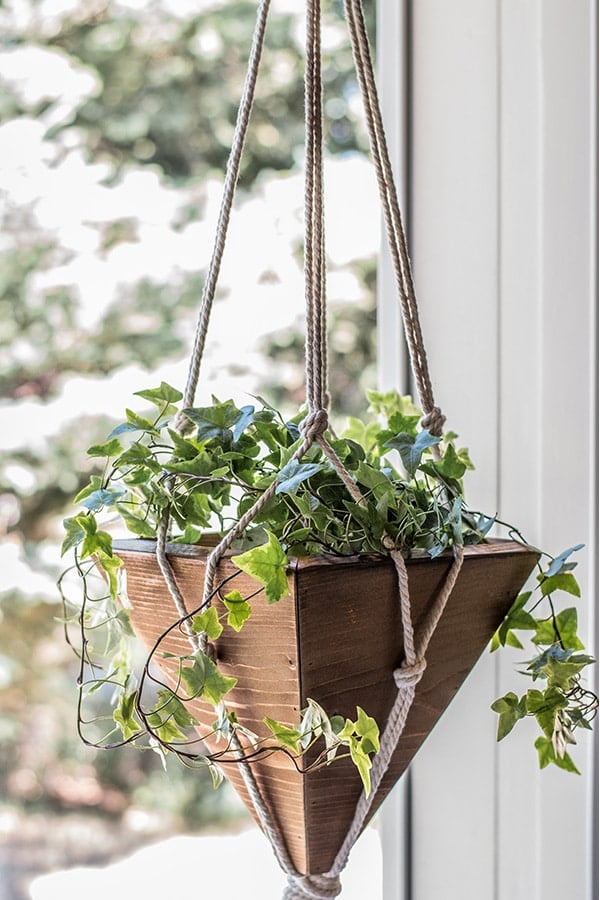
I just love the look that the little construction shims gave this project, it looks like a little cedar-shake house!
Add your first layer of shims over the face of the box in two rows. You are just placing them on the board to fill the front face. If there is a small gap between the top layer and bottom layer, that’s OK, you can ignore it. That gap gets filled when we add the next layer.
Align your shims on the front face of your planter so that they are all different size thickness, don’t match them up. Lay them out so that they are well mixed up.
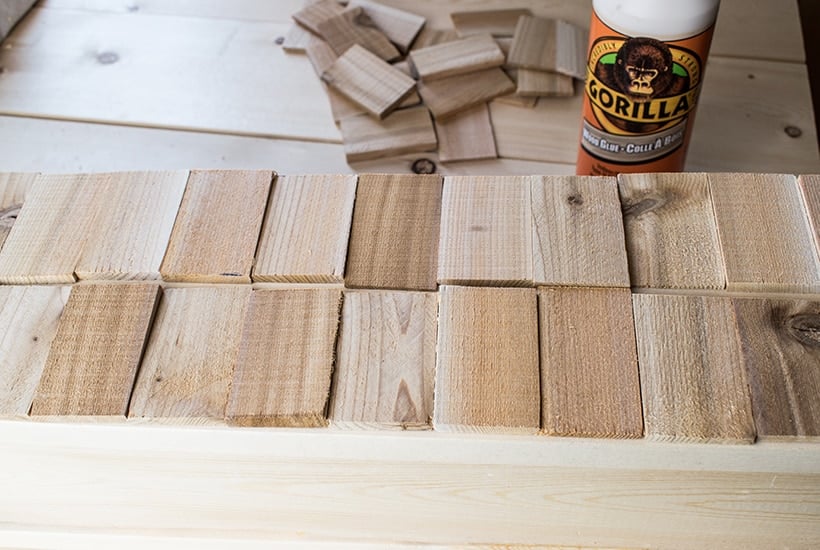
Once you have a pattern that you like, go ahead and lay a heavy bead or two of wood glue under each row and place the shims back in place. Don’t worry about nailing them, they will most likely just split and frustrate you.
5. Attach the Second Layer of Shims
The next step is to add the center row of cedar shims to the front of your wooden planter.
Once you have the pattern set to the way you like it, go ahead and lay down a bead of glue along the center and put your middle row of shims in place. You want to mix up the heights here, add some low, and some high to add a pattern and texture to your wooden planter.

Because the shims are different thickness, you’re going to find that they have difficulty fitting flat. Don’t worry about that, just add a bit more glue to those areas. This adds a bit of dimension, and that’s what we want.
Press the shims firmly into place. Clamping would be difficult because of the different heights, and nails are likely to split your shims. They are purely decorative, anyways, so I just let the glue do the work.
6. Sanding
This is a rustic project, so it doesn’t need to be sanded smooth. The rough texture of the wood actually enhances the look of the stain in this case. Just sand the cut edges where the saw made splinters, and you’re ready for stain.
7. Stain
Apply your stain of choice using a foam brush. Excess stain can be dabbed off with a clean rag. If your stain turns out too light, you can add a second coat to darken it. Allow your planter to dry per the instructions on your stain.
Expert Tips
Test your stain: Choose some scraps of wood and test your stain. Remember if you are using different types of wood for the box and shims that they will take the stain a bit differently. Testing the stain enables you to be sure that the color will match the decor in the room. I know too well the pain of finishing a project and setting it up only to find out that the stain didn’t turn out quite how I wanted, and now I have to start again.

Pre-cut your pieces: Having pre-cut pieces makes the assembly go a lot faster! Get it all done in one go and you won’t be wandering back and forth from the saw wondering where you left the tape measurer (as much).
Layout your wood before gluing: Before you start to glue and nail your project, lay out the pieces together to make sure the dimensions are correct! You never know when a pencil line will just move and you’ll end up with a piece that’s too short or too long (it happens to me, I swear).
Keep a wet rag on hand: Use a wet rag to wipe up any spilled or dripped glue right away. This will save you from having to sand it off later!

Frequently Asked Questions
At bare minimum you’ll need some boards, some glue, and a saw. To make the project easier, also grab your tape measure, a hammer and some nails.
Opt for rot-resistant woods like cedar or redwood for longevity. Ensure the wood is untreated if planting edibles. Consider the aesthetics of the wood grain as well as its durability in different weather conditions. You can even use pine scraps, the planter will still turn out beautiful, it just won’t last quite as long.
Experiment with different shim shapes, sizes, and stain colors to match your style preferences or garden theme. The planters can also be crafted without the shims, resulting in a smooth front that’s primed for paint, stencils, or any creative embellishment you can imagine!
Final Remarks
You’ve now got the tools, know-how, and inspiration to craft your very own wooden planter box. From selecting the right wood to customizing the design, you’re all set to bring your greenery dreams to life. Get creative, experiment with different styles, and let your inner DIY enthusiast shine through as you embark on this woodworking journey.
So, what are you waiting for? Roll up your sleeves, grab those tools, and start building your DIY wooden planter box today. Your plants will thank you for their stylish new home! Happy crafting!
More DIY Projects You’ll Enjoy:


DIY Wooden Planter Box
Learn how to build a DIY wooden planter box for your garden or windowsill.
Materials
- One (1x4) board at least 30 inches long
- One(1x6) board at least 42 inches long
- Wood Glue
- Wood Shims
- Wood stain of your choice - I used Minwax Early American
- 1.5-inch Finishing Nails
Cut List
- Two 1x6 cut to 20-inches
- One 1x4 cut to 20-inches
- Two 1x4 cut to 4 1/4-inches
- Cedar shims cut to approximately 2 1/4 inch lengths (40-45)
Tools
- Saw (either powered or hand-saw)
- Measuring Tape
- Pencil
- Foam Brushes
- Hammer (or finishing nailer)
- Quick-Clamps (recommended)
- Safety Glasses
- Work Gloves
- Rags
Instructions
1. Precut your wood per the cut list.
2. Attach the sides (1x4 at 4 1/4") to the base (1x4 @20") using a bead of glue and 2 or 3 finishing nails.
3. Attach the front to the base and sides with a bead of glue and a few nails.
4. Flip the project and attach the back in the same way.
5. Layout 2 rows of cedar shims along the front of the planter. Once you have some variety in heights, attach them with glue.
6. Layout another row of shims to cover the gap between the first 2 rows. Stagger the position of the shims to create a bit of visual interest. Attach with glue.
7. Sand down and rough or splintery edges.
8. Stain your project the color of your choice.
Notes
Test your stain. Choose some scraps of wood and test your stain. Remember if you are using different types of wood for the box and shims that they will take the stain a bit differently. Testing the stain enables you to be sure that the color will match the decor in the room. I know too well the pain of finishing a project and setting it up only to find out that the stain didn’t turn out quite how I wanted, and now I have to start again.
Pre-cut your pieces. Having pre-cut pieces makes the assembly go a lot faster! Get it all done in one go and you won’t be wandering back and forth from the saw wondering where you left the tape measurer (as much).
Layout your wood before gluing. Before you start to glue and nail your project, lay out the pieces together to make sure the dimensions are correct! You never know when a pencil line will just move and you’ll end up with a piece that’s too short or too long (it happens to me, I swear).
Keep a wet rag on hand. Use a wet rag to wipe up any spilled or dripped glue right away. This will save you from having to sand it off later!

Author: Warren Kennedy
Writer, Editor, and Builder at Little Yellow Wheelbarrow
Editor’s note: This article was originally published March 16, 2018. It was updated on February 9, 2024, for clarity and reader experience.
