How to Build a DIY Pot Rack and Secure it to Your Ceiling

Ok, I read all your emails, and I get it, people want the plans for that DIY pot rack in my kitchen.
Ever since I put the post about our small kitchen storage solutions I’ve been getting emails about the pot rack.
But, I don’t have in process pictures for this post because when I built it, I had no idea I would be sharing these projects on a blog.
My husband was kind enough to recreate these plans in Sketch-up for me. So not a lot of pretty pictures with this post, but the diagrams he created are very clear.
If I Can Make a Pot Rack Anyone Can – Customize Your Own!
Honestly, this DIY pot rack was slapped together pretty organically. It was one of my first (unsupervised) projects, and I winged it all the way!
I couldn’t ask the hubby to build anything else; he was in the middle of trying to repair and restore our 100-year-old badly damaged floors. I’m pretty sure his head would have exploded if I had said “Oh honey, and also this.”
I also looked everywhere for a pot rack that I liked that would fit adequately above our sink. That was my first option. Just buy one, save the time and move to the next project. But all the pot racks I found were either too big, too small, or outrageously priced.
I really wanted a wall pot rack, but space was limited, so I was forced to find a free ceiling space. My choices were above the sink and over the window, or over my small kitchen dining island space. I opted for above the window only because I needed to keep my above island light, or else that’s where I would have preferred to hang my pots and pans.
I decided to roll up my sleeves and figure out how to build one. I didn’t need to buy any wood, all I needed was the chains, hooks, and fasteners, but even including the wood, the project comes in under $50.00.

How this pot rack came to be
I went upstairs, dug through our stash of offcuts and found enough 2×3’s to put together a frame. From there, I just winged it.
I measured to get an exact fit for my DIY pot rack spot so my plans may not be the best plans for you. You can take what I did for my area and apply them to yours. Make the pot rack the same width, but adjust your length to fit where you need it.
Creating custom sized and designed pieces for your space makes a difference, I find when something fits just right, it looks intentional, and the area pulls together.

Materials and Tools Required
Materials
- Screws 1 1/2 inch for the pot rack and 3-inch screws to attach the base to the ceiling
- Wood Glue
 (we only use Gorilla glue)
 - 12 Pack Heavy Duty S Hooks
I am going to suggest that you go to your local hardware store and pick up these items for your DIY pot rack. It will be far cheaper and you can look at the chain, clasps, and links to make sure they all work together.
You will also be able to buy exact amounts of what you need instead of having to buy a larger pre-pack.
- Wood plugs (the same diameter as your Countersink bit)
- 8 feet of 3/16 inch zinc-plated proof coil chain
- 8 D-ring anchor 1 1/2 inch
- 1 1/2 inch screw in hooks ( to hang the pots and pans)
- 8 threaded chain links 3/4 inch
Tools required
- Mitre saw ( you can get away with a hand saw for this project)
- Drill
- Countersink bit
- Stud Finder (this is the one we have and it works very well)
- Kreg Jig System
Cut list
- 2x 2×3 @ 4ft
- 6x 2×3 @ 1ft
- 1x 2×3 @ 18in
- 2x 2×8 @ 4ft
Step 1
Attach one of the 1ft 2×3’s at the very end of the 4ft 2×3: Countersink two screws through the 4ft board, apply glue to the end of the 1ft board, and screw them together.
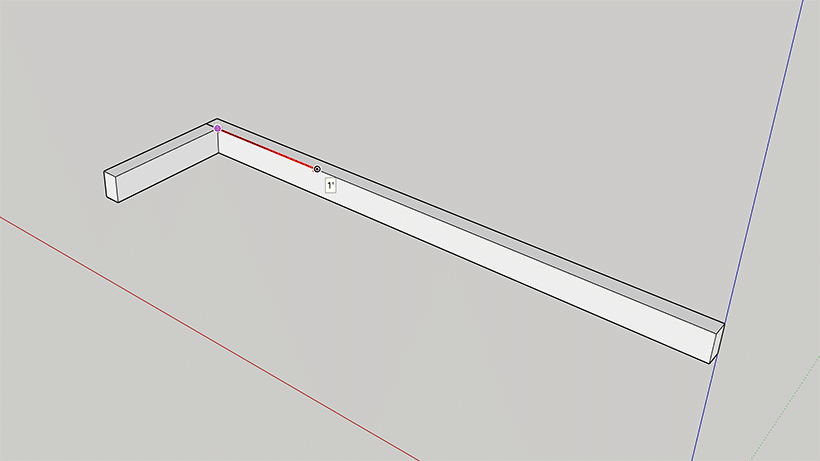
Step 2
Attach the next 1ft piece in the same way, with 12 inches between it and the first one.
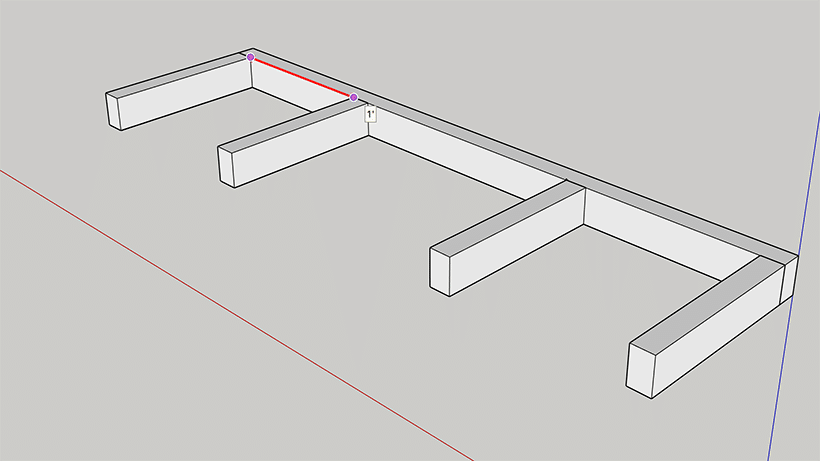
Step 3
Attach the next 1ft piece, 18 inches from the last one.

Step 4
Attach the next 1-foot piece at the very end of the 4-foot board. There should be 1 foot between it and the previous one.
Step 5
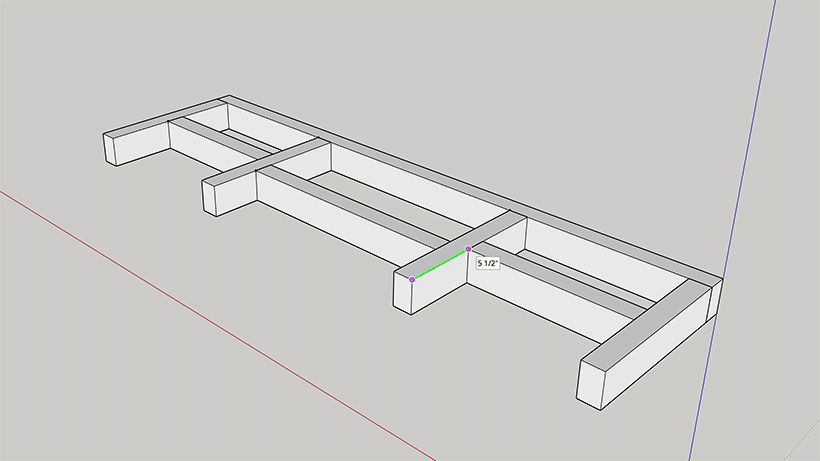
Attach another 1-foot piece in between the 1st and second boards from steps 1 and 2, 5 1/2 inches from the end. Use 2 countersunk screws at either end to secure it in place.

Step 6
Repeat the above step at the other end of the rack, attaching another 1 foot 2×3 in between the pieces from steps 3 and 4.
Attach the 18-inch piece in the middle section, using countersunk screws the same way as the other two, this time 4 inches from the end of the 1-foot cross pieces. (measurement not shown in the diagram)
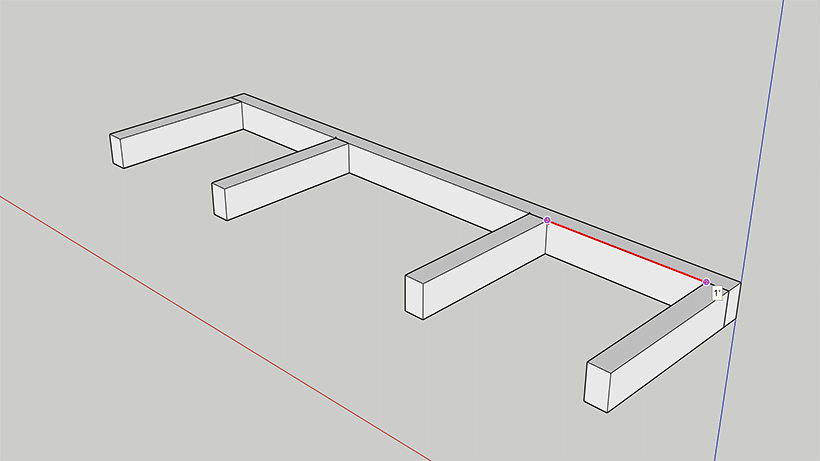
Step 7
Attach the second 4ft 2×3 to each of the 4 1 foot cross pieces using 2 countersunk screws into each crosspiece.
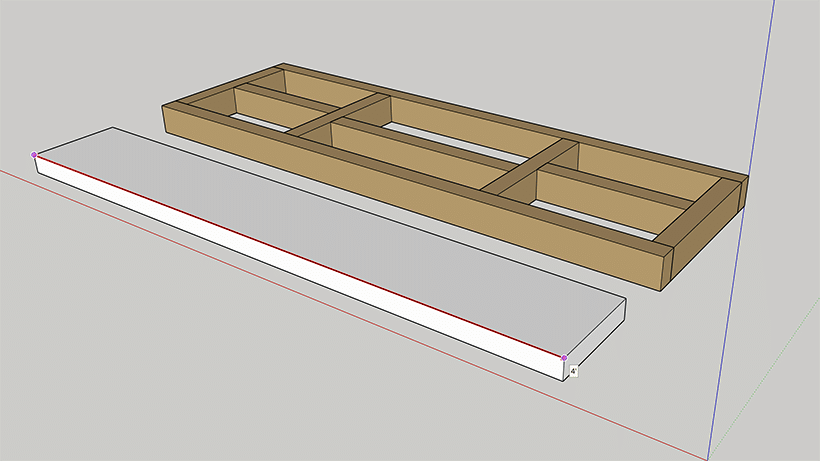
Step 8
Using a Kreg-jig and wood glue, secure the two 4 ft 2×8’s together, side by side to form a ‘base’. 8 screws will be more than adequate.
If you are unsure how to use the Kreg-Jig to join two pieces of wood together you can check out this fantastic how-to video from Lowes.
Step 9
Add your hooks for your pots. I added mine only to the center of the base. Ten hooks fit very well and stagger my pots and pans perfectly. I added 3 to the left, 4 in the middle, and 3 to the right of inside wood pieces that make up the frame.
If you have more pots, or if you are hanging this over an island, you can add more hooks to the outside frame pieces.
Stain, paint, or finish your pot rack however you wish. I suggest if you are going to stain it to make sure you give it sanding with 120 sandpaper and use a wood conditioner prior to applying your stain. This will give you an even finish.
Be sure you stain your wood plugs at the same time.
I did not add wood plugs to the outside of my frame, instead, I spray painted some large screw heads and glued them over the holes. It adds a nice industrial feel to the pot rack.
Completely optional, wood plugs would work and once that rack goes up, you won’t even see them. I forgot I even use screw heads on the outside until my husband mentioned I should add it to the post.

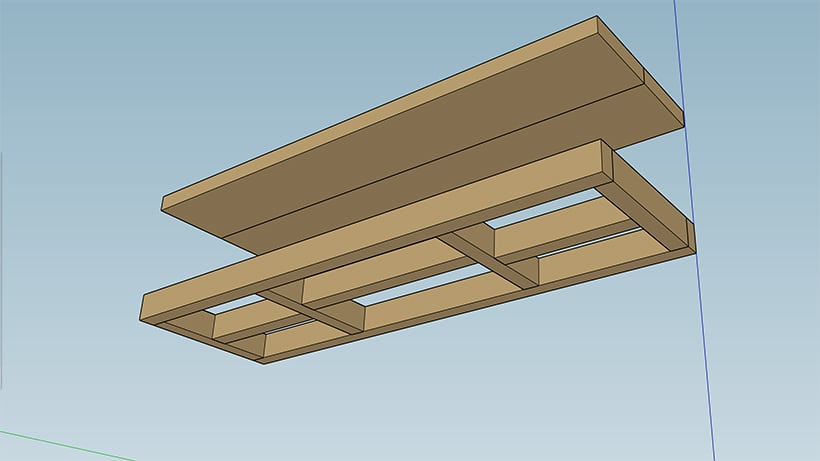
Securing your DIY pot rack to the ceiling
It’s important to get this piece right. You need to ensure that you are screwing into studs. Anchors here will not work, don’t even try it.
You need to find the studs in your ceiling first and mark them. You can use a stud finder to find the stud locations. Your studs may not line up perfectly with your pot rack. If that’s the case don’t worry about it. The holes will be covered with plugs and stained and you will never see them.
Countersink holes into the 2×8’s so that they will line up with the center of the studs. You want at least 8 screws PER 2×8.
Attach the base to the ceiling, screwed deep into the studs. Fill the countersunk holes with the wood-plugs using carpenters glue (we love Gorilla Glue, and we don’t get paid for saying that, it’s truly our favorite wood glue)
Attach one clasp at each corner on the top of the rack, and at each corner of the 2×8 ‘base’.
Getting a rustic look on your chains
Our chains, hooks, and fasteners were shiny metal, not the look I was wanted. I intended to spray paint the chains, but I was worried the paint would eventually chip.
My husband had the great idea to rust them. I added all the chains and bits and bobs to a jar of vinegar. In the morning all the metal had a nice patina of rust or turned a dark grey.
In order to get the metal to patina, you need to start out with zinc pieces. Stainless steel will not rust or patina.

Attaching the chains to your DIY pot rack
Securing your frame to the base with the chains takes a bit of fussing.
We crossed our chains and connected them to the top while holding the frame in hand. It was awkward, and I almost fell off the countertop, so if you’re going to do this I highly suggest a sturdy ladder and at least two people. Three would be best!
Attach the ends of the chain to the clasps using the threaded chain links.
Once your chains are attached, you can adjust them. It does take a bit of trial and error. I had to change the height a few times to get it right.
I didn’t want my pots covering my entire window, but I had to be able to reach up and grab them easily.

How to get the height right
My suggestion is to fiddle until you get the height right. My ceilings are nine feet, so you may not have the same space gap between the base and the rack. Test it with your pots to make sure it’s comfortable to reach and not too low that it is in your way.
Once your chains are up, you can snip off the excess with bolt cutters or a Dremel.
I chose to keep my chains long because it added a bit of rustic industrial feel to the DIY pot rack. The hanging chains also make a great spot to attach all my stainless steel utensils.
When you have a small kitchen any little extra storage space makes a difference. In my kitchen, I use those hanging chains for anything in my cabinets that were stainless including things like my cheese grater and a flour sifter.
It doesn’t sound like a lot, but it created so much extra space for me!

How to keep your DIY pot rack looking great.
I only put my stainless steel pots, pans, and utensils on my pot rack. This makes it look more unified and tidy, but your kitchen: your rules.
The pots and utensils are used enough that I never get dust on anything, all pieces are in heavy enough rotation that they get washed frequently.
This DIY pot rack does require cleaning every few months. I find the metal chains get a bit greasy and dusty and they require a wipe down. It isn’t difficult; it only adds a few minutes to your cleaning routine every few months.
I have a cleaning tip and trick too. If you do hang your stainless steel and you want them to sparkle and shine on display, I highly recommend Bar Keepers Friend for stainless steel.
I am telling you, it makes your pans SHINE like new. I cannot say enough good stuff about Bar Keepers Friend! It also takes all the black marks and scuffs off my white porcelain sink without a bit of fuss.
It’s like magic in a canister!
Want More Farmhouse Style Home DIYs?


Make sure that your pot rack is secured to ceiling joists in at least 4 places. If the joists don’t line up with your hangers, you can attach the hangers to a board, then secure the board to the joists.
You could use a hanging pot rack for kitchen utensils, of course, or to hang herbs for drying, or as a hanging photo collage! Anything that you need within easy reach, and in any small space that could use some vertical organization.
As you can see, we chose to hang our pot rack over the kitchen sink. The perfect place would have been over the kitchen island, but we couldn’t move the lighting fixture that was there.
The hooks on your hanging rack should be about 40 to 48 inches from the surface of your workspace.
You can use S hooks to hang all kinds of cookware from ceiling pot racks.
Small kitchens that are limited in cabinet space are ideal spots for hanging pot racks. If your kitchen space feels disorganized, or you just don’t have room for pots and pans, consider a pot rack! Installing a hanging pot rack is one of the easiest ways to add a functional focal point to your kitchen design.
I made this pot rack myself, with almost no woodworking experience. It’s a simple design, and was very easy to put together.
Editorial Note: This post was originally published on October 4, 2018, and was updated on February 21, 2022.

