How to Make Rustic Stackable Storage Bins
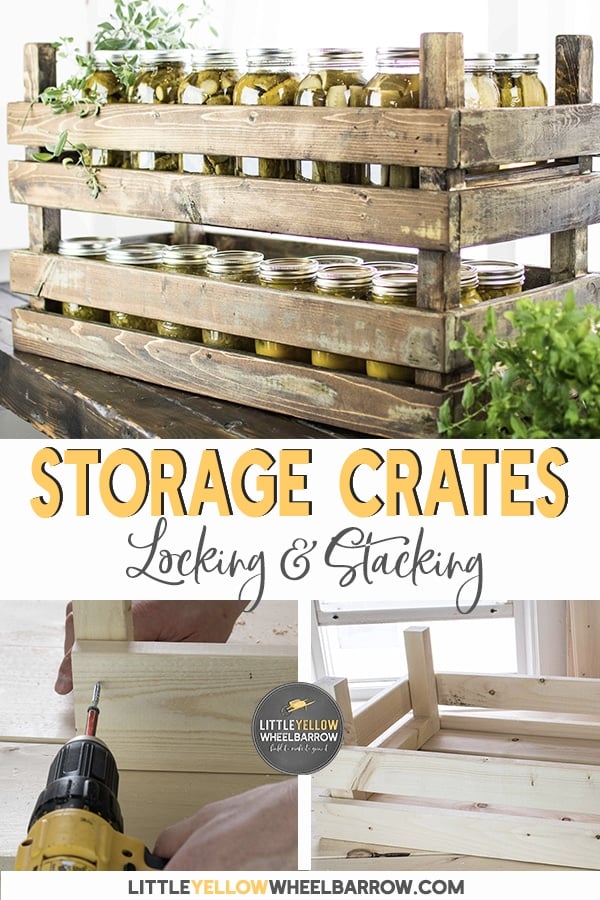
I made these stackable storage bins in a single afternoon. They were incredibly easy to build.
I have a large (large for me!) garden, and in the summer it supplies us with bushels of fresh vegetables and fruits. I preserve all through the season, with jars of pickles, tomatoes, salsa, if you name it I likely have it stacked in the basement somewhere.
If you make preserves, or can your garden bounty, you will no doubt have quite a few extra mason jars floating around in mid-winter.
I have hundreds of these jars now! I started buying mason jars in conjunction with my tomato-growing addiction, and like everything around this house, they got out of hand. They are everywhere! I swear, they all multiply like rabbits.
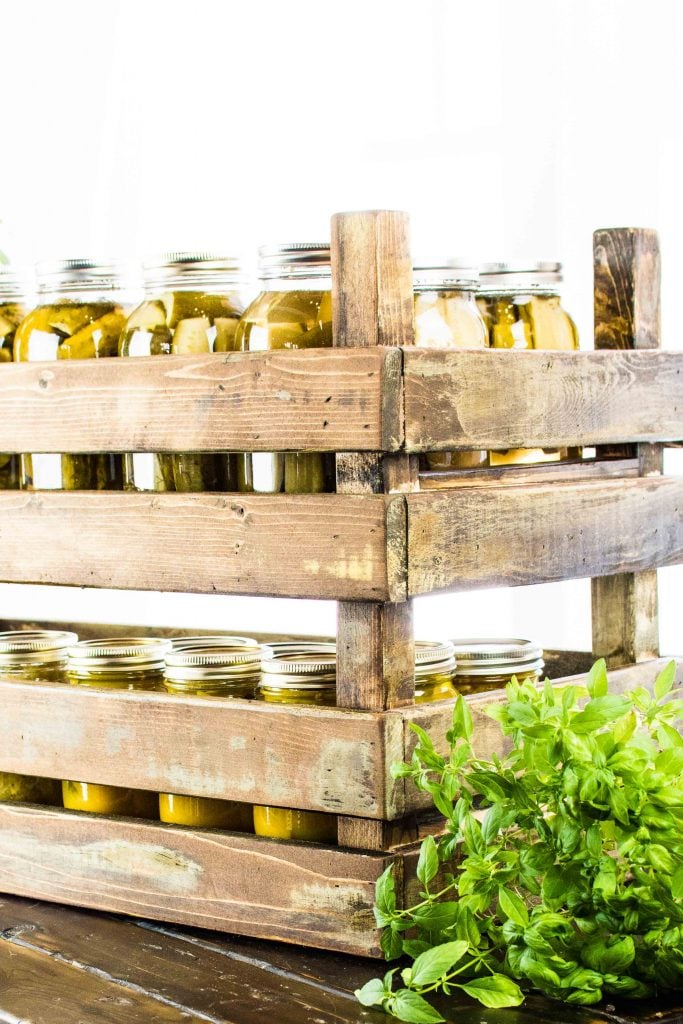
So I sat down and designed a stackable, locking crate that would be tall enough to store my whole tomato quart jars and keep them safe and out of the way until summer rolled back around again.
My DIY Stackable Storage Bins
I took inspiration from vintage tulip crates. They are stackable, and rustic and I could tweak the design with a solid bottom and size them for my canning jars. I also figured that I could make these inexpensively from some simple 1x2s and 1x3s.
They worked so well I am building at least a dozen for my cold storage room.
I made these stackable storage bins in a single afternoon. They were incredibly easy to build.
I have a large (large for me!) garden, and in the summer it supplies us with bushels of fresh vegetables and fruits. I preserve all through the season, with jars of pickles, tomatoes, salsa, if you name it I likely have it stacked in the basement somewhere.
If you make preserves, or can your garden bounty, you will no doubt have quite a few extra mason jars floating around in mid-winter.
I have hundreds of these jars now! I started buying mason jars in conjunction with my tomato-growing addiction, and like everything around this house, they got out of hand. They are everywhere! I swear, they all multiply like rabbits.
So I sat down and designed a stackable, locking crate that would be tall enough to store my whole tomato quart jars and keep them safe and out of the way until summer rolled back around again.
My DIY Stackable Storage Bins
I took inspiration from vintage tulip crates. They are stackable, and rustic and I could tweak the design with a solid bottom and size them for my canning jars. I also figured that I could make these inexpensively from some simple 1x2s and 1x3s.
They worked so well I am building at least a dozen for my cold storage room.
Stackable Storage Bins Cut and Supply List
Supplies
- Carpenters glue (my favorite is Gorilla Wood Glue
)
- 1-inch screws
- 2 (1″x3″x8′)
- 1 (2″x2″x8′)
- 1 (1″x4″x8′)
- Stain or paint – I used Minwax Early American
 mixed with a bit of paint to fake a worn texture.
 - Finishing nails
- Foam Brushes
Cut List
- (4) 1″x3″x 30 inches
- (4) 1″x3″x 12 3/4 inches
- (2) 2″x2″x 9 3/4 inches
- (4) 2″x2″x 7 1/2 inches
- (3) 1″x4″x 28 1/2 inches
Step 1 – Building the Stackable Storage Bin Frame

Glue and screw the 2x2s into a “U” shape, with the longer 2×2 along the bottom. We use the drill bit from our Kreg-Jig set to counter-sink and pilot hole our projects – it has a tapered end and a depth-stopper, eliminating the need to swap bits. If you don’t have one, you can achieve the same effect by drilling partway through the wood with a 1/4″ bit, then the rest of the way through with a 1/8″ bit. Repeat this process to make a second “U”.

Step 2 – Adding the Bottom To the Stackable Storage Bins
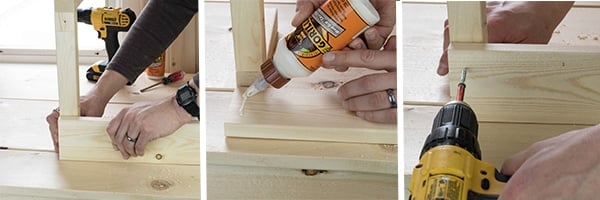
You are going to add the three 1-inch x 4-inch x 28.5-inch boards to the bottom of your frames. To ensure sturdiness, you will be adding two 1.5-inch screws through each board into the frame on each end.
Add a bead of glue along the width of your board before putting it in place. Do not skip the glue; it adds a significant amount of structural strength to the stackable storage bin.
Once your board is in place, add two screws and fasten the board to the frame.
This is what the bottom of your storage bin should look like when you finish attaching the three bottom boards.
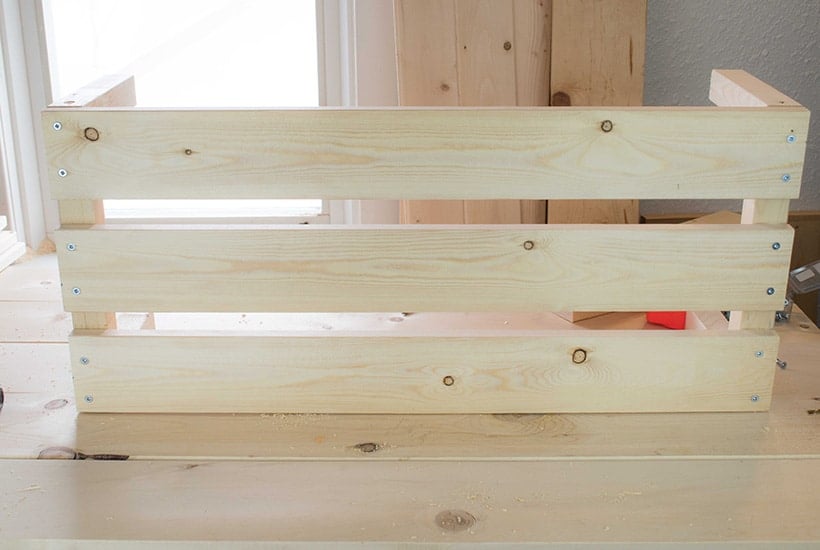
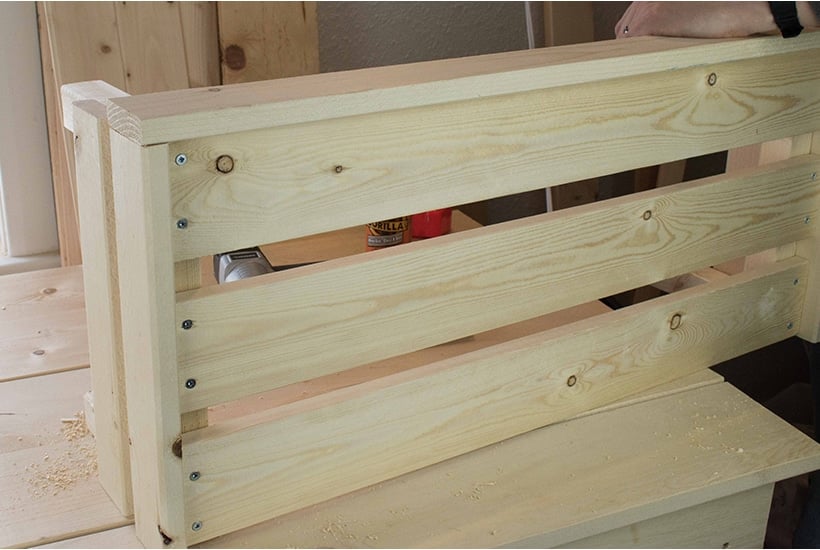
Step 3 – Adding the Side Pieces and Creating the Lockable Lip

We need to create a lip all around the stackable storage crate to enable the crates to lock into one another. When you place your first side piece, you will add 3/4-inch overhang as shown above.
Attach your two 1-inch x 3-inch x 12 3/4-inch boards to each end, leaving a 1 inch between the bottom and top board.
Step 4 – Adding the Front & Back Pieces
Now you can add your 1-inch x 3-inch x 30-inch front and back pieces. Be sure to leave the same 3/4 inch overhang on the bottom board. Make sure to add glue to each piece and nail in place.
Step 5 – Finishing your Stackable Storage Bins

Now you can finish your stackable storage bins however you like. I made mine look old, messy and chippy because I wanted them to look old and vintage. Any finish here would work!
If you like an old worn texture finish you can check out the method that I use in this tutorial: BUILD AN EASY DIY HEADBOARD.
Use them for all kinds of things!

I made mine specifically for mason jars and designed them to fit 18-quart jars three deep and six across. But these stackable storage bins could be used for anything.
They would work well for cold storage for vegetables in a root cellar. They would also look great filled with flowers on a porch in the summer, or filled with mini pumpkins in the fall.
So – many – ideas!
For now, the two test models that we made are stacked on top of my kitchen pantry to store my empty mason jars. In the next few weeks, I plan on building more for my basement storage.
In case you’re wondering if they are sturdy I carried around a full tray of 18 quarts of pickles and never had any issues.
Also, homemade pickles are just the best.
If you like DIY and woodcraft projects you should check out these posts:
- Easy Planters to Make in an Hour
- Farmhouse Style Headboard
- Industrial Desk Made from Antique Sewing Machines
- 13 Inexpensive Small Kitchen Storage Ideas
- How to Build a DIY Ceiling Pot Rack
- How to Build Simple and Inexpensive Decorative Shutters
- Hardwood Floor Restoration: After Years of Neglect


