An Industrial Desk Made from Vintage Sewing Machines

Working from home means you need an office, or at least a space to call your own. The best advice I received when I started working from home was to create a space somewhere in my house and make it mine. That mean finding or building the perfect industrial desk.
Don’t underestimate the power of a well-designed office, or the right pen or even finding the perfect vintage desk. They do make a difference to how productive you are at home.
If you’re new to the work from home game, you’re going to get a lot of advice, take it all with a grain of salt. For example, I recently read an article that advised you get up, shower, dress head to toe and start your day like you were working in an actual office. Pfft is all I have to say about that.
When I worked from home and my first conference call of the day was at 6:00 am I would roll out of bed, find my laptop and phone and log in. I usually stayed in pajamas until around noon.
I killed it working from home.
In all seriousness, I was far more productive working from home vs. in the office. I might have looked like a hobo for most of my morning, but I always got my stuff done.
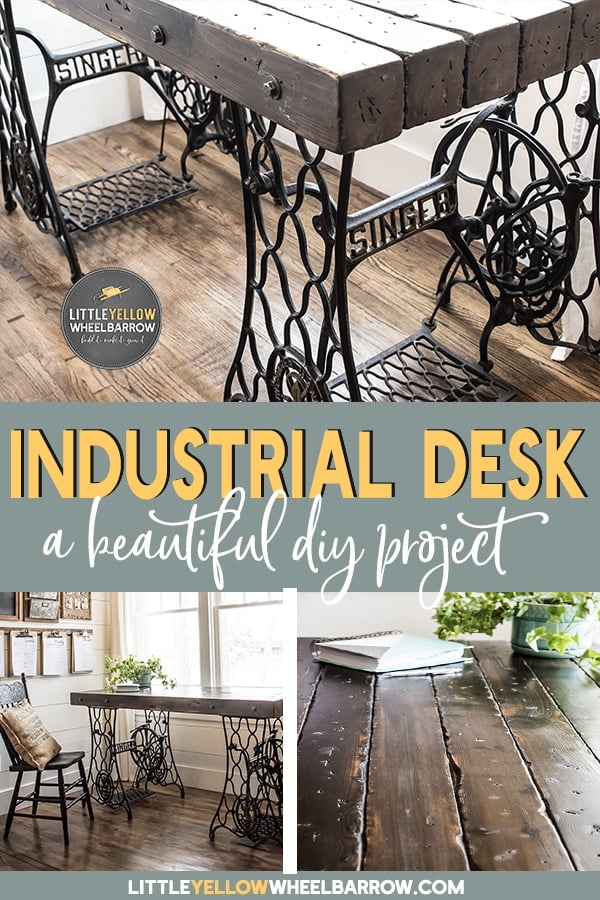
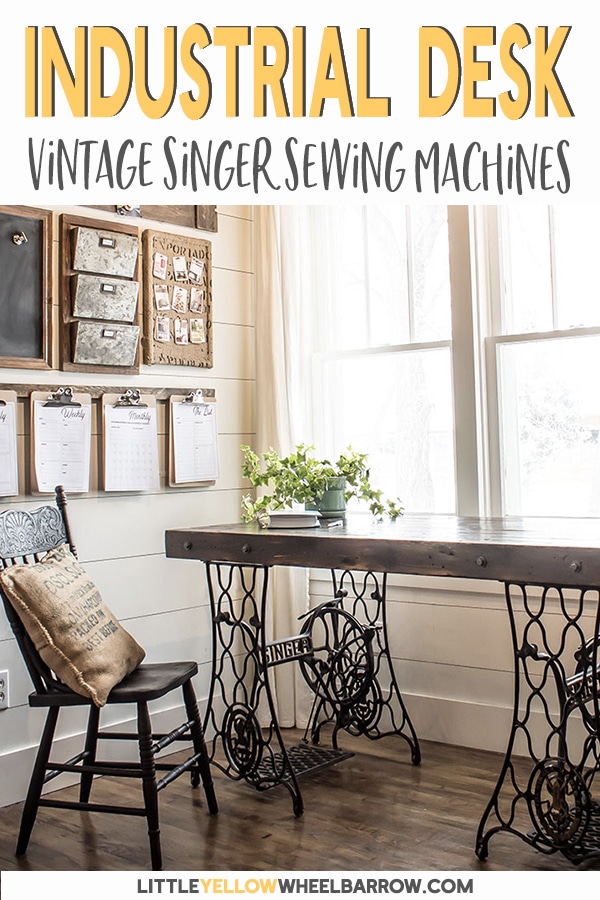
A DIY Vintage Desk with Cast Iron Legs
Do you know what you need to be productive working from home? It’s not a routine (although that does help) and it’s not wearing a business suit at home. Who does that?
My big tip for working from home and being productive … create a home office you want to hang out in every day. Period.
It could be a corner of a room, a spare bedroom, or a basement. Whatever space you choose to be it has to be your space, and it has to inspire you to get stuff done.
Working in an ugly office is too uninspiring.
High profile companies have started including nap rooms, hammocks, and brightly colored walls. You know why? It’s less depressing – you’re stuck there you might as well enjoy your environment.
You can do the same thing when you work from home, and you don’t have to have a big space or spend a fortune to make it work. For you, it might mean a few beautiful plants or fresh flowers. Maybe an area that is brightly painted, or the perfect comfy chair.
For me, it was all about finding the perfect industrial desk.
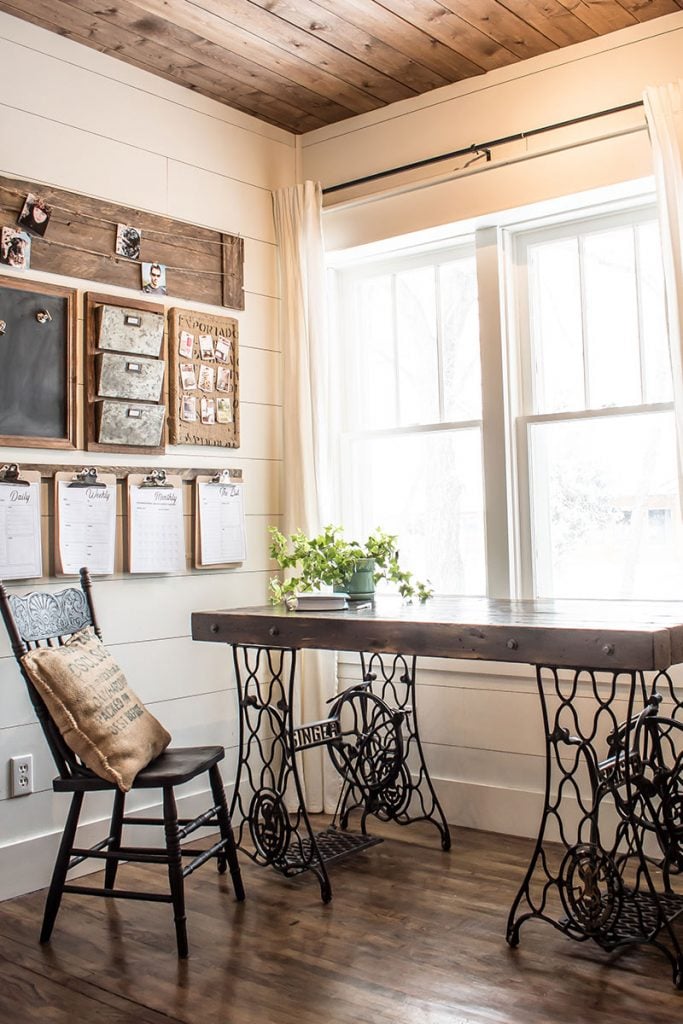
The Sewing Machine Desk.
When I started working from home, I had the option to pick a desk from a catalog. The desk would be free and delivered and set up in my house. My problem was that every single desk in that catalog was straight up ugly!
My husband argued that a free desk was a free desk. But since I confirmed that I couldn’t paint it or bedazzle it in any way I skipped it.
Then I started hunting for a vintage desk on Craigslist and Kijiji. I thought I could find one and restore it. That’s where I first spied the desk that we made. It was rustic & vintage, and I fell in love with it the minute I saw it. The only problem – they wanted over $1000 for it. It was going to be a difficult sell to the husband when I just turned down a free desk.
I showed it to him just to see his reaction, he surprised me when he said ” I can make that” and that was that. I bet he committed to making it because he figured I would never find two vintage treadles that matched. HA..ha..ha..
Finding Matching Singer Treadles for the Base
Never underestimate a woman on a mission.
It took me seven months of online searching to find two vintage singer sewing machines that matched. The first one I snagged for free from Craigslist because the sewing machine itself didn’t work. The second one was $100 bucks, and I found that one on Kijiji. I would have paid twice that price considering how long it took me to find it.
And yes, if you’re doing the math I waited 7 months before having a home office space. I worked from the corner of my sofa during that time and I don’t at all recommend it.
The only challenge to making this industrial desk is finding two treadles the same style. I’ve seen the treadle split and the ends separated and used as single legs, but that’s not the look I wanted. After seeing a desk made with two matching bases, that’s what I had to have. It was so balanced and beautiful. There was just something about it.
Plus I’m a bit of a lunatic, so I had to see the project to completion the way I had pictured it in my head.
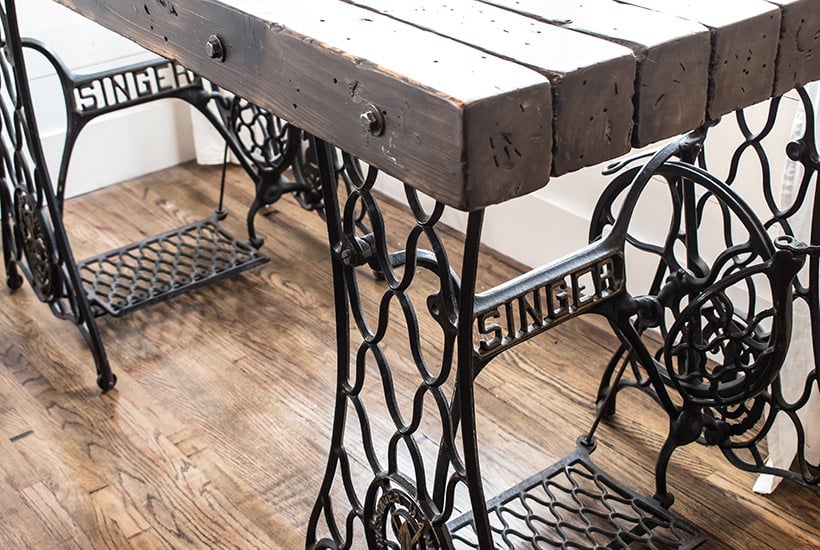
The Vintage Desk Top
We used untreated 4×4’s for the top. I love the way the top looks because it’s nice and chunky, and a perfect balance to the delicate iron worked legs. The cedar posts cost us $60 CDN, and we bought some 6-inch lag bolts to hold it all together. All in my industrial desk cost less than $200.
Using 4×4’s did add a few inches to the height of the desk. I have a long torso, so sitting at this desk is perfect for me. If you’re not tall, you may want to consider using 2-inch boards instead.
The total height of the desk is 31.5 inches.
Required Supplies
- (24) 6-inch lag bolts
- (8) 8ft 4×4 cedar posts (or pine)
- Black spray paint for the visible bolts we used Rustoleum Hammered Metal in black.
- A stain of your choice
- Polyurethane Acrylic Sealer
- Cut 8 4×4’s to 59 inches
- Beat the ever living hell out of your wood pieces using hammers, screwdrivers, kitchen implements, boards with nails poking out, and pieces of scrap wood. If you don’t want your boards to look old skip this step.
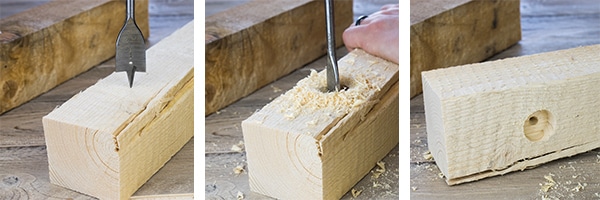
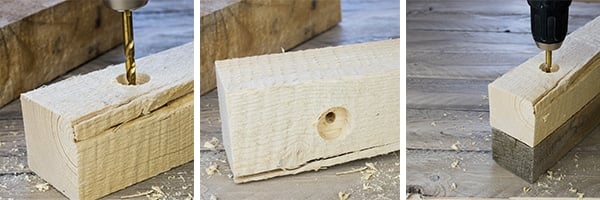
- Attach 6 of the posts to each other one at a time using the lag bolts and carpenter’s glue. To ensure the boards don’t split, drill a pilot-hole, then counter-sink it so that the posts sit flush together. 3-4 bolts per post should hold it firmly. Don’t worry too much about measuring out where they go – just move the hole an inch or two for each post, so that your bolts don’t run into each other. I’ve included photo instructions so you can see what we did. (photos below)
- Paint the heads of 8 of your lag bolts to match your treadles. We used Rust-Oleum Hammered Metal spray-paint
 .
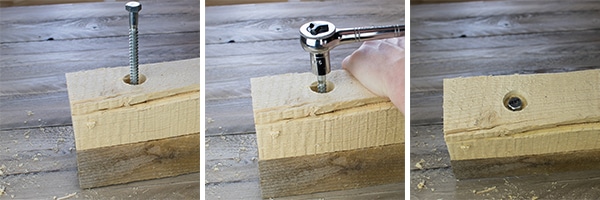
. - Attach the two remaining posts to the ‘front’ and ‘back’ edges of the desktop, similar to how you connected the previous ones. Because these bolts are going to remain visible, you don’t need to counter-sink them, just drill a pilot hole. You can put them wherever you think they look best. We put them at 4.5 and 14 inches from the end so that they sit right above the treadle.
- Sand it all down and stain it. We used the tea and steel wool treatment, then gave it three coats of Minwax Gloss Polycrylic Protective Finish
- Set the desktop on the treadles, and attach using 4 screws each.
On any kind of tabletop, we would usually use a Krieg jig to attach the boards to one another. As these were 4×4’s we opted to use lag bolts. The entire thing is probably over-engineered, but it is sturdy and after 2 years and 2 moves it has never separated or cracked.

If you work from home – carve out your space
Right now we’re mid renovations with our upstairs bedrooms so I don’t have a room I can claim yet as a home office. My current workspace is a tiny corner in my living room where my vintage desk sits against two old double hung windows. I love it there, and I may be sad when we move it back upstairs.
It’s a tiny corner, it’s not private, and it’s far from perfect. I still love to work there because that’s my industrial desk and just looking at it stirs the need to sit down and do something.
If you’re working from home my advice is to make your space yours and love it… you will be far more likely to get work done in an area that inspires. I know when we finally made my industrial desk and set up my home office I immediately felt more productive.
If you’re interested, I did carve out some additional office space in that tiny corner by building a command center. You can see that project here: RUSTIC INDUSTRIAL COMMAND CENTER
I also get LOTS of questions and emails about this room. If you want access to my free 5 Step design process you are welcome to download my FREE Room Planner!