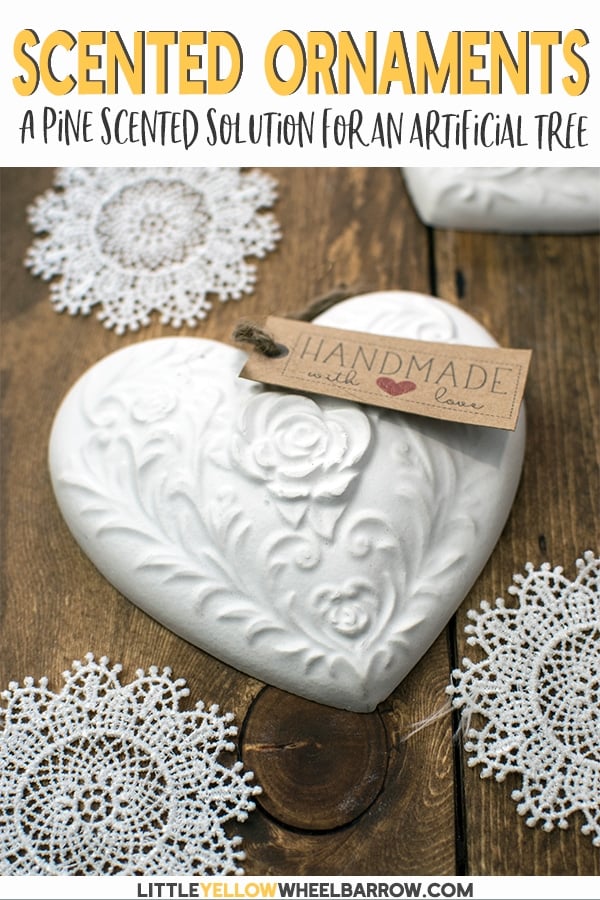
How to Make These Sweet Homemade Air Fresheners
I didn’t set out to make these homemade air fresheners. I was actually starting to work on Christmas decorations when this idea came to life.
Yeah, you read that right, I am a certain kinda of special when it comes to planning for Christmas.
They were so pretty when I unmolded them that I started thinking of ways I could use them outside of the holiday season.
A few tests later and I had all my closets and dresser drawers filled with homemade air fresheners.
Funny how things work out sometimes.
How to make plaster air fresheners – a simple step by step
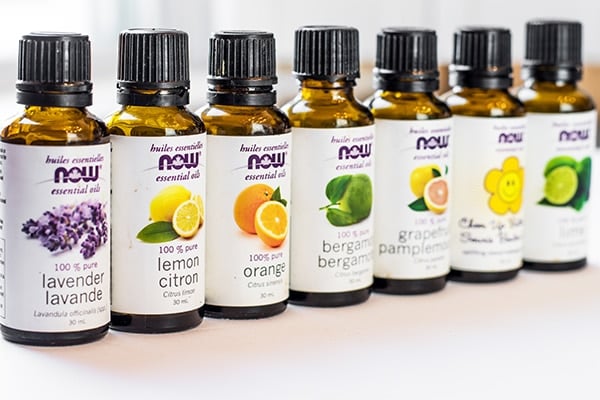
I made one a few weeks back to test the staying power of the essential oils. In my first test, I added bergamot and grapefruit essential oils to the plaster prior to pouring into the mold. I love the smell of bergamot and it pairs so well with grapefruit.
The essential oils held up for almost 2 weeks, dwindling toward the end of the second week.
Recharging them by dropping the oils on the surface also lasted for about two weeks. Your mileage may vary here. The citrus scents will wear off faster than floral, or spice. I found the grapefruit wore off after a few days but the bergamot stayed strong for almost two full weeks.
These air fresheners are not overpowering, or super strong. If you want them really strong, add more essential oils and or add more to the surface after they have cured to double down on the scent.
I also tested one with my perfume to add to my dresser drawers. That one, that one is STILL going strong and it’s been 3 weeks. It could be that the area is smaller so the scent gets trapped, but it is absolutely beautiful to open up the drawer and get a whiff of perfume.
Perfect to Scent an Artificial Christmas Tree
Just a quick edit, I recently tested these with pine essential oils and I can tell you that the scent lasted a long time and a little went a long way! If you are planning on making a few for your artificial Christmas tree, go easy with the drops of pine essential oil.
20 drops of pine essential oil are plenty to add to the mix, and you can always recharge your air fresheners by adding drops to the surface when the scent fades.
Tools & Supplies
~This post may contain affiliate links. If you click one and make a purchase, I may receive a commission at no additional cost to you.~
My last few DIY projects were a bit involved, and frustrating! It was nice to pull this one together over the course of a day and have it work as intended without any fuss.
These are not at all hard to make and you can use any mold you want in any design that you like. All you need is a box of plaster of Paris and a mold and a few simple materials to pull it all together.
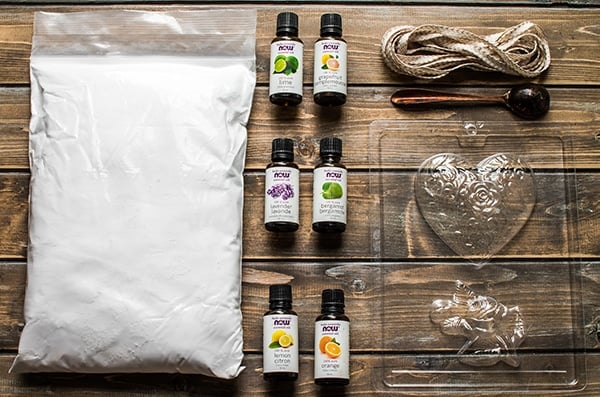
- Plaster of Paris
- Rose Heart Mold
- Essential Oils
- Ribbon
- plastic cups
- plastic spoons
Step 1: Mixing Your Plaster of Paris for Your Homemade Air Fresheners
When mixing your plaster of Paris, wear a particle mask, eye protection, and gloves. Read the manufacturers instructions and follow their recommendations.
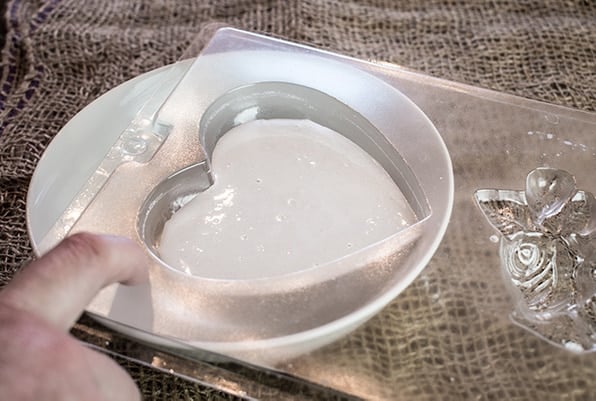
My heart mold is a bit on the large side. The cavity holds a cup and a half of liquid.
To fill my molds I used 2 parts of plaster of Paris and one part water. I also added 40 drops of essential oils, 20 of my bergamot and 20 of my grapefruit. The whole kitchen smelled amazing!
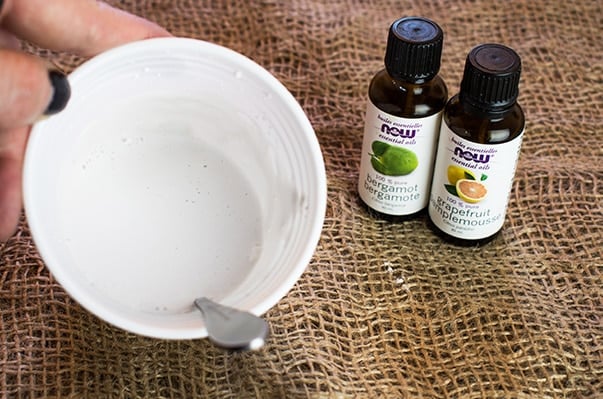
I used a small plastic cup and an old spoon to mix it up. The plaster mixes in quickly and you want to work quickly.
I did stir for at least a minute to make sure it was well mixed and didn’t have any lumps. You also want to make sure that you mix well enough so you get a reaction. My first one never cured, it pooled water on the top and stayed crumbly. My second one was perfect, the only thing I did differently was stir for a full minute.
DO NOT rinse your cups or spoons in the sink. You could have it cure in your pipes and cause a blockage. If you want to reuse the cups wait until the plaster sets inside the cup and just chip it out and add the chips of hard plaster to the waste bin.
Step 2: Pouring the Plaster and Preventing Bubbles
Pour half in your mold. My mold does not sit level on a table, so I leveled it out by using a bowl. After I poured in half of my plaster of Paris, I gave it a good tap about 10 times to remove as many air bubbles as I could.
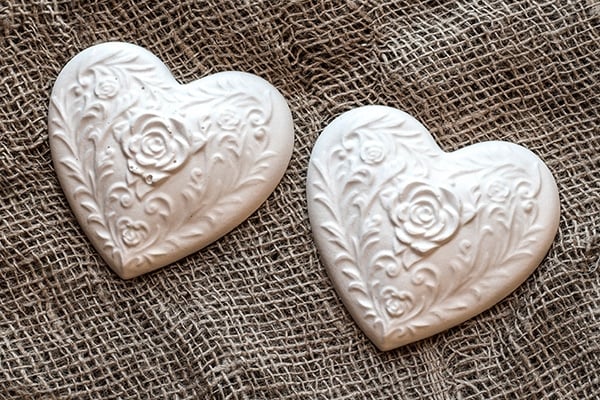
In the photo below you can see the one on the right has multiple air bubbles and the one on the left that was tapped a few times has none.
Tapping doesn’t guarantee a perfect surface, but it does help. I only had 2 of the 12 that I made end up with bubbles. The remaining 10 were very smooth and perfect.
Step 3: Final Pour and Curing Time
Pour the remaining plaster of Paris from your cup. Give the mold a few last taps to level out the surface of the plaster.
Setting only takes 30 minutes, and a full cure only 24 hours.
I was pleasantly surprised by the scent of the essential oils. Even after the plaster cured, the scent was quite strong. It did lose strength after a day, but the scent filled and stayed inside my closet for almost two weeks. Every time I opened the closet I could smell the bergamot quite clearly.
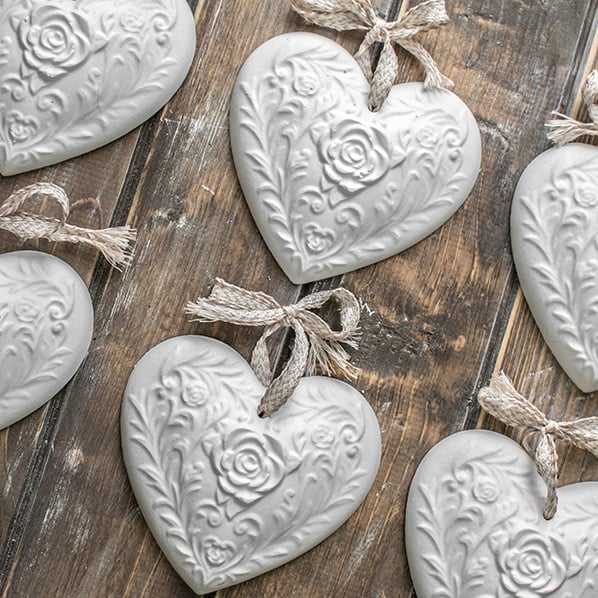
Step 4: Adding Ribbon to your Homemade Air Fresheners
Once you are sure your plaster of Paris is dry, you can drill your hole.
Use a 1/4 inch drill bit to create a hole. Go slow, you don’t want your plaster to crack!
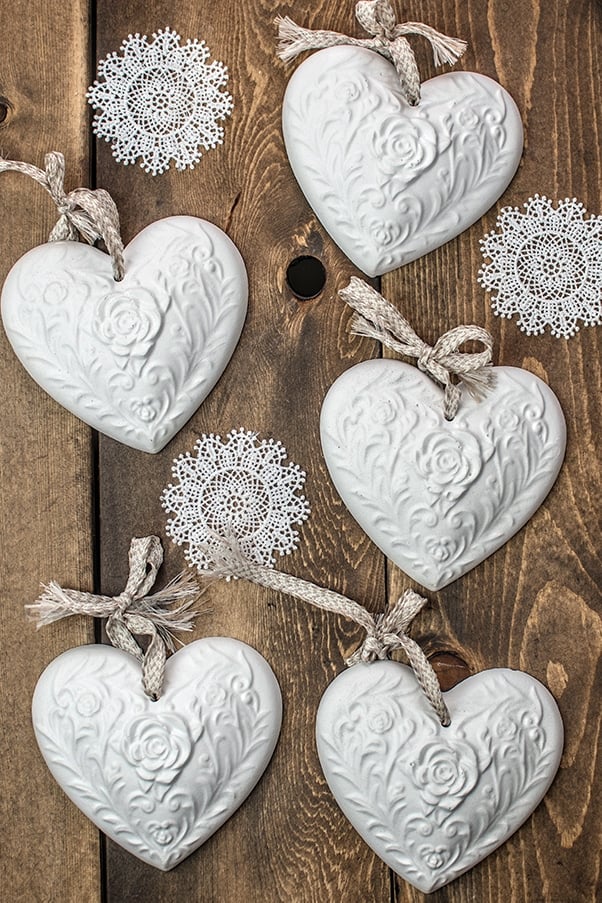
Sweet Vintage Looking Homemade Air Fresheners
Add your ribbon and hang them in a room you want to add scent. The larger the room the weaker the scent will be. In a very small room or small space, they work perfectly. Think closets, dresser drawers, and cabinets.
I can see them at Christmas time adorning a tree, or hanging on door handles scented with pine or cinnamon!
These would make great DIY gifts too and can be personalized by finding the right mold. We even have a set of gift tags and product wraps you can download to add to all your handcrafted goodies.
We have some nifty cement projects on the site too, you might want to check out these posts.
Fun and Unique DIY Concrete Clock Made with Shapecrete
How To Make Concrete Pots For All Your Indoor Herbs
Thanks for a fun craft idea. I think you could insert a little piece of a plastic or paper drinking straw into the plaster before it hardens to make the hole instead of drilling it, and it would be more kid-friendly and easier. Definitely going to make these for the holidays
That’s a great idea Sarah, far easier too. I think when we made these I only figured out AFTER they were made that yes, I needed a hole and the drill worked in a pinch. Thanks for leaving a comment and such a great tip. Cheers!
ADORABLE 🥰👏🏼♥️ Thank You For Sharing👍🏼!! The Heart 💗SACHET is Nice just To Open Your Drawer AND get A PRETTY Smell🌹Or JUST To Hang To Freshen The air For The “COUNTRY LOOK G-d♥️Bless
So glad you like the post, Cheri! I also saw you commented on Pinterest and I have to tell you, we love when our readers do that, so thank you very very much. Cheers!
I’ve been making these too but the scents never last much. What perfume did you use for your closet one?
Hey Christina, I find citrus scents do not linger long, but I do find the evergreen scents, and wood scents last longer, like fir, and cedarwood or the herbaceous scents like lavender and rosemary. My perfume is Her Narciso Rodriguez and it has some serious staying power.
I am planning on making these tomorrow. I have 2 questions. First, I purchased a silicone mold for this. Will that still work? Second, instead of adding any scent to the wet mixture can I wait until it hardens and just spray perfume or essential oils as needed? Thank you!
Hi Melissa, a silicone mold should work, although I haven’t tried one myself, I cannot see any reason why you can’t use one. And you don’t have to add the scent to the batch, you can certainly add it after the fact as well. Cheers!
I used the silicone molds and it worked fine.. sometimes needs extra care to take them out though like the bear bolds so the ears don’t break off
What Pine scent do you recommend for the Christmas ornament.
Hi Martha, the essential oil I used was simply Pine. I did, however, make a few this past holiday and blended pine with cedar, and they filled the house with a really lovely smell. My combo was 1 drop of cedar for every 3 drops of pine. Cheers!
Thank you! Can’t wait to try it!
I loved this project – I wanted a permanent ornament I could reuse and rescent every year so I painted, sanded, stained , distressed and sealed with polyurethane on the front of the ornament – the back is stained but still porous, once that has cured a month or so I will scent and seal for next year. Can’t wait for next Christmas! 💕💕💕Thank You!
Hi Martha, thanks so much for the lovely comment and I am SO happy you enjoyed the project. I love the idea of painting the fronts but leaving the backs porous, that’s a great idea!
I’m curious how you cleaned your mold after the process. There is a plaster residue that remains on the plastic mold and the second heard doesn’t work well at all. How do you remedy this?
Hi Sue, the molds I recommended in this post never ever had anything stick to them, I have used them over and over again and the plaster just pops out of them. What molds did you use?
I used the same mold you recommended using. I loved what you did! The first heart actually came out ok, but left a film or residue in the mold. I tried to wash it out with water hoping that would be good enough, but when I tried making another heart it stuck in many areas. Was afraid to use any mold release for fear of compromising the plaster. Do you let the plaster dry completely before removing? What do you recommend?
Hi Sue, I let mine get bone dry before removing them and I have used the mold several times. They just slip out and I don’t even wash them to use them the next time, the plaster just slides off. I would try washing it again and using some mold release. It could be humidity. In the winter (when I first made these) it was dry (it always is here in the winter) very low humidity and that could be a factor. But I have also used mold release before with other molds and had no problem with it at all. Let me know though, I know other readers will be interested. I am always worried too that vendors change their products, and if my mold is somehow different now.
Love your ideas.
Hi Marilyn, thanks so much for leaving such a lovely comment, you’re incredibly thoughtful. 🙂 Cheers!
Pretty. You could also add some color by painting them. Maybe not the whole thing, but picking something to highlight with color. I keep thinking gold paint or leaf would look great on those.
So I know you used essential oils, but I wonder if/how candle scents would hold up in this. I’m talking in terms of longevity. I have a set of snowflake ornaments I got from Candlelite over 10 years ago, that were scented. They still smell (not as strong of course). Which is why I’m wondering if the candle scent would last longer.
Hi Amy, gold leaf would be beautiful. I’m sort of leaning toward gold for Christmas this year, and I might remake a batch of these and do them with some gold leafing around the edges, great idea. I think candle scents would hold up longer. They tend to be much stronger, and long-lasting. Cheers!
Where can I find heart molds like yours? I love them.
Hi Susan, the mold I found was from Amazon. If you scroll back up through the post to the area for materials, the link to the mold is there. Cheers!
How charming ! These put me in mind of sachets. Going to try this.Who doesn’t love opening a drawer and smelling a favorite scent. Super idea! Barb
Thanks for the comment, Barbara! Glad you enjoyed the post.
I wonder if you could do this with the ornaments made with the children from baking soda and corn starch? Would the essential oils affect the outcome other than just a nice smell?
Hi Kristen, I think you could. There is no reason why those ornaments wouldn’t work the same way. The essential oils only add a nice smell, they do not change the consistency of the final product. I think the only difference between something made with plaster of Paris vs baking soda is longevity. The plaster is harder and will likely last a few years. Both types are porous and would take essential oils or scents easily, and could be recharged by adding additional drops once the scent wanes. Without testing, I am not sure how well the scent will hold, especially with baking soda. But things like bath bombs that are made primarily with baking soda seem to hold their scents for quite a long time, so my guess is that there wouldn’t be a difference in scenting? If you do try it, drop back and let us know how to it goes. This post is popular, and people might want to try it with different materials. Thanks so much for the question, it was a good one!
Thank you for this lovely recipe. Lovely handmade gift.
You’re welcome Lillian, thanks so much for the kind comment.
Hi! You mentioned that you would use a lot less pine essential oil for this craft so how much should I add? I’m a teacher and I really like this craft but I just don’t have a lot of time for trial and error. Thanks!
20 drops of pine essential oil will be plenty to start out. I changed up the instructions to reflect that as well. Different brands of essential oils have different potency so my pine essential oil might be weaker than yours, so it is difficult to say how many drops will be perfect for your oils and your nose, but 20 is a good start. If they are too weak you can always add a few drops after they cure and you can continue to recharge them. Good luck!
These are so sweet! You mentioned you used perfume – did you mix this in the plaster or just spray it on after they cured?
Hi Jessica, I just sprayed it on after they cured. Honestly, the ones that I sprayed and tucked away in the dresser, the scent seemed to last forever, but it could be dependant on the perfume too. Thanks for the comment!
Laura, these are so pretty, and unique to me! 😉 Love them! They would be perfect gifts for any occasion! I found you via a group board we are on together! So glad I did! I’ve followed you and pinned this! Also, featuring you on my Tuesday Turn About this week!
Thanks for the comment, Julie. They really are a pretty craft project and super easy to make. Thanks for the follow and the feature, all of that stuff always makes my day!
oh, and interestingly enough I was already following you on Pinterest!