Pretty Handmade Holiday Gift Tags – A Lovely Addition To Any Gift


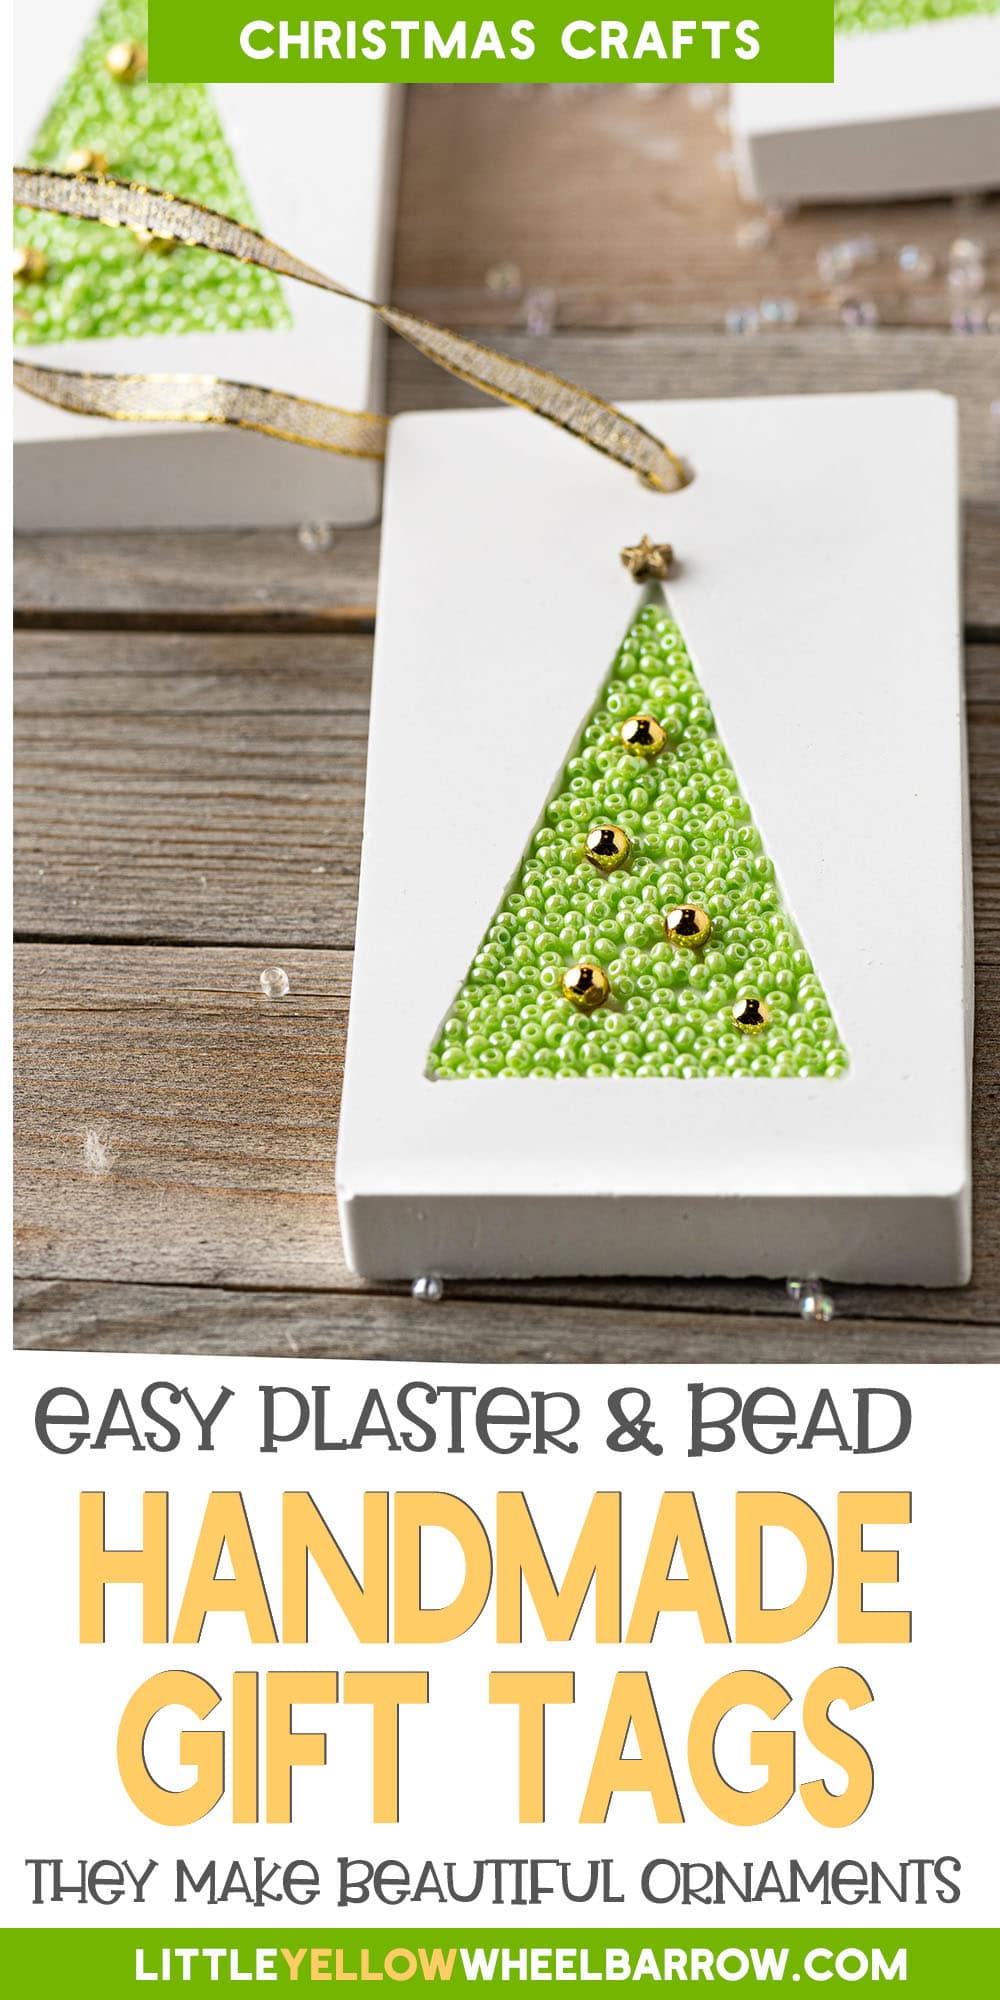
Every year I make my own gift tags. I have always made gift tags from paper, ribbon, bobbles, you know, the regular stuff. But this year, I wanted handmade holiday gift tags that made folks ask where I bought them.
These tags turned out exactly how I wanted them to, and I love the look. They look bejeweled, and the iridescent green beads look beautiful against the creamy white plaster.

Beautiful Handmade Christmas Tags with Plaster of Paris
These gift hangers look complicated, but they are straightforward to make. They take about 15 minutes to set up and pour. They cure overnight and then the next day only take about another 30 minutes to finish.
Material and Tools required
You could make these trees in any shape mold you like, but I liked that the tag molds have a hole in them so that they could be used as tags or even as Christmas Tree ornaments. You could also use other colours of beads if you like, just pick out your favourites at the craft shop. I also found these super cute little star beads for the tip of the trees, but you might find something you like even more!
These handmade holiday gift tags do not require many tools, but I found that a pair of tweezers came in very handy. If you are using a Cricut we have linked to the SVG file below. If you don’t have a Cricut don’t worry, you can easily cut out your foam triangles using a sharp Xacto knife and a ruler.
Materials
- Plaster of Paris
- Tag mold
- Mod Podge
- Disposable cups (for mixing)
- Disposable stir sticks
- 2 ounces of small beads (I used iridescent green pony beads)
- A dozen small gold beads
- 6 star-shaped beads for tree toppers
- 6 feet of ribbon or twine (for the hanger)
- Piece of craft foam sheeting 6 mm thick(any colour)
Tools Required
- Scissors
- Cricut or Xacto knife
- Small disposable paintbrush

Step 1
Cut out your foam trees. We have included a file for your Cricut, or if you want a template for cutting to make the project quicker for you. Feel free to use any shape you want. We went with a simple triangular shaped Christmas tree because we knew the beads would settle in well in that type of shape, but you can use any shape you wish, including lettering.
Step 2
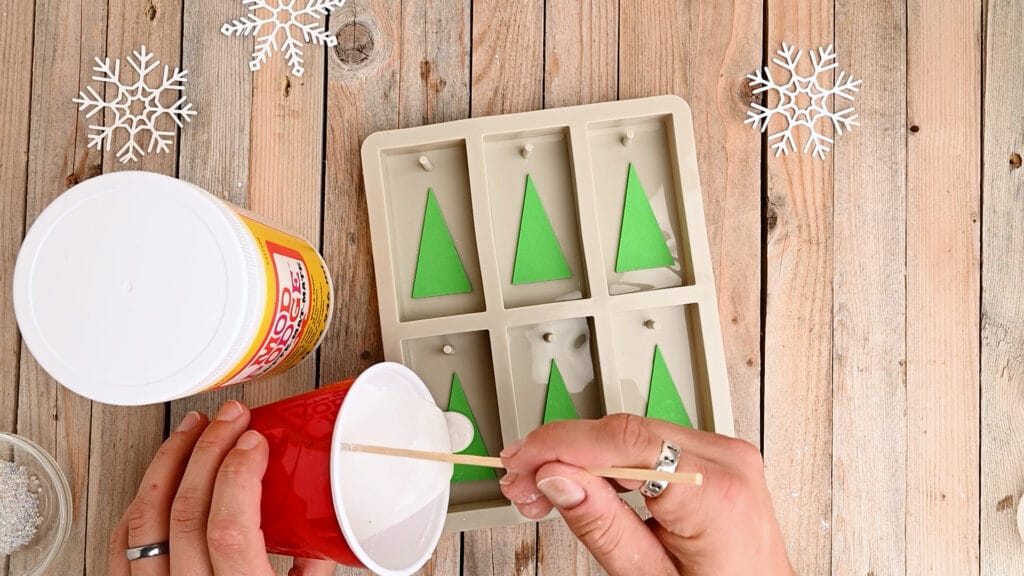
Use a small craft paintbrush to coat one side of each triangle with a small amount of Mod Podge. Place each triangle into the molds with the glue side down. This will stick the foam to the mold and prevent it from moving when you pour in the plaster. Let dry before moving on to step 3.

Step 3
Follow the package instructions to mix about 1 1/2 cups of plaster of Paris. The ratio on my plaster was 1 cup plaster to 1/2 cup water. Stir until the plaster is smooth with no lumps.
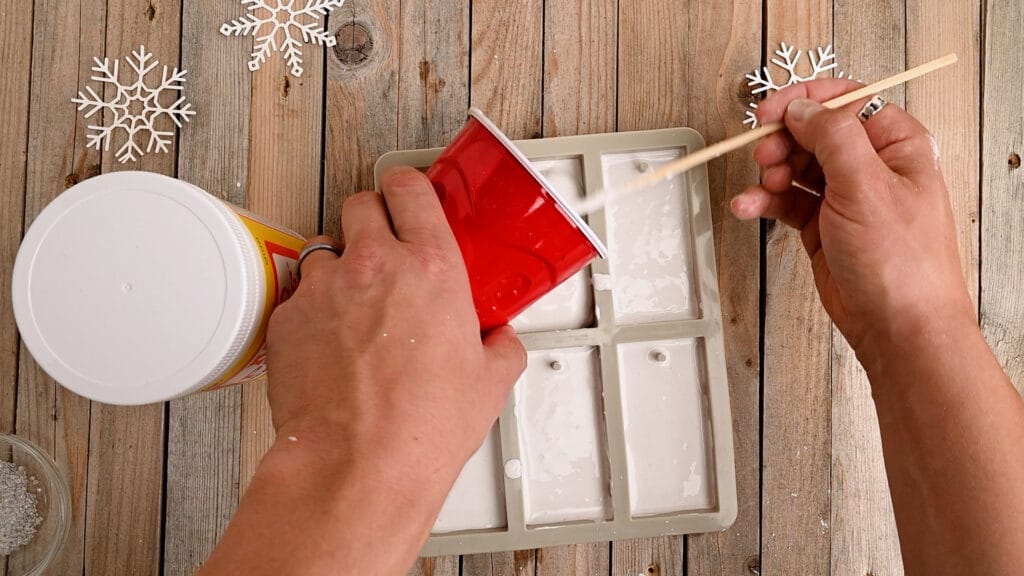
Step 4
Pour the plaster into the molds. I poured mine about 1/4 inch thick. If you decide to make your handmade tags thinner remember that plaster is brittle and may break if you make it too thin. Allow the plaster to cure at least overnight.
Step 5
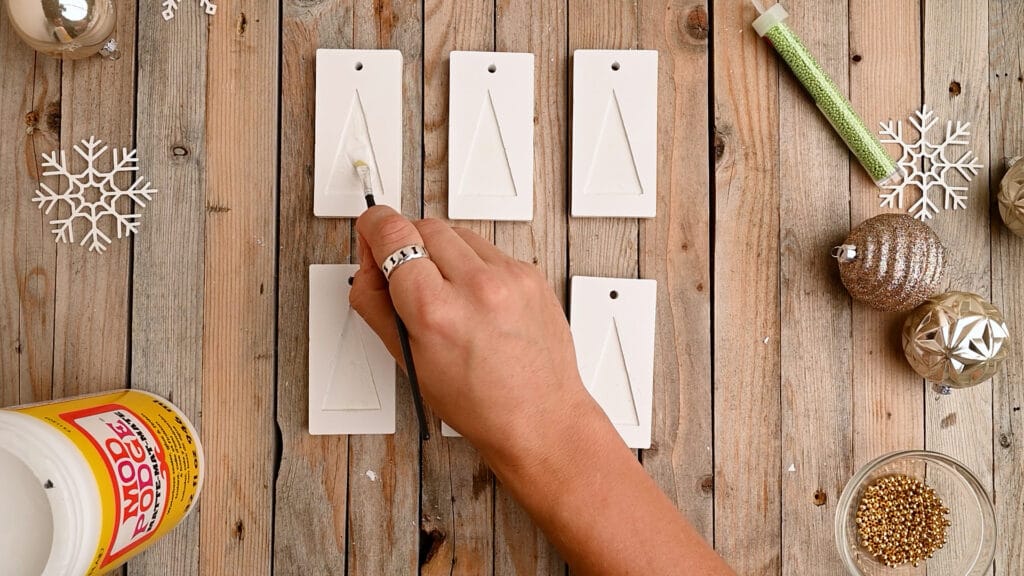
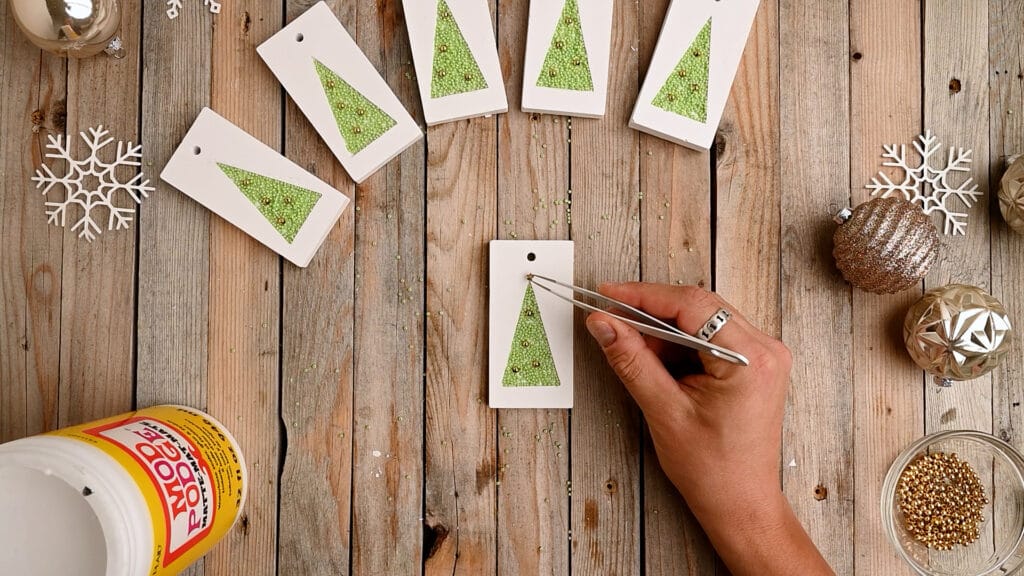
Pull the tags out of the molds. Peel the foam triangles out of the plaster. This is where the tweezers should come in handy!
The foam shouldn’t stick to the plaster. You may get a small piece clinging on here or there, but you can easily scrape it out lightly with a sharp Xacto blade.

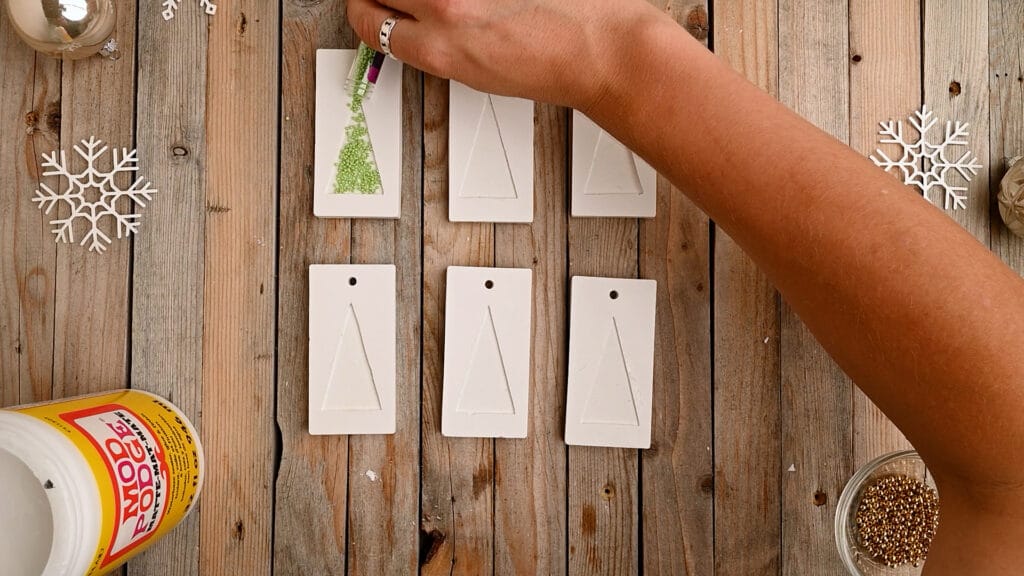
Step 6
Brush a thick layer of Mod Podge into the triangle left behind by the foam. Pour in your green beads, and place a few gold beads here and there for decorations.
Press the beads down into the glue. It’s better to use more beads than less – any extras that don’t stick can be re-used. Let the glue dry before dumping off the extras.
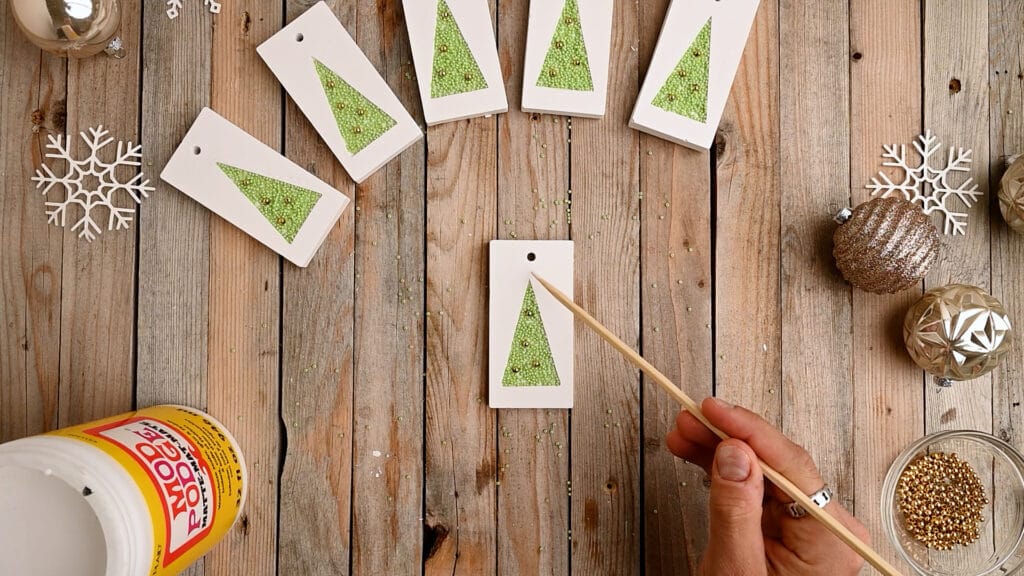
Use the wood end of your paintbrush to dab a bit of glue at the top of each tree and stick a star to it.
Step 7
Once all the glue is dried, tie a length of ribbon through each tag-hole. If you find any ‘bare’ spots in your trees where the beads didn’t stick, you can use the wood end of your paintbrush to dab a little extra glue and push in a few more beads.
Finishing up
No matter the cost, I find gifts always seem a bit more thoughtful when presented with beautiful wrapping and a handmade holiday gift tags.
Beautiful doesn’t have to mean expensive or wasteful either. These hanging tags can be reused as handmade ornaments for the Christmas tree and look beautiful on a gift with simple, inexpensive butcher paper. Simple, elegant & pretty.
You can write on plaster of Paris fairly easily with a sharpie or other permanent marker. You could add a quote or sentiment to the back to make the tag a bit more personal.

Looking for a few more handmade holiday projects?
We have some very popular holiday craft projects that you may peek your interest.
- Free Holiday Wreaths Made From Pine
- A 30 minute knit look wreath that is perfect for the winter season
- Simple Glittery Resin Coasters
- An Easy But Beautiful Woven Wreath


Pretty Handmade Holiday Gift Tags - A Lovely Addition To Any Gift
Beautiful plaster handmade gift tags with beaded inlay. These hang tags make pretty additions to gifts and adorable decorations for the Christmas tree.
Materials
- Plaster of Paris
- Tag mold
- Mod Podge
- Disposable cups (for mixing)
- Disposable stir sticks
- 2 ounces of small beads (I used iridescent green pony beads)
- A dozen small gold beads
- 6 star-shaped beads for tree toppers
- 6 feet of ribbon or twine (for the hanger)
- Piece of craft foam sheeting 6 mm thick(any colour)
Tools
- Scissors
- Cricut or Xacto knife
- Small disposable paintbrush
Instructions
Step 1
- Cut out your foam trees. We have included a file for your Cricut, or if you want a template for cutting to make the project quicker for you. Feel free to use any shape you want. We went with a simple triangular shaped Christmas tree because we knew the beads would settle in well in that type of shape, but you can use any shape you wish, including lettering.
Step 2
- Use a small craft paintbrush to coat one side of each triangle with a small amount of Mod Podge. Place each triangle into the molds with the glue side down. This will stick the foam to the mold and prevent it from moving when you pour in the plaster. Let dry before moving on to step 3.
Step 3
- Follow the package instructions to mix about 1 1/2 cups of plaster of Paris. The ratio on my plaster was 1 cup plaster to 1/2 cup water. Stir until the plaster is smooth with no lumps.
Step 4
- Pour the plaster into the molds. I poured mine about 1/4 inch thick. If you decide to make yours thinner remember that plaster is brittle and may break if you make it too thin. Allow the plaster to cure at least overnight.
Step 5
- Pull the tags out of the molds. Peel the foam triangles out of the plaster. This is where the tweezers should come in handy!
- The foam shouldn't stick to the plaster. You may get a small piece clinging on here or there, but you can easily scrape it out lightly with a sharp Xacto blade
Step 6
- Brush a thick layer of Mod Podge into the triangle left behind by the foam. Pour in your green beads, and place a few gold beads here and there for decorations.
- Press the beads down into the glue. It's better to use more beads than less - any extras that don't stick can be re-used. Let the glue dry before dumping off the extras.
- Use the wood end of your paint brush to dab a bit of glue at the top of each tree and stick a star to it.
Step 7
- Once all the glue is dried tie a length of ribbon through each tag-hole. If you find any 'bare' spots in your trees where the beads didn't stick, you can use the wood end of your paintbrush to dab a little extra glue and push in a few more beads.
Recommended Products
As an Amazon Associate and member of other affiliate programs, I earn from qualifying purchases.


