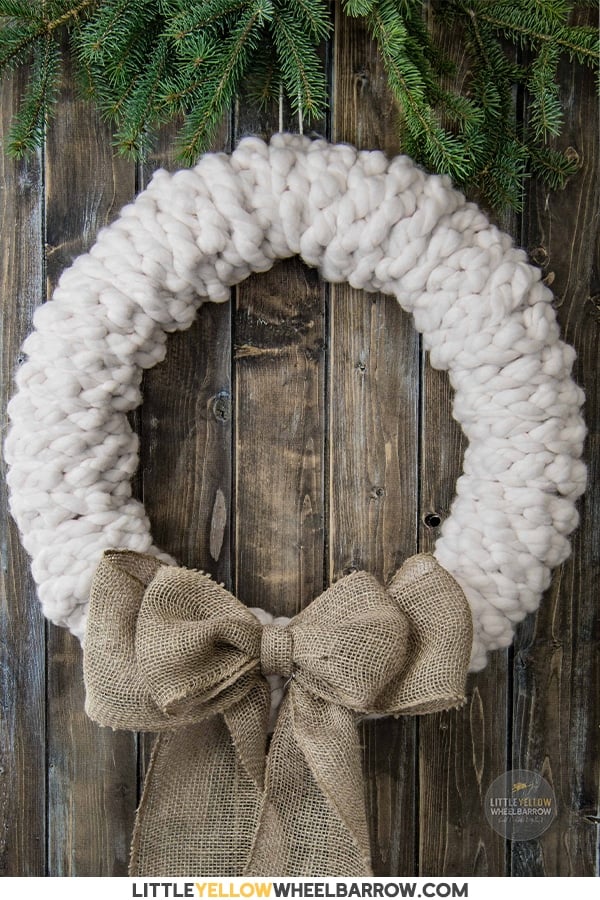
A Rustic Wreath You Can Make in Under 30 minutes – No Really!
Nope, seriously, you can make this rustic wreath, in all it’s beautifully knitted glory in under 30 minutes. With no tools.
When I say no tools, I mean no glue, glue guns, sewing, or anything. You don’t need anything for this simple project except your two skeins of jumbo yarn and a form. Oh and maybe a cute burlap bow.
Only 30 minutes to make a knitted rustic wreath?
The trick here is to use chunky yarn. It will save you ALL kinds of time and give you that rustic wreath look with minimum effort.
Chunky yarn and I are like best buddies. I love to knit, but I seriously do not have the patience to knit anything that takes longer than a day – ok maybe two days, because I did knit a chunky knit blanket that took two days, but that’s about my max.
I’ve seen a similar knitted rustic wreath made with thinner yarn and knitted around the form.
Nope, no time for that fanciness around this place.
But I did want a rustic wreath that looked a bit like a chunky knit blanket and let’s get real for a second; I didn’t want to spend a week on it.
~This post may contain affiliate links. If you click one and make a purchase, I may receive a commission at no additional cost to you.~
The jumbo yarn to use for your rustic wreath
For this project, I chose Red Heart Irresistible Yarn, Aran because it was the thickest, and had the best roving look. It was a bit whispy and looked more like wool than yarn.
The only challenge I had with this yarn was it was pink. I ordered “Aran” because it looked cream on the site I ordered it from, but in actuality, it’s a very faint blush.
Ignore the knitting needles in the photo, you won’t need them at all.
In some photos, you will see it, and in others, it will look cream. Depends on what kind of mood my camera was in when I snapped the photos.
But don’t be fooled, if you order Aran you will get blush pink yarn!
I knitted up a skein to see how it was going to look.  Don’t worry, no actual knitting for this rustic wreath!
But isn’t that yarn dreamy?
If this yarn isn’t available, you can check out this post comparing some of the more popular jumbo yarns.
The Wreath Form
I live 4 hours round trip from the nearest city, so when we do go, we make a grand trip out of it.  I ALWAYS forget something, despite my best efforts with my lists.
Sometimes I forget the stupid lists… that’s always fun.  Once I even forgot my purse – which meant an empty-handed round trip. That was even more fun.
This time I forgot to buy the form for the rustic wreath. BOOOO!
So you know what I did, I used a pool noodle.
Shh – Don’t tell anyone.
The pool noodle was the perfect thickness, and I was able to make it any size I wanted by slicing it to size with a sharp blade.
My pool noodle was 3 inches thick in diameter and 20 inches wide after I cut and put it together.
I didn’t even do anything fancy to it except tape it with white duct tape and give the whole thing a quick spritz with white spray paint.
The spray paint wasn’t even necessary. I could have just wrapped the entire thing in white duct tape and called it a day.
Pool noodles are the things everyone seems to have their garage but never seem to use, so it was easy to get my hands on a few, I just put the call out, and sure enough, a friend had two kicking around her barn.
Bonus.
Pool noodle for the win!
But you can buy a simple form as well, the thicker the better, because the thick yarn shows best on a wreath form that is thick vs. thin.
How to work your yarn to create a knitted rustic wreath
Ok, so this is the only time-consuming part; and by time-consuming, I mean it’s the piece that takes up the bulk of the 30 minutes.
I was able to loop both my yarn balls very quickly – your mileage may vary, but it is super simple to create the braid look we want.
If you have ever crocheted, you will know how to do this right away. You will be chaining your entire ball of yarn to make one long chain (x2).  No crochet hook required, only your fingers for this project.
It really is this easy.
Step 1
Leave at least an 8-inch tail – and make a loop.
Step 2
Pull your yarn through the first loop creating a new loop, and tighten the yarn a little bit. You don’t want to tighten down your loops too much, but you don’t want to leave them big and loose either.
Step 3
Keep going looping yarn through each new loop. When you get to the end leave about 8 inches on the end after your last loop. Your yarn will look like a long braid.
Attaching your yarn to the form
No glue, glue guns, sewing needles, or anything!
If you left your 8-inch tail, all you need to do is split your yarn tail in half by spreading the fibers and tying the end of your yarn onto your form.
If you need to whip out the glue gun, go ahead, but entirely not required.
Wrapping your yarn braid around your wreath form
Now you’re going to cover the entire form with your chained yarn. When you do this, make sure your yarn lies nice and flat against the form from the front to the back.
Keep wrapping the yarn around the form until you get to the end of your first ball of yarn.
Split your tail again, and tie on the end.
Finishing up your knitted rustic wreath
You can trim any ends that are too long or weave them in.
Once you finish your first ball of yarn, move on to the second.
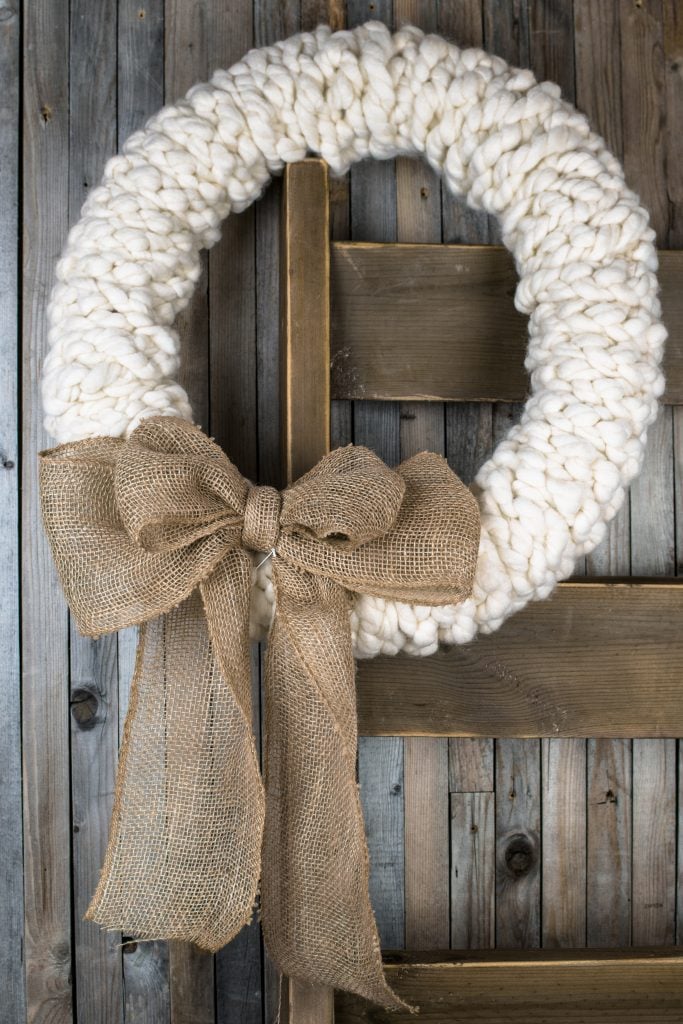
Two skeins of yarn worked perfectly (no underage, no overage) for my 20 x 3-inch wreath frame. If you go bigger or smaller, consider that when you purchase your yarn.
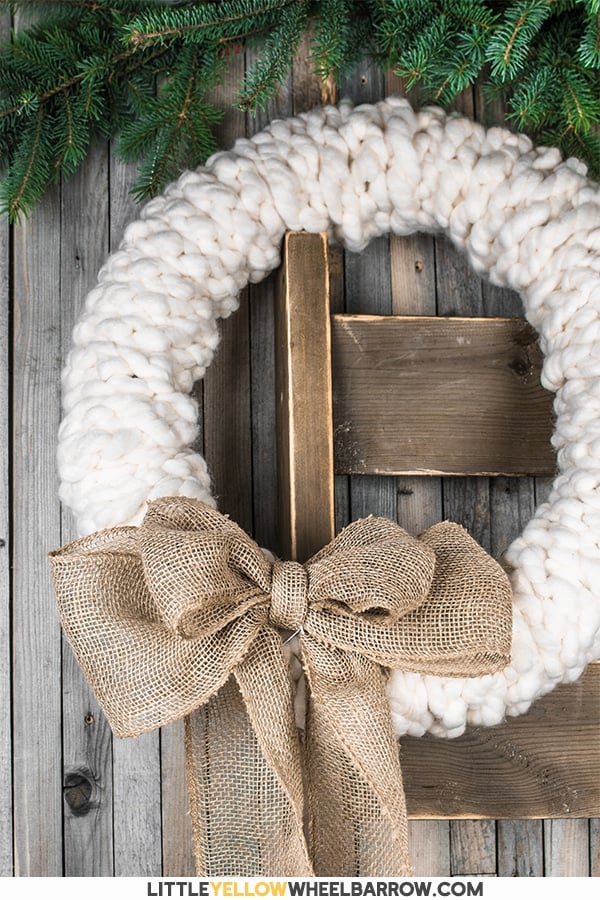
Add a bow and call it a day!
About the easiest wreath I’ve ever made, and it’s pretty. That’s the thing, just because something was made quickly, doesn’t mean it can’t be pretty – and let’s give this project one more star just because I hid a pool noodle inside.
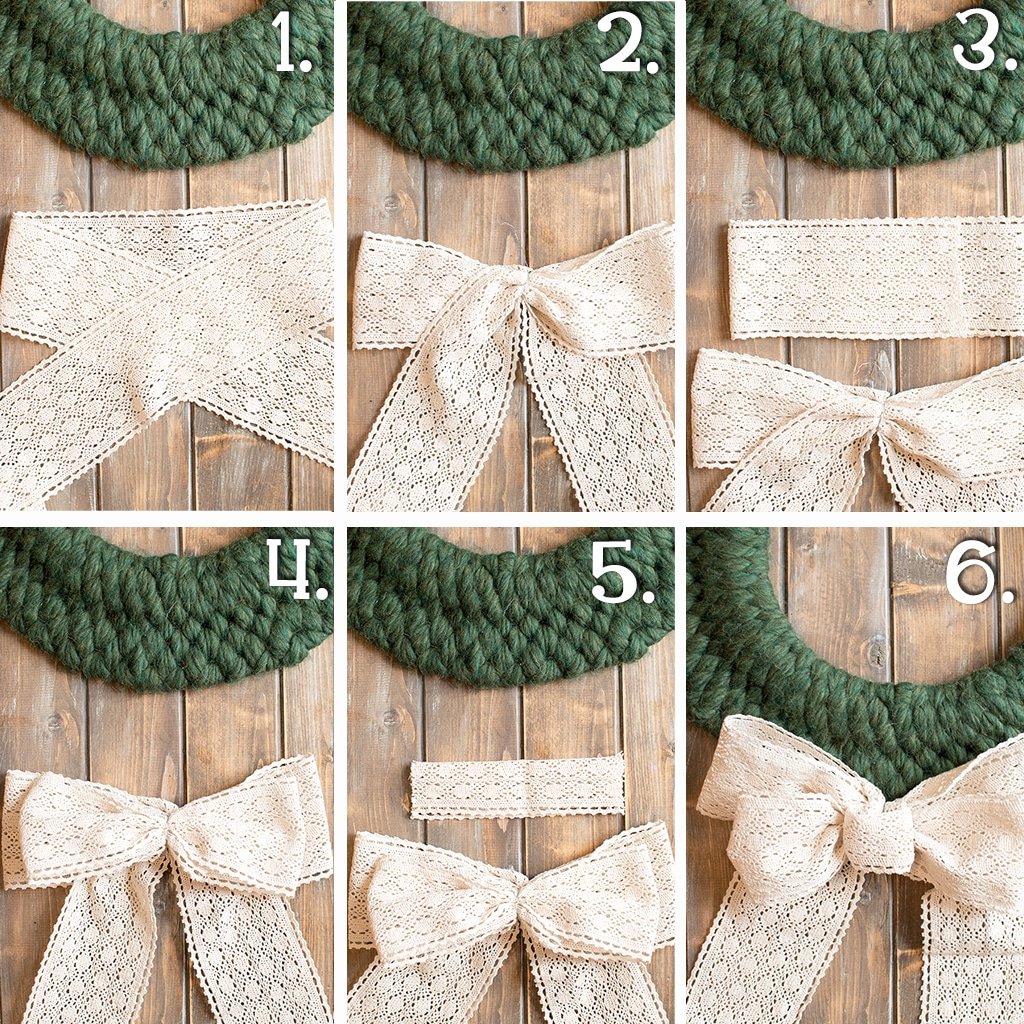
Add a pretty bow (update)
I’ve been asked how I made the burlap bow. I no longer have that burlap, but I use the same method with all the bows I make.
I am not adding in measurements because each type of ribbon is different.  I find working with wire-edged ribbons easier (what I used in this post) because you can shape it the way you want, but heavy fabric ribbons like the one I used in this example work very well too.
- Layout your ribbon creating two loops on both sides.  Make sure your tails are the length you want before you snip the ribbon.
- Once you confirm the length, and you like the width of the bow, wrap a 3-inch piece of floral wire through the center and tighten down to pinch it together.
- Make another double loop, without tails (or with you want), give about 2 inches of overlap before snipping the ribbon. I usually try to make my second ribbon layer about 1-2 inches smaller than the first bow you created.
- Add the second layer to the first ribbon layer and use the wire to loop around the second layer and twist to tighten.
- Take a smaller piece of ribbon, fold it half lengthwise, and create a loop.
- Add the loop to the top of the bow, and use the same wire you used prior to connecting the loop to the top of the bow.
Straighten and fluff the bow into shape.
You can add multiple layers with a thin ribbon to create even fuller bows.
See More Holiday Wreath Projects:
Beautiful Cranberry Red Beaded Wreath; Simple DIY Tutorial!
Wreath Supplies You Need to Make A Perfect Wreath
All Black Halloween Wreath; A Cheap and Easy DIY Halloween Project.
A Dollar Store DIY Halloween Wreath (Only $15.00!)
Simple knit projects for the home
I picked up different “jumbo” yarns to test and try out over the next few weeks. ( you can check that jumbo yarn comparison post out here )
I plan on adding a few single-skein projects to the site. Simple knitting projects that you can knock out in a single afternoon and say, “There, I made it!”  No scarves or cowls on my list, only home decor projects.
So with that said, if you have a favorite jumbo yarn, let me know in the comments so I can add it to my list of “tests.” Right now, I have eight different ones to test and try out to see which performs better.
For all you knitters out there, have you noticed that “jumbo” means very different things to different suppliers?
Check out that picture above; each is considered a “jumbo” yarn! Red Heart Irresistible Yarn, Aran that we used in this project, was almost twice as thick as any of the yarns in that photo!
Thought this a brilliant idea but decided to use a dolly peg to create my own thick yarn. I now have a dolly peg machine which “ knits “ the yarn quicker and makes an even tube to work with. Also doing this gives you a chance to use any colour you want. Will take a bit longer but hope to do it within a day.
Hey Jenny, Oh using a dolly peg to make your own thick yarn is such a brilliant idea. It’s getting harder and harder to find the thick wool, and this is such a great option. I am sure my readers will really appreciate the information. Thanks so much for leaving a comment!
Thanks for the idea!!! I love this! I made one using the Aran color, but knitted the chain instead. It took longer than crochet would but I am just leaning to knit so it was great practice. Thanks for sharing your idea!
Thanks so much for the comment Shareen, I’d love to see the knitted chain wreath! So glad you liked the project. 🙂
I used a mega bulky yarn by Bernat (64 yards long), but it was thinner than the yarn you suggested just because I couldn’t find it in the store. It took at 3 hours to complete the project, but I’m really happy with the end results. Thank you for the inspiration!
I’ve used the mega bulky before and I really liked it, it would take about 4-5 strands of that yarn to be the same thickness as the Lion Brand Wow yarn. You have WAY more patience than I do. I am so glad it turned out for you. I’d really love to see a photo to see how it turned out with thinner yarn. Thanks so much for the comment Momma Harps!
I just made 6 of these to give away as gifts, in all different colors! What did you do to attach the bow? Did you just use hot glue or a pin?
Hi Sarah, since I used wire to create the bows I just used the ends of the wires to insert the bow and twisted them together in the back to fasten, but hot glue always works in a pinch too. cheers!
So… I’m just now seeing this post a year later. I LOVE this wreath!! I am super excited to make one. I do have a question though… my door is white. Do you think the cream color will show up or should I try maybe red yarn? I’m happy for any suggestions or ideas!
Hi CH, this wreath in red would be a show stopper. The only challenge is I have never seen this yarn or even comparative thick yarn in red. They all seem to come in much more muted colors.
It is getting a little more difficult to find the lion brand wow, but Loops and Threads spirit yarn (you can find it at Michaels) is a good comparison and they have a beautiful pine green. Since your door is white, I would consider a different color. It doesn’t matter what brand of wool or yarn so long as the strand is about as thick as your ring finger, give or take. You want the yarn to be nice and chunky so you can see the stitches.
OH you could also double up some bulky yarns together (or triple or whatever you need to do to get the right thickness) that would work too, and actually it would add a bit more dimension to the wreath. I would LOVE to see your wreath when you complete it.
Cheers!
This is sooooooo pretty! I love chunky yarn but I will crochet mine. Don’t have the finger strength anymore. The pool noodle is a great tip. But if you don’t have one, go to the hardware store and get pipe insulation. A little duck tape will seal a 3.5 to 4.0 foot ring. No really, I tell everyone!!
Hi Sandra, this is a GREAT tip. Pipe insulation would work really well. Thanks so much for the comment, I am sure it will help out a lot of folks.
Love this. Plan to make one for this winter. By the way, I’m from Manitoba, next door!
Hi neighbour! I think you will really like making these wreaths, it’s SO easy! They turn out so well too.
Any instructions on how to make that pretty bow?? 🙂
That bow is super easy to make, it’s a simple little trick of how you twist the burlap (ribbon) around. I will add a quick tutorial to that post in a day or two Julieann.
Hi, Laura!
I found your site and this wreath project just last week, and love it. I got three quarters finished the looping and wrapping while watching a movie tonight, but I need to get more yarn. It will look great! Thank you!
Question about the bow – how did you get it to look so pretty, and sit so straight, and the double loops??? Did you post a follow-up tutorial? Where did you buy the burlap ribbon? How wide is it? Are the inner loops from a narrower ribbon? It looks finished on the edges. Details please!
Thank you so much,
Chelsea
Hi Chelsea, posting a follow up about the bow completely fell off my radar, however, I am working on another holiday wreath today and it also has a bow designed just like that one and I will add the instructions from that post to this one since the bow is made the same way.
For this bow, I used wired burlap ribbon and I believe I picked it up at Michael’s last fall. It wasn’t with the holiday ribbon or even the ribbon section, it was down around the fabric’s area. I believe the brand was Collections, but don’t quote me on that because it’s been a while. It already came pre hemmed, and with wire edging.
I made two loops on both sides of the bow and pinched it in the center. I made another just like that only a bit smaller and added it to the first layer. This created the 4 loops. for the front loop, I simply added a smaller loop and then I pinched it in the center and added floral wire through the top center loop and pulled it around to the back. This connected all three layers. Then I just fluffed it up and made it sit the way I wanted it to.
The wired ribbon is the easiest to do this with, especially when using something like burlap that has a tendency to want to flop over.
I hope that helps and thanks for pointing out that I never updated this post! It was something I had intended on doing. I need more hours in the day. Cheers!
This is a beautiful wreath and I thought I would love to make one , especially since it only takes 30 minutes. I bought 2 skeins of chunky yarn (although I don’t think it is quite as thick as yours.). Yesterday I spent 1 1/2 hours on the first seen and I still have the second one to go. I have crocheted and worked with yarn before but it has taken me a lot longer than 30 minutes to finger crochet the yarn. Hopefully I can get the second skeet finished and the wreath completely soon.
Hey BB, your yarn must be considerably thinner vs the yarn I used. The yarn I used in this wreath is Jumbo #7 it’s super thick, the thickest of the jumbo size yarns I’ve tested. Each skein is only 31 yards long and each chain uses approx 3.5 inches of yarn.
The thickness in yarn here will definitely impact how long it takes to chain. A bulky yarn like Lion Brand Quick and Thick would take much longer to chain vs the Red Heart Irresistible I recommended in the post. If you used any other yarn I have no way of determining how long it would take to chain, or even if it would be enough yarn to cover the wreath form.
Red Heart’s Irresistible is a truly jumbo yarn (much thicker than bulky)- it’s so fat in fact that it’s considerably thicker than my thumb. It might take 4-6 strands of a bulky yarn to make up the bulk thickness of Irresistible.
Using a thinner yarn in this project will likely take longer and will look much different, BUT I bet it’s going to be a beautiful wreath in the end.
So pretty! I’m a little confused by the looping instructions. I wanted to search YouTube for a video – is this technique called finger knitting? I think I’ve seen that before. Thanks!!!
Hi Mayme, I need to start making videos for these posts so I can show what I mean – this video is exactly what I am talking about and she does a great job visually demonstrating how to do it – I will add the link to her video in the post for anyone else who might be confused as well. Sorry about that! Cheers. https://www.youtube.com/watch?v=KAERB_BlcD4
Love it. But do you have any projects that can go outside like this wreath?
Hi Carol, this is my first Christmas blogging and my holiday posts are limited. The only other wreath that I have that would be outdoor friendly is a simple pine wreath and I am guessing that’s not what you’re looking for. I’ve been thinking all morning how to make the knitted wreath waterproof and I have not yet come up with a solution. Maybe one of my readers might have a creative solution?
Yes you can make it waterproof by spraying Scotchguard fabric protector from a spray can. Then you can use it on a door on a front porch! Works great!
Thanks for the tip Millie, I will try it out this fall!
You can make “yarn” by cutting Walmart type bags in strips & looping them together. There are tutorials on line on how to do this. I think it would work rather well to make this wreath weather proof.
You are quite the hoot! Love it! More bubbly is what we need in this world 🙂 Your wreath is a beauty and simple enough for the average somebody to do. I am definitely going to try it. Thank you very much for sharing! Keep it up 🙂
Hi Teri! Thanks so much for the comment it made my day, I leaned over to my husband and said: “see someone thinks I’m funny” … If you make the wreath, come back and share it with us, I would love to know how it went and if my instructions made sense. 🙂 Cheers!
What a great idea and so simple to make! Considering I practically live in the north pole, a wool wreath is perfect for my winter decor. Love, Want, Pinned 🙂
Oh hey, Marie! I was just over checking out your blog and I see we’re DIY soul mates. I’m not quite to the North Pole, but I am in Northernish Saskatchewan and we’re knee deep in snow right now so I feel like I live near the pole!. Thanks for the comment and the pin! Cheers.
How many balls of yarn did you use??
Hi Jill, I used two. Cheers!
What a brilliant idea – so easy to make, simple, rustic and absolutely gorgeous! Sadly, I have to order such a yarn by mail – we, too, live a long way from a large center – and that means I can’t start this immediately. I have just discovered your blog and delighted to have done so. ^^
Hi Kate! Living in the country definitely has it’s advantages, but shopping isn’t one of them! Thanks so much for the kind comment. If you make the wreath let me know how it goes!
This is so beautiful! I love projects you can finish in a short amount of time. I’m going to attempt this one!
Hey Tuula! This definitely was one of my favorite projects because it was simple and pretty. You’ll have to share your results if you make one. 🙂
Don’t use the pool noodle! They don’t work and sag. Use Styrofoam forms. What a waste!!!
Hey Melody, sorry your wreath frame sagged The original wreath I made for this post I used this season on my front door this p Christmas. No problem with sagging and it hung in my craft room for almost 11 months too. If your form sagged I am guessing the connection didn’t hold.