How to Make Giant Embroidered Rose Wool Wall Hangings

These wool wall hangings were incredibly easy to make. This method is an embroidery technique, and honestly, super fun to work with.
I initially made a set of three, but I have it in my head I want to make two more sets in different variant colours of yellow and make a big wall display. Stay tuned for that update!
In the meantime, I wanted to share the project now because even three bundled together look super cute on a small wall.

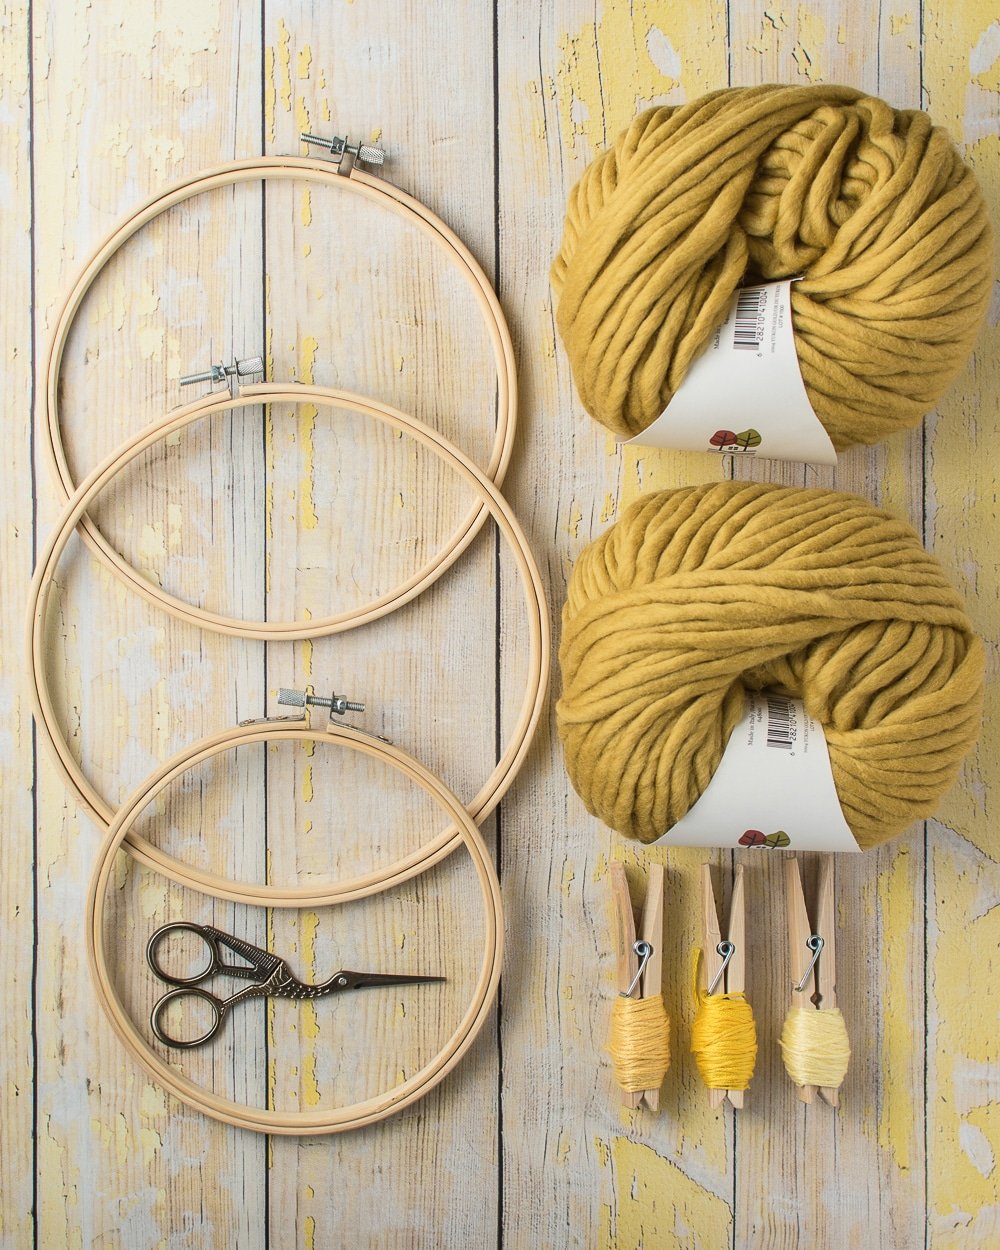
Materials & Tools
~This post may contain affiliate links. If you click one and make a purchase, I may receive a commission at no additional cost to you.
I only ever recommend what tools or materials I use for my projects. I also test all my projects before publishing and if something doesn’t work, I don’t share it! ~
Ok, for this project I used wool that wasn’t actually cheap. I had purchased a few different skeins of yellow wool for a bigger project. When this wall hanging project manifested itself in my brain, I had these two skeins kicking around so that’s why I used this particular wool.
I used what I had, and that’s what I recommend you do. Go bust that yarn stash!
With that said, I love this wool. The wool is by a Canadian company called Sugarbush, it’s called Chill Yarn and the colour is Yukon Gold.
Sugarbush Chill wool is beautiful. It was really nice to work with, I didn’t get as much shedding as I expected and the colour was AMAZING. It’s a bright punchy mustard colour that went very well with some embroidered yarn pillows that I made earlier this month with the same technique.
But as always you can use any wool or yarn you want, so long as you keep it bulky. Look for size 6 super bulky yarn and you should be good to go.

Materials
- 3 Embroidery hoops (different sizes) Mine were 6 inches, 7 inches and 8.3 inches.
- Light cotton, or linen fabric 1/2 yard
- 2 Steins of jumbo yarn (for this project I used 1.5 skeins of this particular wool, your mileage may vary based on the yarn you buy as each skein tends to be different lengths)
- Embroidery thread in a similar colour to your yarn (you won’t really see it, but it’s good to have it at least a bit close in colour)
- Glue sticks
- 3 pieces of matching felt for the backs (entirely optional)
Tools
- Yarn needle
- A pen, marker, or pencil
- Measuring tape
- Scissors
- Glue gun
Step 1
Cut and add your fabric to your embroidery hoop.
Make sure the fabric is straight with no puckers or loose areas.
Once your fabric is centered and well placed, tighten the embroidery hoop by twisting the screw at the top. Don’t over tighten, but make sure it is good and tight. We don’t want the fabric to loosen mid-project.

Step 2
With a measuring tape, measure the outside of your hoop and divide by 5. You will use this measurement to mark off 5 equidistant spots on your fabric.
When you mark your fabric, don’t do what I did. Make sure your marks are at least 1 inch inside the hoop away from the outside ring.
The roses look much better on the hoops when they have a small ring of white still showing. Since I put my marks so close to my hoops, the marks showed when I made my rose so I had to start over again. (I make these mistakes often!)
You can see below what I mean, the marks were almost touching the outside ring.
Also, you don’t have to worry too much about this measurement. If it is off by a quarter inch here or there it won’t matter in the end. We just need them almost the same distance.

Step 3
Thread an embroidery needle with embroidery thread (don’t separate the strands, leave it together). Sew spokes from the center to the marks that you made on your fabric.
Sew each spoke at least 3 times from the mark to the center, to give the spoke a bit of strength. Sewing it at least three times also makes it easier when it comes time to weave your yarn over and under these spokes.

Step 4
Thread your yarn needle with your yarn and tie the bottom on to one of the spokes you embroidered on to the hoop.
Tidy up the ends by snipping then close to the knot.

Step 5
Start to weave in and out. Weave over one spoke and then weave under the next and repeat. You can push and poke the yarn once it is weaved on to the spokes to get it to sit the way you want. The video below demonstrates what I mean and you can see how easily the pattern comes together.
Step 6
Continue until you reach half an inch from the outside ring of your embroidery hoop.
To add more yarn, simply tie on the ends of your wool to the spoke where you left off last and tuck the knot under. As you continue to weave over and under the knot becomes hidden and you can’t see it. When you reach the end simply tuck in the loose ends.

Step 7
Fold the fabric overhang to the back of the embroidery hoop and tack it down with a few dabs of hot glue. You can add a piece of matching felt to the back to finish off the project. Totally optional but the felt pieces look very nice on the back especially if you make these as a gift.

Giant Embroidery Flower Wall Hangings
Guys, I loved this project. These wool wall hangings are so pretty and make such easy wall decor. Anyone can make these! Even if you’ve never done any embroidery before I swear, you will be able to make these. Unlike knitting or crochet, even if you mess up, you don’t mess up. Mistakes are easily hidden in the weaving, so if you like these but think you can’t make them, go try!
I love this simple woven rose pattern, and I think it’s fairly versatile. I had all kinds of ideas of what I could do with these when I made them. Made with larger jumbo yarn, they would make fantastic stool covers, both cozy and totally unique. I also thought it would be a neat idea for a blanket, or even for a rug.
I am going to be working on a few of those projects in the coming weeks so stay tuned!
LOOKING FOR MORE DIY Wall Decor?
Check out these other cute wall decor projects!
- Easy Pink Rag Wreath for Valentine’s Day
- DIY Halloween Wreath for $15
- Sparkling Cranberry Christmas Wreath
- Blackout Dead-Flower Halloween Wreath
- A Rustic Yarn Wreath for Any Occasion

Like Projects Made With Yarn? You Should Check out These Posts!

How to Make a Chunky Knit Pillow Cover in Under an Hour
A chunky knit pillow cover for a 14x14 inch pillow form. This big knit pillow is perfect for a beginner, has no difficult sites or seams, and comes together in less than an hour.
How to Make a Cozy Finger Knit Blanket in Under Two Hours
A thick and cozy jumbo stitched blanket made without any tools. This finger knit blanket works up in under 2 hours and is the perfect project even for a beginner.


A Rustic Wreath You Can Make in Under 30 minutes - No Really!
Make this easy yarn covered wreath in under 30 minutes.


Giant Yellow Rose Wall Hangings
Giant rose wool wall hangings made with a simple embroidery pattern.
Materials
- 3 Embroidery hoops (different sizes)
- Light cotton, or linen fabric
- 2 Steins of jumbo yarn (for this project I used 1.5 skeins of this particular wool, your mileage may vary based on the yarn you buy as each skein tends to be different lengths)
- Embroidery thread in a similar color to your yarn (you won't really see it, but it's good to have it at least a bit close in color)
- Glue sticks
- 3 pieces of matching felt (totally optional step)
Tools
- Yarn needle
- Pen, marker, or pencil
- Measuring tape
- Scissors
- Glue gun
Instructions
- Cut and add your fabric to your embroidery hoop.
- Make sure the fabric is straight with no puckers or loose areas.
- Once your fabric is centered and well placed, tighten the embroidery hoop by twisting the screw at the top. don't over tighten, but make sure it is good and tight. We don't want the fabric to loosen mid-project.
- With a measuring tape, measure the outside of your hoop and divide by 5. You will use this measurement to mark off 5 equidistant spots on your fabric.
- When you mark your fabric, don't do what I did. Make sure your marks are at least 1 inch inside the hoop away from the outside ring.
- The roses look much better on the hoops when they have a small ring of white still showing. Since I put my marks so close to my hoops the marks showed when I made my rose so I had to start over again. ( I make these mistakes often!)
- You can see below what I mean, the marks were almost touching the outside ring.
- Also, you don't have to worry too much about this measurement. If it is off by a quarter-inch here or there it won't matter in the end. We just need them almost the same distance.
- Thread an embroidery needle with embroidery thread (don't separate the strands, leave it together). Sew spokes from the center to the marks that you made on your fabric.
- Sew each spoke at least 3 times from the mark to the center, to give the spoke a bit of strength. Sewing it at least three times also makes it easier when it comes time to weave your yarn over and under these spokes.
- Thread your yarn needle with your yarn and tie the bottom on to one of the spokes you embroidered on to the hoop.
- Tidy up the ends by snipping then close to the knot.
- Start to weave in and out
- Continue until you reach 1/2 of the outside ring of your embroidery hoop.
- To add more yarn, simply tie on the ends of your wool to the spoke where you left off last and tuck the knot under. As you continue to weave over and under the knot becomes hidden and you can't see it. when you reach the end simply tuck in the loose ends.
- Fold the fabric overhang to the back of the embroidery hoop and tack it down with a few dabs of hot glue. You can add a piece of matching felt to back to finish off the project. Totally optional but the felt pieces look very nice on the back especially if you make these as a gift.
Notes
Use any color or size yarn. Thinner yarn will take longer to create the roses, and chunkier yarn will go much faster. Each giving a very different look to the project.
Save a bit of cash and use yarn instead of wool, I had these skeins on hand and decided to use them for this project, but the wall hangings will look just as good made with acrylic bulky yarn.
I had a reader suggest ombre flowers and I think they would look beautiful. You could start from the center with the darkest color and work your way out using lighter yarn.