Easy Dried Orange Garland For Your Holiday Tree!


We try to marry our Christmas tree themes with the feel of our house to keep everything connected even through the holidays. Last year, we did a crochet garland to add some rustic charm to our tree because we were in a tiny little 100-year-old farmhouse, and it fit the house perfectly. This year, we’re in 1865 Victorian, and we felt we wanted our decorations to “fit in” a bit more with the age of this house and go a bit more natural. We started with this easy-dried orange garland and are so glad we did! It turned out better than we had hoped.
We provided step-by-step instructions for drying the orange slices with either a dehydrator (Option 1 below) or an oven (Option 2 below). Instructions for making the garland are the same, no matter what method you use to dry your oranges.

Editor note: This article was first published on October 29, 2021, and updated on October 10, 2023, to include instructions on dehydrating the orange slices without a dehydrator. We also addressed some formatting issues and grammar and added extra images and a how-to card at the bottom of the post.
Natural Christmas Decorations are Easy, Inexpensive, and Lovely
There is something about natural decorations. They are always easy to make (generally), have an old-world feel, and add that cozy extra feeling during the holidays. If you’re into natural elements and all of that, we have several holiday posts that fit nicely into that theme that you may want to check out:
- Easy & Free Holiday Pine Wreaths
- Easy Crochet Garland – 1 hour Project
- Rustic Stocking Ideas with Instructions
- 30 minute bulky knit look wreath

Option 1: Dehydrating Orange Slices with a Dehydrator
You can use two methods to dry your orange slices for your holiday season successfully. You can use a dehydrator, or you can use an oven. We have provided instructions for both methods below. Either way, you can make dried orange slices in a few hours.
Materials required to make a DIY dried orange garland for your tree
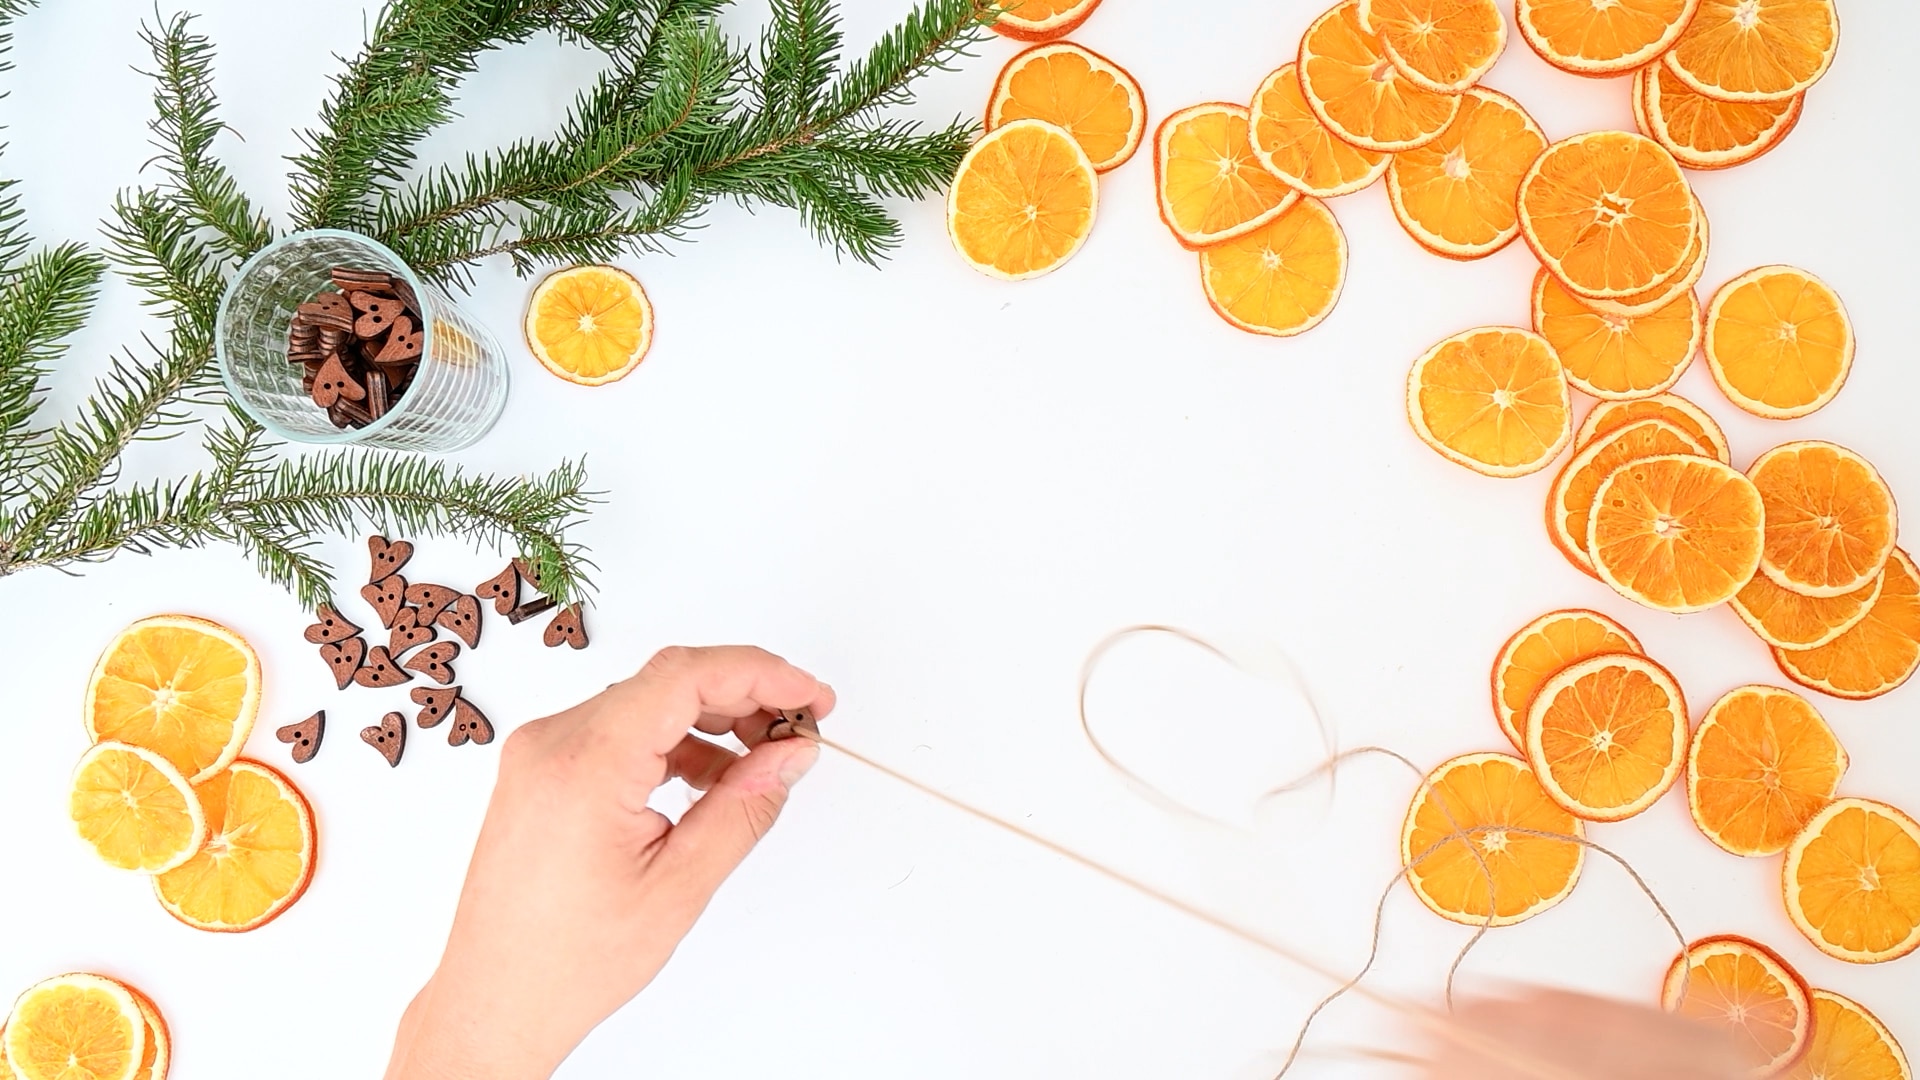
We only used three very simple items to make our garland: twine, navel oranges, and little heart-shaped wooden button, but you can use any string you want and add more or fewer embellishments. We added the buttons for texture and charm and thought it was the perfect balance with the dried orange slices.
- Navel Oranges
- Twine
- Wooden Buttons

Tools Required
- Dehydrator, or an oven or kitchen appliance that can go as low as 135F *
- Sharp knife
- Cutting board
- Paper towel or a clean, dry dishcloth
- A small dab of glue from a hot glue gun – See our complete guide on craft glues!
A Note about American Harvest Dehydrators
I’ve had my cheap Neco American Harvest Dehydrator for +20 years. I’ve used it for everything from sweet potato jerky for the dog to sugar-free dried cranberries,dried flowers, and everything in between. It’s never failed me, and if you’re looking for a dehydrator for crafting (or snacking), I highly recommend it as an entry-level dehydrator.

Step 1 – Clean and Thinly Cut Your Orange Slices
We recommend using seedless navel oranges because they slice the best and have the best look once dehydrated, but you can try to use any citrus you want. Lemons, tangerines, and even limes will dehydrate just fine.
Slice oranges into 1/4-inch slices. Try to make the slices as uniform as possible so they dry evenly. You will want to discard any slices that are too thick or too thin. You will also discard the ends.

Step 2 – Place The Sliced Oranges In a Dehydrator At 135F for 6 Hours
You will need a dehydrator, oven, or kitchen appliance to dehydrate for this step. 135F is an excellent baseline for dehydrating fruits. You can go higher (150F-170F), but you must keep a close eye to ensure the slices do not over-dry.
Pat your slices gently with a paper towel or clean dishcloth to remove some initial moisture.
Place slices in your dehydrator in a single layer with edges not touching any other slice.
Turn on the dehydrator to 135F for 6 hours.

Step 3 – At the 6 Hour Mark, Check The Oranges for Dryness
At the 6-hour mark, check to see if the orange slices are dried. They should not be tacky or sticky and should feel fairly crisp. The orange color should still be very vibrant, and the inside of the dried orange slice should look like beautiful orange stained glass.
Remove the slices from the dehydrator and set them aside.

Step 4 – Begin to Build Your Garland With Twine and Hot Glue
Add a small dab of hot glue at the end of your twine and twist it to make threading through the dried orange slices and wooden heart buttons easier. Do not attempt this step without gloves on!
Tie a large knot at the opposite end of your twine.

step 5 – Alternate Wood Beads and dried Orange Slices On The Twine to Create the garland.
Thread the twine through one of the wood beads, going through both holes. Then, use a sharp tool to poke a hole in an orange slice at the edge near the rind. Thread the twine through the hole until the orange slice is 2-3 inches from the bead, and tie the twine in a knot at the top of the orange slice.
Continue alternating between wood beads and orange slices until your dried orange garland is complete! Tie another large knot at the end to keep the pieces from sliding off.


Option 2 – Dehydrating Orange Slices in The Oven
Dehydrating oranges in an oven is a simple and tasty way to preserve them for snacking, baking, or decoration. Here are step-by-step instructions for dehydrating oranges in your oven:
Ingredients and Equipment For Oven-Dehydrated Fruit
- Oranges
- Knife
- Cutting board
- Baking sheet
- Parchment paper
- Cooling rack (optional)
- Oven
- Kitchen towels or paper towels
- Airtight container for storage
Instructions – Orange Slices Oven Dehydration Method
If you do not have a dehydrator, you can make your dried orange garland with oranges dried right in your oven. The only disadvantage to drying in an oven is the color. Fruit dried in the oven takes on a more brownish color, often due to too much heat too fast. You can avoid over-browning by controlling your heat and closely monitoring your orange slices.

Step 1 – Preheat the Oven
Preheat your oven to the lowest possible temperature, ideally around 140°F (60°C). This low temperature ensures the orange slices dry evenly and don’t burn.
Step 2: Wash and Slice the Oranges
Wash the oranges thoroughly to remove any dirt or residue. Use a sharp knife and a cutting board to slice the oranges into thin, even rounds.
Aim for slices that are approximately 1/8 to 1/4 inch thick. If the oranges have seeds, you can remove them with the tip of your knife. Slicing the oranges uniformly ensures they dry evenly and at the same pace.

Step 3: Line A Baking Sheet with Parchment Paper
3. Line a baking sheet with parchment paper to prevent the orange slices from sticking and make cleanup easier. Place the orange slices in a single layer on the parchment paper, ensuring they don’t overlap.
If you have a cooling rack, place it on the lined baking sheet and arrange the orange slices. This allows for better air circulation and even drying.
Step 4: Blot The Oranges Slices To Remove Excess Moisture
Use a kitchen towel or paper towel to blot the orange slices on top gently. This helps remove excess moisture, which can speed up the drying process.
The orange slices may spoil or develop mold during drying if they contain too much moisture.
Step 5: Place the Baking Sheet In The Oven
Put the baking sheet with the orange slices in the oven. You can open the oven door slightly using a wooden spoon or oven-safe prop to facilitate air circulation and allow moisture to escape.
This is optional but can help with the drying process. If your oven has a fan setting, use it to help circulate air and speed up drying.

Step 6: Allow the Orange Slices To Dry For Several Hours
Dehydrate the orange slices in the oven for several hours, possibly up to 6-8 hours or longer, depending on your oven’s temperature and the thickness of the slices.
Check the oranges periodically. They are ready when they become dry and slightly leathery, with no visible moisture when you touch them.
To check if they are fully dry, break one slice in half. If moisture is visible, the orange slices need more than 30 minutes in the oven.

Step 7 – Allow the Slices to Cool
Once the orange slices have cooled completely, you can use them for your garland or store them in an airtight container. Keep the container in a cool, dry place to maintain their freshness. You can store the dried orange slices for up to a month in a sealed container.
If you notice any signs of moisture or mold, discard the slices.

HOW LONG WILL THE DRIED ORANGE SLICE GARLAND LAST?
I would only keep the garland for a single season. I would not risk putting the garland in with the Christmas decorations and tucking them away; they would be an enticing treat for mice or insects.
You can hang your used dried orange garland cut up outside at the end of the holiday season for the birds and squirrels; I’ve found blue jays in my area keen on the dried oranges!

A Lovely Orange Garland You Can Make on the Cheap!
This is one of those projects that are fairly easy to make. The only time-consuming part of the whole thing is waiting for the orange slices to dry. The rest comes together fairly quickly, and you can make dried orange garland for your tree, mantle, or entrance.
If you make a dried orange garland, share with us your results; we would love to see them!
Looking for more Holiday Tree Decorating Craft Ideas?
- Make Pretty Air Dry Clay Ornaments – On The Cheap
- DIY Christmas Ornaments you Can Make Faster than a Melting Snowflake
- Christmas Tree Storage: The Ultimate Guide
- Sparkly Elegant Beaded Wreath!
- 7 Christmas Ornament Storage Ideas To Help You This Holiday Season


Easy dried orange garland for your holiday tree
A lovely and simply diy dried orange slice garland for your holiday tree. Add a bit of old-world feel to your holiday decor this year with our easy DIY garland.
Materials
- Navel Oranges
- Twine
- Wooden Buttons
Tools
- Knife
- Cutting board
- Baking sheet
- Parchment paper
- Cooling rack (optional)
- Oven or dehydrator
- Kitchen towels or paper towels
- Airtight container for storage
Instructions
- Clean and Thinly Cut Your Orange Slices. We recommend using seedless navel oranges because they slice the best and have the best look once dehydrated, but you can try to use any citrus you want. Lemons, tangerines, and even limes will dehydrate just fine.
- Slice oranges into 1/4-inch slices. Try to make the slices as uniform as possible so they dry evenly. You will want to discard any slices that are too thick or too thin. You will also discard the ends.
- You will need a dehydrator, oven, or kitchen appliance to dehydrate for this step. 135F is an excellent baseline for dehydrating fruits. You can go higher (150F-170F), but you must keep a close eye to ensure the slices do not over-dry.
- Pat your slices gently with a paper towel or clean dishcloth to remove some initial moisture.
- Place slices in your dehydrator in a single layer with edges not touching any other slice (or in an oven on parchment paper; see detailed notes in blog post for instructions).
- Turn on the dehydrator to 135F for 6 hours.
- At the 6-hour mark, check to see if the orange slices are dried. They should not be tacky or sticky and should feel fairly crisp. The orange color should still be very vibrant, and the inside of the dried orange slice should look like beautiful orange stained glass.
- Remove the slices from the dehydrator and set them aside.
- Add a small dab of hot glue at the end of your twine and twist it to make threading through the dried orange slices and wooden heart buttons easier. Do not attempt this step without gloves on!
- Tie a large knot at the opposite end of your twine. Alternate Wood Beads and dried Orange Slices On The Twine to Create the garland
- Thread the twine through one of the wood beads, going through both holes. Then, use a sharp tool to poke a hole in an orange slice at the edge near the rind. Thread the twine through the hole until the orange slice is 2-3 inches from the bead, and tie the twine in a knot at the top of the orange slice.
- Continue alternating between wood beads and orange slices until your dried orange garland is complete! Tie another large knot at the end to keep the pieces from sliding off.
- Hang your garland on your tree, wreaths, or even along a staircase.