Easy Drop Cloth Christmas Stockings – Styled 5 Different Ways

You think it’s such a great idea to change up your Christmas theme, and then Christmas starts rolling around the corner and you realize you are not at all ready. I made these drop cloth Christmas stockings when I realized I didn’t have any this year that would match my theme. I pulled them together quickly and they barely cost me anything, so I thought it would be a good project to share.
This is such a simple pattern, and anyone at any level sewing skill can pull it off. This is one of those projects where if I can do it, you can do it. My sewing skills are very *cough* lacking.
As always, I like to bring you projects that don’t cost a fortune, but still look great. This is one of those, it fits all the fun parameters – quick, cheap and pretty!

Drop cloth stockings, the perfect starting point for any Christmas theme and style.
~This post may contain affiliate links. If you click one and make a purchase, I may receive a commission at no additional cost to you.
I only ever recommend what tools or materials I use for my projects. I also test all my projects before publishing and if something doesn’t work, I don’t share it! ~
I used a plain 100% cotton canvas drop cloth. I love them, but they do come with a small downside. Drop cloths do unfortunately take a bit of preparation to get them ready for sewing projects.
The canvas is stiff when you first pull it out of the package, very rough, and not all great for sewing.
To get my canvas cloths soft I soak them in a 10-gallon stock pot with 3 cups of vinegar and boiling water. I let the water boil first, then toss my drop cloth in and turn off the heat and let it soak overnight.
If you do not have a large stock pot, you can wash your drop cloth 2-3 times in the washing machine on hot to get the same effect. After each cycle, test the drop cloth by feel to see if it is soft and pliable.
In the morning I toss the drop cloth in the washer and tumble dry. Easy peasy!
This process does a good job of removing the stiffening agent that is applied to the canvas.

Drop Cloth Colours and what to do if your drop cloth is a bit yellow.
The easiest way to whiten a drop cloth is to use bleach.
I toss a full cup into my washing machine when it’s time to wash. This does a decent job of removing any yellowing or discoloration if it is needed.
It’s a bit hit or miss with the colour of the drop cloths, sometimes they are an off-white, sometimes and off yellow, and once in a while they have a bit of a blue tinge.
If you want your drop cloths super white – add bleach instead of vinegar to your overnight soak. Notice I said “instead”, that’s because you do not want to add bleach to vinegar soak, that’s just bad news, don’t do it. Replace your 3 cups of vinegar with 2 cups of bleach, and that should do the trick.
Don’t worry about the bleach. The canvas is heavy duty and durable and can handle an overnight bleach soak.
And if you want colour, the cotton drop cloth fabric is very easy to dye, so you could colour them to your heart’s content.

Simple Pattern, and sewing instructions
The pattern can be printed off on two separate 8 1/2 x 11 sheets and taped together and cut out. You can download the pattern by clicking here: Stocking-Pattern
Lay your fabric flat. I find it easier to split my drop cloth in half so I can work with smaller pieces of fabric. Make sure it’s nice and flat, no wrinkles or puckers.
You may need to run a hot clothes iron over the fabric to get it to lay flat.

Pin your pattern down to make it easier to cut. Once you have your pattern cut out, zip it through your sewing machine with a 1/4 inch seam allowance.
I added a 1/2 inch hem on the top, and that was that.
It only took about 30 minutes to cut and sew five of these drop cloth Christmas stockings. It was really that quick and that simple.

Jazzing up your Christmas stockings
I decided to make five different stockings to show you how easy it is to change the style.
A bit of ribbon here, an applique there, a little bit of crochet, and a lot of glue from a glue gun is all it took to make these farmhouse style Christmas stockings.
You can do anything you like with these, that’s the great thing. Since the cost is so low, and time to cut and sew one is so quick, you could make a stack of these in no time flat.
It would be a fun project to do with a group of kids too. Create a stack of inexpensive basic stockings and have the kids decorate them any way they want. Super fun Christmas time activity that won’t break the bank.

#1. An easy crochet Christmas stocking – well not really, but close enough.

So it’s not really a crochet stocking, but it does have a crochet cuff. This crochet cuff is SUPER easy folks, even if crochet isn’t your specialty, if you can single crochet, you can make this cuff.
Materials Required for Crochet Cuff Christmas Stocking
- 1/2 Red Heart Grande Yarn, Oatmeal
 (I used Oatmeal, and adore it)
 - Size 25 crochet hook
- Needle and thread
- 1 drop cloth stocking
Step 1
Chain 8
Single crochet 16 rows, and test to see if the cuff will fit around the rim of your drop cloth stocking. I would love to say that 16 rows are exactly what you need to crochet, but we all have different tensions when we’re knitting and crocheting, so it’s best to manually measure.

Step 2
Once your cuff fits comfortably around the top rim of your drop cloth stocking you can bind the sides together.
Single crochet your last stitch from your last row, into the first stitch of the last row.
Match up your side, and single crochet the two sides together all the way to the top.
This is your seam, and don’t worry, you won’t see it because you can turn it inside out.
Step 3
Once you get to the top of your two sides, you will continue on by chaining 12 more times.
Single crochet your chain back into the top of the crochet cuff to create your stocking hanger.
Tie off your end, and weave it in.

Step 4
The cuff will slip over the top of your stocking and you can now use a needle and thread to tack the cuff to the stocking. It doesn’t take a lot of work and goes quite quick.
I didn’t get fussy, I just wanted to make sure that the stocking could take some weight without the cuff coming apart.
#2. A rustic rose covered stocking – a little farmhouse and little vintage.

Of the five stockings, this one was my favorite, but I love all things roses. Husband, if you’re reading this – hint hint.
Last spring I made a rose covered pillow with a similar method, and it ended up being a pretty popular post. People really liked those drop cloth roses, so I thought why not on a stocking?
The method for making the roses is easy and doesn’t take a lot of time. You could sew your roses on to your stocking, but I just used a glue gun to attach the roses to my stocking.
Materials Required for rose covered stocking
- Leftover scraps of drop cloth fabric
- Lace Bits
- Needle and thread
- 1 drop cloth stocking
Step 1
Use any scrap fabric that you have left over after making your drop cloth stockings. You want lengths about 16 inches and 3-5 inches in width. Make them all different sizes so you have some variation to your roses.
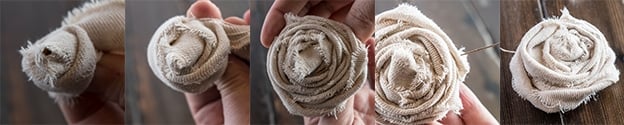
Cut curved lines through the center of your strips of fabric as shown in the photo below.

Step 2
All you need to do is roll your fabric up and twist a bit as you go to create petals and texture. You can either pass a needle and thread through the center to fasten them together or add a temporary pin through the center to hold it until you can get it glued on to your stocking. (I opted for glue! So much quicker to use a hot glue gun)
Step 3
Once you have your roses finished, start gluing them on one by one. Make sure there are no gaps and try to get as close to the edge as you can.

Step 4
I added a bit of lace trim because I felt it need a little something more, and hand sewed a hanger to the corner.
#3. An easy yarn stocking – without any knitting or crocheting

This one is easy; actually, it doesn’t get any easier!
This stocking only requires a hot glue gun, some leftover yarn, and maybe a small piece of ribbon or lace trim.
Materials Required for rose covered stocking
- A small bit of chunky yarn ( I used Red Heart Grande Yarn, Oatmeal )
- Lace Bits
- Needle and thread
- 1 drop cloth stocking
Step 1
Add a circular blob of hot glue, and give it a few seconds to cool down a bit.
Start your yarn in the center of the glue and wrap outward, creating a spiral, or circular pattern.
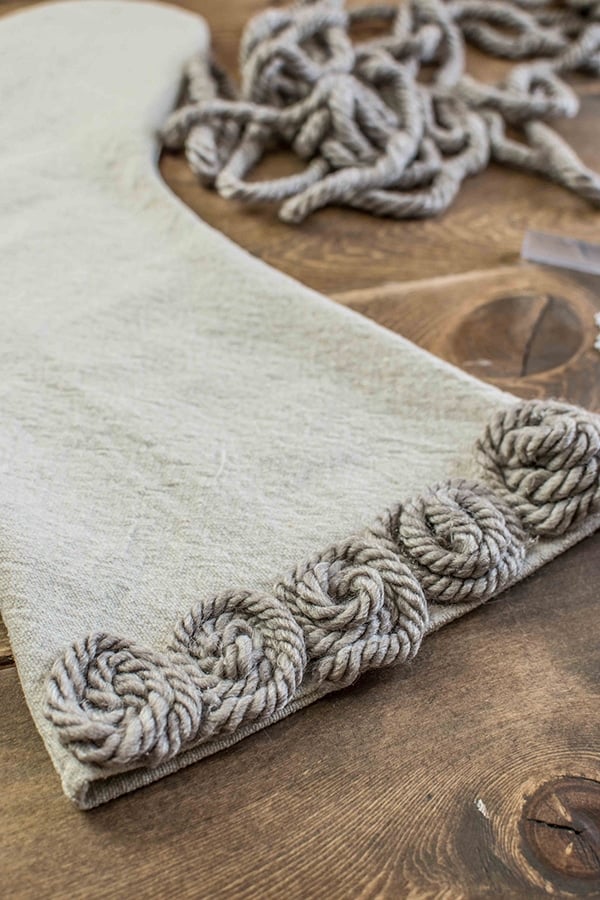
Step 2
Stagger your circles, so that the second row nestles in-between the two-row circles as shown in the photo below. Keep adding glue, circles for 4 full rows.
Step 3
Add a hanger. I used a small scrap piece of lace and hand-sewed it to the corner of the stocking.
This is a super simple way to decorate a stocking. You could get very creative with this method and make trees, or words, or anything really.
#4. Cuffed stocking, traditional with a bit of whimsy

This stocking was the easiest (no this time I mean it). A bit of ribbon trim, a small snowflake applique, and a lace hanger. I did make a cuff for the top of the stocking to add a bit more texture.
Materials Required for traditional stocking
- Wide ribbon
- A piece of scrap drop cloth fabric
- Snowflake Applique 7cm x 7cm or small ornament
- Needle and thread
- 1 drop cloth stocking
The snowflake appliques that I used come in a pack of twenty. If you like them, but wonder what you would do with 20 of them, I have a snowflake ornament post that uses them up – you can check out that post here: DIY Christmas Ornaments you Can Make Faster than a Melting Snowflake
Step 1
Create a cuff.
Cut a piece of fabric from your drop cloth that measures 18.5 x 9 inches. You will fold it twice as shown in the photo below and sew along the bottom.
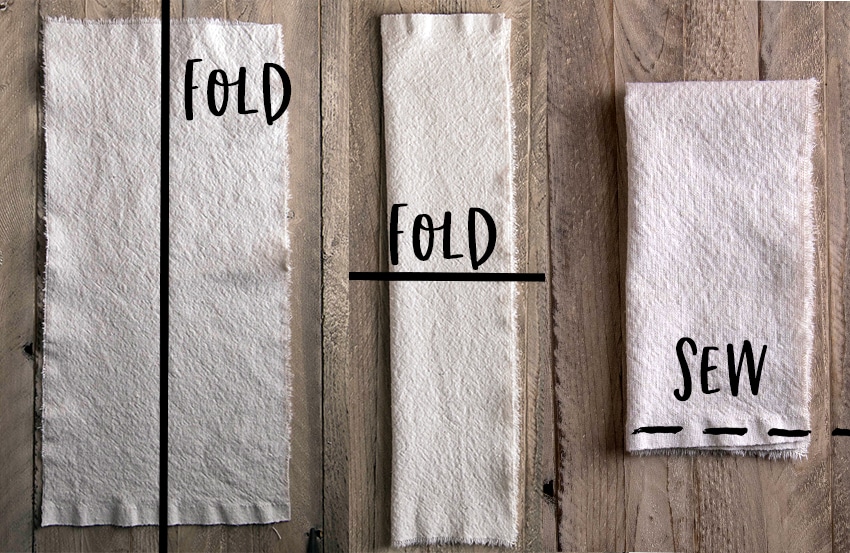
Step 2
Tuck your cuff into your stocking, all raw edges will be lined up, as in the photo below. Sew a 1/4 seam along the rim. Flip the cuff out by turning it right side out.

Step 3
Add a piece of wide ribbon across the cuff, a small applique or small ornament to add some additional texture. Sew your hanger to the corner with a needle and thread.
#5. Hanging ornament with bows and ribbons.

Not going to lie to you, this blog post was supposed to be only FOUR Christmas stocking ideas, but when I started to take the photographs, four just wasn’t cutting it.
They do say that when decorating group things in odd numbers. I have found this to be true, so no idea why I stopped at four.
I needed a 5th stocking, so I went upstairs, cut and sewed another stocking, and had it decorated before my husband had our morning coffee made.
He was impressed (don’t tell him but so was I) because the first four took some fiddling and playing around but this one came together in under 10 minutes.
Materials Required for ornaments with bows stocking
- Snowflake Applique 7cm x 7cm, or alternate fabric circles
- Lace Bits
- 5/8 inch ribbon
- Needle and thread
- 1 drop cloth stocking
Step 1
Add three round appliques (mine were snowflakes) to your stocking to make them look like staggered hanging ball ornaments. If you don’t have appliques no worries! Cut circles out of scrap drop cloth and use some fabric paint (or any paint for that matter), and use them in the same way you would the appliques.

Step 2
Cut ribbon, or lace long enough to go from the top of the applique or ornament to the top of the stocking.
Step 3
Use hot glue, fabric glue, or hand-sew your appliques and ribbon or lace in place.
Step 4
Add a ribbon cuff across the top, and a hanger in the corner.
Pulling it all together – new Christmas stockings to match a holiday theme.

So, no secret, that I love drop cloths. They make for a very inexpensive fabric perfect for rustic, farmhouse, and vintage feel projects.
Also, if you have any leftover fabric, you could make a whole host of Christmas decorations or even home decor.
A few suggestions for this holiday season – you could make pillow covers and decorate them to match your stockings, or even a table runner, or tree skirt. I’ve even seen fabric magnolia wreaths made with drop cloths, OH and … don’t forget good old fashioned rag wreaths.
You could whip up a whole new holiday theme with a drop cloth or two!
Related Christmas Posts!
If you’re looking for some other easy Christmas projects you should check out these posts:
- A Rustic Wreath You Can Make in Under 30 Minutes
- A Cozy Crochet Wreath to make for Fall, or Winter, or Whenever!
- French Hot Air Balloon Ornaments: Here is How to Make Your Own
- Pine Scented Ornaments & Air Fresheners
- How To Make A Rag Wreath For Valentine’s Day


