French Hot Air Balloon Ornaments – Here is How to Make Your Own
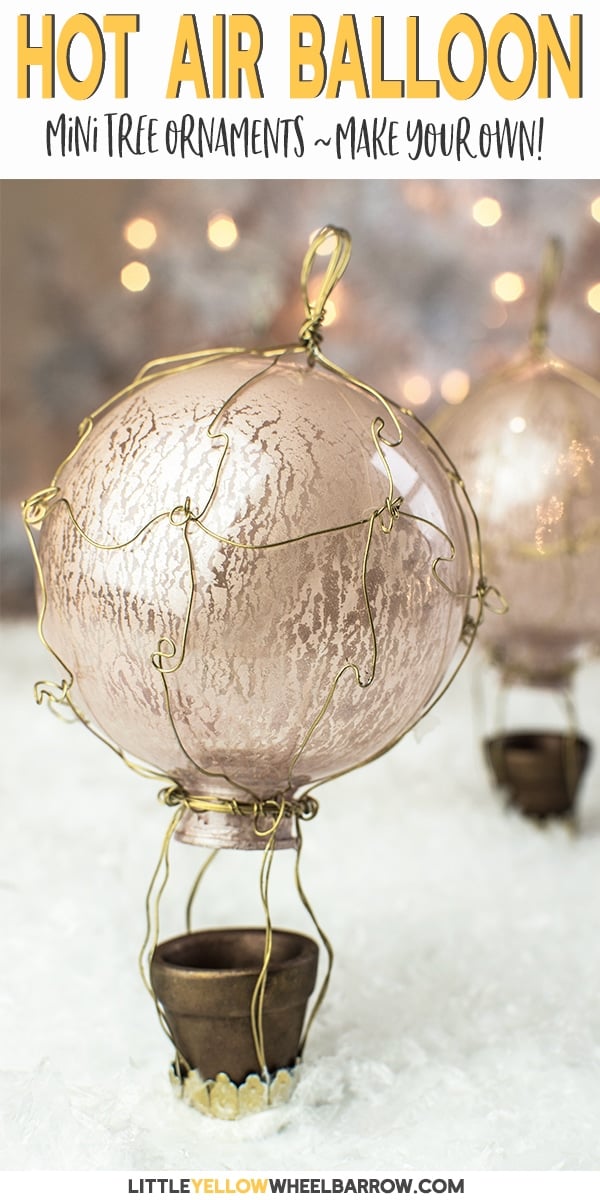
I opened my inbox the other day when I saw Magnolia had sent a holiday preview. That preview had these beautiful French hot air balloon ornaments. A bit vintage, a bit glam, and a perfect fit for this years holiday theme.
But I just about choked when I saw the price tag. They were 18 bucks EACH!
18 bucks!? Nope – You know I like pretty things, but I don’t like to spend the cash. So out came the wire cutters.
I also want to add that this holiday email came to my inbox on October 31st.
As all the little kiddos dressed like bears, witches, and Iron Man, came knocking on my door for treats, I was sitting at my coffee table making hot air balloon ornaments for my Christmas tree.
Because that’s the way I roll.
My brain skips right over Halloween.

Hot air balloon ornaments you can make for a few bucks (not 18 bucks in case you were wondering)
I took a bit of liberty with these and made them from what I had on hand. I didn’t have to buy anything and iron crafted them out of my current craft supply.
Iron crafting? Think iron chef, but in a craft room. Smush a bunch of things together and say “There I made it.”
I digress… The retail version of these hot air balloon ornaments uses a much heavier gauge wire. You could use heavier gauge wire here, but it would be more challenging bending it into shape.
At the end of the day, the version that I created worked up easily enough that anyone could make them with a simple pair of needle nose pliers.

Supplies + Tools required to make your own hot air balloon ornaments
Before I list out the supplies and tools that I used I wanted to drop this quick note. Make these any colour you want, but stick with the Rustoleum Metallics spray paints for inside the ornaments. It’s what creates that beautiful old world crackle finish perfect for your hot air balloon ornaments.
I did try other spray paints before I decided on the pink champagne Rustoleum metallic. Those other paints did not crackle. So keep that in mind if you decide to change things up.
The Rub N Buff is completely optional, but I am adding exactly what I used to get the look and colour from the photos. You can paint or decorate your little hot balloon baskets any way you want.
~This post may contain affiliate links. If you click one and make a purchase, I may receive a commission at no additional cost to you.
I only ever recommend what tools or materials I use for my projects. I also test all my projects before publishing and if something doesn’t work, I don’t share it! ~
Supplies
- Clear DIY Plastic Globe Hanging 4″ Inch Round Ornament

- Rust-Oleum Bright Coat Metallic Gold
- Rust-Oleum Pearl Metallic Champagne Pink
- Hot glue sticks
- 22 Gauge Floral Wire
- Mini Clay Pots 1.5 inch
- Rub ‘n Buff Wax Metallic Finish, Spanish Copper (optional)
- Rub ‘n Buff Wax Metallic Finish, Gold Leaf (optional)
A note about Rub ‘n Buff – if you do decide that you want to try out this product I highly recommend buying the 12 piece sample kit because it is very cost effective. Also, each tube of Rub ‘n Buff goes a long long way.
This is the kit – Amaco Rub N Buff Wax Metallic Finishes 12 Color Sampler Set![]()
Tools
- Pair of needle nose pliers
- Pair of wire cutters
- Gloves
- Glue gun
- Sharpie (or perm marker)
- Drop cloth

Step 1
Cut four 30 inch lengths of wire.
Line the 4 pieces up lengthwise and bend in the middle to create a small loop as shown in the photo below.
Cut and twist one 2 inch piece of wire around to secure the top loop. Use the needle nose pliers to bend in the end.

Step 2
Separate the 8 pieces of wire evenly and flatten on a table surface. It does not have to be perfect, but try to align the wires in equal segments as shown below.

Step 3
Mark each wire at 1.5 inches from the top loop.
Cut a 12-inch piece of wire. This will be the wire that is bent and secured through the center of the ornament. It is a bit tricky and a bit finicky, so I am going to implore you to have to have a bit of patience through this piece.
Keep in mind, any mistakes or issues can be bent out afterward, it does not need to be perfect. Actually, for these ornaments the less perfect they are, the more perfect they look.
Twist the 12-inch piece of wire around each wire leg at 1.5 inches from the top loop. The easiest way to do this is to twist forward and back with both the wire leg attached to the top loop and with the 12-inch wire that you are looping around.
If this is too complicated, or doesn’t make sense, OR becomes too frustrating you can simply cut small pieces of wire and use them to fasten the center wire to the legs.

Step 4
Once your center wire is fastened all the way around, place it on the top of your ornament to make sure the fit is ok.

Step 5
Cut a 5-inch piece of wire and wrap it around the mouth of the ornament. Don’t wind it too tight. We need to create a ring that fits (loosely) over the ornament hole (as shown below in the photo)
Once you have the size measured, take a small 2-inch piece of additional wire and wrap it around your ring to secure it as shown in the photo below.

Step 6
Verify the ring will easily fit over the mouth of the ornament but isn’t too tight.

Step 7
Fit the wire mesh that you created in Steps 1-5 and place it over the top of your ornament, making sure to center the top loop.
Pull the loose wires together, as shown in the picture below and slip the metal ring over them. The metal ring should rest above the lip of the opening as shown in the photo at Step #8.

Step 8
The wires will need to loop around the ring. This part is a bit finicky, so take your time.
The metal legs only need to wrap around the wire ring once to secure the two metal pieces together, but you will need to secure each of the 8 wire legs around the ring.

Step 9
Slip your plastic ornament out of your wire mesh.
It may require a bit of tugging and bending. Don’t worry, your mesh will go back into shape later, but for now, we need to slip the ornament out of the wire mesh so we can add some sparkle and shine.
Spray paint your wire mesh with your gold spray paint. Also, spray paint the small metal ornament mouth cover.
Add a good blast of Rustoleum metallic spray paint ( I used pink) into your ornament. Once it is has a small bit of paint, cover the mouth and swish the paint around until it coats the entire inside.
Stand the ornament upright so the paint can drain.

Step 10
Paint your mini terracotta pots (or mini baskets) with Spanish Copper Rub and Buff. Once it is almost dry add a few small dabs of Antique gold to give it a bit of shine.

Step 11
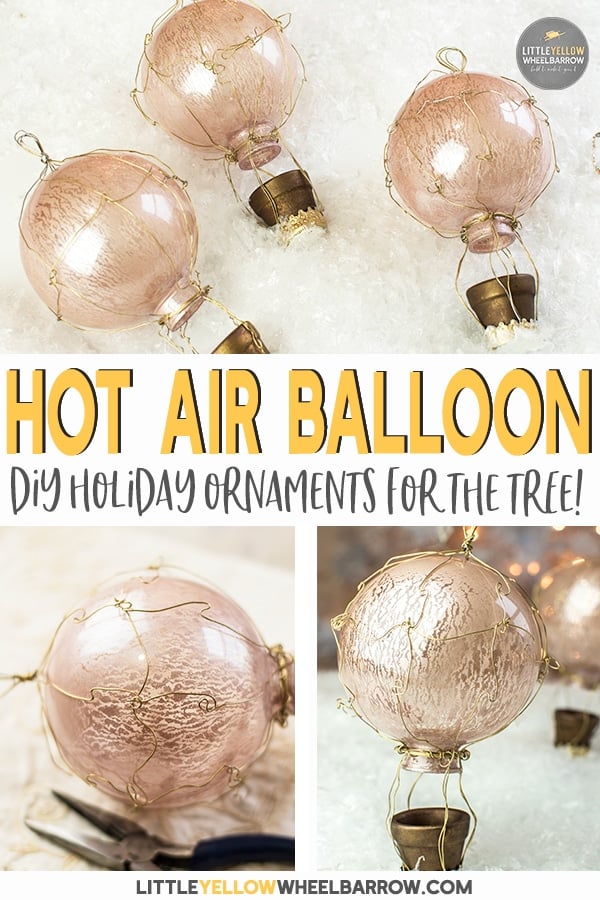
Once your wire mesh and ornament balls are dry it’s time to put it all together.
Slip the wire mesh over the ornament and center and straighten out.
I used my needle nose pliers to add a few twists to the wire here and there. This method works very well for areas that may not look tight enough.

Step 12
Add the mini pot to the bottom and straighten the wires so that they are spread evenly in pairs around the terracotta pots.
Once you have the length the way you like, and everything is sitting neatly, give the bottom of the wires a twist to secure and cut off any excess with your wire cutters.

Step 13
Slide the small ornament metal mouth cover to the bottom of the ornaments to make sure they fit. Once you have the fit right add a big dollop of hot glue from a glue gun into the metal mouth cover and secure it to the bottom of the terra cotta pot keeping the wires tucked inside.
It is a very good idea to use gloves when you do this. The hot glue will burn fingertips!
When the hot glue hits the metal mouth cover, it also gets extremely hot. Wear gloves and avoid burns.

Cleaning & Straightening up
Give your hot air balloon ornaments a once-over, tidying up wires, straightening where needed and add a few bends into the wire mesh to add some texture and tighten everything up.
Keep adjusting until the ornaments look well put together.
I made these hot air balloon ornaments for the price of “stuff I had on hand” so kinda free. You can easily make each one of these for less than $3.00 each even if you need to buy all the supplies.
Are there any holiday ornaments that you fell in love with but balked at the cost? Did you make your own? Love to hear all about your DIY knockoffs in the comments below!
Looking For More Christmas Ideas?
- Christmas Tree Storage: The Ultimate Guide
- 7 Christmas Ornament Storage Ideas To Help You This Holiday Season
- How to Weave a Lovely Winter Wreath – It’s SO easy!
- A Rustic Wreath You Can Make in Under 30 minutes – No Really!
- Beautiful Cranberry Red Beaded Wreath – Simple DIY Tutorial!
- Easy Dried Orange Garland For Your Holiday Tree!


SO pretty! You are a genius! 😉
That’s what I keep telling my husband! Thanks for the comment Julie, but I assure you if you saw half the things that never made it to the blog you might not feel that way. 🙂